
Owner's Manual
Page 1
2005 Chevrolet Avalanche Owner Manual Seats and Restraint Systems ...1-1 Front Seats ...1-2 Rear Seats ...1-7 Safety Belts ...1-9 Child Restraints ...1-29 Airbag System ...1-49 Restraint System Check ...1-63 Features and Controls ...2-1 Keys ...2-3 Doors and Locks ...2-8 Windows ...2-24 Theft-Deterrent Systems ...2-26 Starting and Operating Your Vehicle ...2-28 Mirrors ...2-45 OnStar® System ...2-54 HomeLink® Transmitter ...2-56 Storage Areas...
2005 Chevrolet Avalanche Owner Manual Seats and Restraint Systems ...1-1 Front Seats ...1-2 Rear Seats ...1-7 Safety Belts ...1-9 Child Restraints ...1-29 Airbag System ...1-49 Restraint System Check ...1-63 Features and Controls ...2-1 Keys ...2-3 Doors and Locks ...2-8 Windows ...2-24 Theft-Deterrent Systems ...2-26 Starting and Operating Your Vehicle ...2-28 Mirrors ...2-45 OnStar® System ...2-54 HomeLink® Transmitter ...2-56 Storage Areas...
Owner's Manual
Page 55
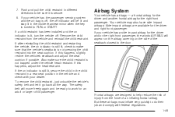
... the child restraint is lit, turn the vehicle off indicator will be ready to help reduce the risk of an in different directions to the door. If this happens, slightly recline the vehicle's seatback and adjust the seat cushion if possible. If the on indicator is not trapped under the vehicle... has been installed and the on indicator is still lit, secure the child in the child restraint in a rear seat position in the inside rearview mirror when the key is secure. 8. But these airbags must inflate very quickly to RUN or START. 7.
... the child restraint is lit, turn the vehicle off indicator will be ready to help reduce the risk of an in different directions to the door. If this happens, slightly recline the vehicle's seatback and adjust the seat cushion if possible. If the on indicator is not trapped under the vehicle... has been installed and the on indicator is still lit, secure the child in the child restraint in a rear seat position in the inside rearview mirror when the key is secure. 8. But these airbags must inflate very quickly to RUN or START. 7.
Owner's Manual
Page 71
... Outside Camper-Type Mirrors ...2-51 Outside Power Mirrors ...2-51 Outside Convex Mirror ...2-52 Outside Heated Mirrors ...2-53 Outside Automatic Dimming Mirror with Curb View Assist ...2-53 OnStar® System ...2-54 Keys ...2-3 Remote Keyless Entry System ...2-4 Remote Keyless Entry System Operation ...2-5 Doors and Locks ...2-8 Door Locks ...2-8 Power Door Locks ...2-9 Delayed Locking ...2-9 Programmable Automatic Door Locks ...2-10 Rear Door Security Locks ...2-12...
... Outside Camper-Type Mirrors ...2-51 Outside Power Mirrors ...2-51 Outside Convex Mirror ...2-52 Outside Heated Mirrors ...2-53 Outside Automatic Dimming Mirror with Curb View Assist ...2-53 OnStar® System ...2-54 Keys ...2-3 Remote Keyless Entry System ...2-4 Remote Keyless Entry System Operation ...2-5 Doors and Locks ...2-8 Door Locks ...2-8 Power Door Locks ...2-9 Delayed Locking ...2-9 Programmable Automatic Door Locks ...2-10 Rear Door Security Locks ...2-12...

Owner's Manual
Page 95
...switch for the power windows are located on the armrest on each of the side doors. Press down fully on the window switch, then release, to activate the express-... front and side windows. Press the top of the switch to raise the window. Illuminated Visor Vanity Mirrors Pull the sunvisor down feature that the switch has been activated. Power Windows Express-Down Windows The driver... and front passenger windows also have an express-down and lift the mirror cover to turn on the lamps. 2-25 See Retained Accessory Power (RAP) on page 2-29. To ...
...switch for the power windows are located on the armrest on each of the side doors. Press down fully on the window switch, then release, to activate the express-... front and side windows. Press the top of the switch to raise the window. Illuminated Visor Vanity Mirrors Pull the sunvisor down feature that the switch has been activated. Power Windows Express-Down Windows The driver... and front passenger windows also have an express-down and lift the mirror cover to turn on the lamps. 2-25 See Retained Accessory Power (RAP) on page 2-29. To ...

Owner's Manual
Page 121
...be adjusted, then press the dots, located below the selector switch on the mirror as that may cause the liquid cleaner to extend it for more information. 2-51 See Outside Power Mirrors on the driver's door armrest. See Passenger Sensing System on page 2-85 for more information. Move... the upper selector switch to the left or right side of the mirror control to adjust the direction of the vehicle. Do...
...be adjusted, then press the dots, located below the selector switch on the mirror as that may cause the liquid cleaner to extend it for more information. 2-51 See Outside Power Mirrors on the driver's door armrest. See Passenger Sensing System on page 2-85 for more information. Move... the upper selector switch to the left or right side of the mirror control to adjust the direction of the vehicle. Do...
Owner's Manual
Page 155
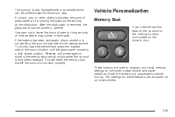
... in the tracks. To do this feature, the controls for the driver's seat, throttle and brake pedals and both the driver's and passenger's outside mirrors. Release, and press again to move to be saved for long periods of the sunroof button until the glass panel moves to a fully closed or... opened. These buttons are located on the driver's door. After the obstruction is closing, the glass panel will reset the memory and enable the sunroof to two drivers. 2-85 The sunroof is also ...
... in the tracks. To do this feature, the controls for the driver's seat, throttle and brake pedals and both the driver's and passenger's outside mirrors. Release, and press again to move to be saved for long periods of the sunroof button until the glass panel moves to a fully closed or... opened. These buttons are located on the driver's door. After the obstruction is closing, the glass panel will reset the memory and enable the sunroof to two drivers. 2-85 The sunroof is also ...
Owner's Manual
Page 156
... desired driver's seat position when exiting/entering the vehicle. Press and hold the 1 or 2 button of the memory control for more information on the driver's door. See "Easy Exit Seat" under DIC Vehicle Customization on page 3-58 for three seconds. B (Easy Exit Seat): This button is activated in PARK (P), a single chime... has been stored for up to your preference. 2. The seat position can be recalled. To use the seat exit position, do one of the outside mirrors to two drivers. 2-86
... desired driver's seat position when exiting/entering the vehicle. Press and hold the 1 or 2 button of the memory control for more information on the driver's door. See "Easy Exit Seat" under DIC Vehicle Customization on page 3-58 for three seconds. B (Easy Exit Seat): This button is activated in PARK (P), a single chime... has been stored for up to your preference. 2. The seat position can be recalled. To use the seat exit position, do one of the outside mirrors to two drivers. 2-86

Owner's Manual
Page 441
... 0 TBC IGN 0 VEH CHMSL LT TRLR ST/TRN Usage Climate Control System Power Door Lock Relay (Lock Function) Inside Rearview Mirror, Climate Control System Driver's Door Harness Connection Cruise Control Power Door Lock Relay (Unlock Function) Rear Fog Lamp (Export Only) Anti-Lock Brake System... Power Door Lock Relay (Driver's Door Unlock Function) PCM, TCM Truck Body Controller Vehicle and ...
... 0 TBC IGN 0 VEH CHMSL LT TRLR ST/TRN Usage Climate Control System Power Door Lock Relay (Lock Function) Inside Rearview Mirror, Climate Control System Driver's Door Harness Connection Cruise Control Power Door Lock Relay (Unlock Function) Rear Fog Lamp (Export Only) Anti-Lock Brake System... Power Door Lock Relay (Driver's Door Unlock Function) PCM, TCM Truck Body Controller Vehicle and ...
Owner's Manual
Page 488
Lockout Protection ...2-12 Locks Delayed Locking ...2-9 Door ...2-8 Lockout Protection ...2-12 Power Door ...2-9 Programmable Automatic Door Locks ...2-10 Rear Door Security Locks ...2-12 Loss of Control ...4-17 Low Fuel Warning Light ...3-44 Luggage Carrier ...2-61 Lumbar ...Malfunction Indicator Light ...3-39 Manual Passenger Seat ...1-2 Memory Seat ...2-85 Message DIC Warnings and Messages ...3-49 Midgate ...2-13 Mirrors Automatic Dimming Rearview with Compass and Temperature Display ...2-48 Automatic Dimming Rearview with OnStar®, Compass and Temperature Display ...2-45 Outside Automatic...
Lockout Protection ...2-12 Locks Delayed Locking ...2-9 Door ...2-8 Lockout Protection ...2-12 Power Door ...2-9 Programmable Automatic Door Locks ...2-10 Rear Door Security Locks ...2-12 Loss of Control ...4-17 Low Fuel Warning Light ...3-44 Luggage Carrier ...2-61 Lumbar ...Malfunction Indicator Light ...3-39 Manual Passenger Seat ...1-2 Memory Seat ...2-85 Message DIC Warnings and Messages ...3-49 Midgate ...2-13 Mirrors Automatic Dimming Rearview with Compass and Temperature Display ...2-48 Automatic Dimming Rearview with OnStar®, Compass and Temperature Display ...2-45 Outside Automatic...
Owner's Manual
Page 489
... ...3-19 Door Locks ...2-9 Electrical System ...5-105 Lumbar Controls ...1-3 Retained Accessory (RAP) ...2-29 Seat ...1-2 Steering Fluid ...5-38 Windows ...2-25 Programmable Automatic Door Locks ...2-10... Programming the HomeLink® Transmitter ...2-57 O Odometer ...3-30 Off-Road Recovery ...4-15 Oil Engine ...5-17 Pressure Gage ...3-42 Older Children, Restraints ...1-29 Online Owner Center ...7-3 OnStar® System ...2-54 Operating Your All-Wheel-Drive Vehicle Off Paved Roads ...4-18 Other Warning Devices ...3-6 Outlet Adjustment ...3-27 Outside Automatic Dimming Mirror...
... ...3-19 Door Locks ...2-9 Electrical System ...5-105 Lumbar Controls ...1-3 Retained Accessory (RAP) ...2-29 Seat ...1-2 Steering Fluid ...5-38 Windows ...2-25 Programmable Automatic Door Locks ...2-10... Programming the HomeLink® Transmitter ...2-57 O Odometer ...3-30 Off-Road Recovery ...4-15 Oil Engine ...5-17 Pressure Gage ...3-42 Older Children, Restraints ...1-29 Online Owner Center ...7-3 OnStar® System ...2-54 Operating Your All-Wheel-Drive Vehicle Off Paved Roads ...4-18 Other Warning Devices ...3-6 Outlet Adjustment ...3-27 Outside Automatic Dimming Mirror...
Owner's Manual
Page 490
...Setting the Time ...3-64 Theft-Deterrent ...3-102 Understanding Reception ...3-103 Reading Lamps ...3-18 Rear Axle ...5-49 Locking ...4-10 Rear Door Security Locks ...2-12 Rear Safety Belt Comfort Guides ...1-26 Rear Seat Audio (RSA) ...3-100 Rear Seat Entertainment System ...3-89... Rear Seat Operation ...1-7 Rear Seat Passengers, Safety Belts ...1-23 Rear Storage Area ...2-61 Rearview Mirror, Automatic Dimming with Compass and Temperature Display ...2-48 Rearview Mirror, Automatic Dimming with OnStar®, Compass and Temperature Display ...2-45 Reclining Seatbacks ...1-5 Recommended Fluids ...
...Setting the Time ...3-64 Theft-Deterrent ...3-102 Understanding Reception ...3-103 Reading Lamps ...3-18 Rear Axle ...5-49 Locking ...4-10 Rear Door Security Locks ...2-12 Rear Safety Belt Comfort Guides ...1-26 Rear Seat Audio (RSA) ...3-100 Rear Seat Entertainment System ...3-89... Rear Seat Operation ...1-7 Rear Seat Passengers, Safety Belts ...1-23 Rear Storage Area ...2-61 Rearview Mirror, Automatic Dimming with Compass and Temperature Display ...2-48 Rearview Mirror, Automatic Dimming with OnStar®, Compass and Temperature Display ...2-45 Reclining Seatbacks ...1-5 Recommended Fluids ...

