
Owner's Manual
Page 9
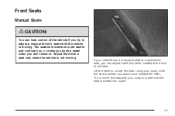
... want to adjust a manual driver's seat while the vehicle is not moving . Front Seats Manual Seats {CAUTION: You can adjust it and release the lever. Lift the lever to make you push a pedal when you try to . Adjust the driver's seat only when the vehicle is moving . Try to move the...
... want to adjust a manual driver's seat while the vehicle is not moving . Front Seats Manual Seats {CAUTION: You can adjust it and release the lever. Lift the lever to make you push a pedal when you try to . Adjust the driver's seat only when the vehicle is moving . Try to move the...
Owner's Manual
Page 12
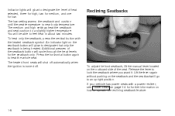
... seatback button will cycle through the heat levels for low. Reclining Seatbacks To adjust the front seatback, lift the manual lever located on the seatback and the seatback will go to an upright position. Lift the lever again without pushing on the outboard side of the seat. Indicator lights will glow to...
... seatback button will cycle through the heat levels for low. Reclining Seatbacks To adjust the front seatback, lift the manual lever located on the seatback and the seatback will go to an upright position. Lift the lever again without pushing on the outboard side of the seat. Indicator lights will glow to...

Owner's Manual
Page 17
... driver's side seatback are accessible to the outboard and center occupant and are returned to cover the rear seat footwell area. Lift the seatback up on a extended model do the following: 1. Lift the floor load panels and latch them into position. 4. Then fold the panels back to the upright position. 1-11...
... driver's side seatback are accessible to the outboard and center occupant and are returned to cover the rear seat footwell area. Lift the seatback up on a extended model do the following: 1. Lift the floor load panels and latch them into position. 4. Then fold the panels back to the upright position. 1-11...

Owner's Manual
Page 19
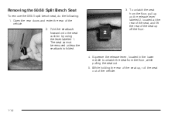
With the seat folded, unlatch the seat from the floor unless the seatback is folded down , the entire seat can be folded upright. 6. Lift up on the release lever labeled 1 before the back can be able to unlatch the seat from the floor by pulling up on the ... rear of the seat labeled 2. 4. Push forward on the seat. Enter the rear cargo area of the seat up on the underside of the seat. 3. Lift the rear of the vehicle. 2. To return the seat to the upright position by pulling up , off the floor. Secure the support rod in...
With the seat folded, unlatch the seat from the floor unless the seatback is folded down , the entire seat can be folded upright. 6. Lift up on the release lever labeled 1 before the back can be able to unlatch the seat from the floor by pulling up on the ... rear of the seat labeled 2. 4. Push forward on the seat. Enter the rear cargo area of the seat up on the underside of the seat. 3. Lift the rear of the vehicle. 2. To return the seat to the upright position by pulling up , off the floor. Secure the support rod in...
Owner's Manual
Page 20
... lower middle to unlatch the seat from the floor, pull up on the release lever labeled 2, located at the rear of the seat, and lift the rear of the seat up , roll the seat out of the vehicle. 2. Fold the seatback forward onto the seat cushion by using the lever...
... lower middle to unlatch the seat from the floor, pull up on the release lever labeled 2, located at the rear of the seat, and lift the rear of the seat up , roll the seat out of the vehicle. 2. Fold the seatback forward onto the seat cushion by using the lever...
Owner's Manual
Page 24
... the following: 1. Push and pull on the seat and release the support lock rod. 2. Make sure the support rod is holding it is folded down. 5. Lift up on the release lever labeled 1 before the back can be able to the upright position by pulling up , off the floor. Pull the... of the seat on the underside of the seat. 3. You will not be folded upright. 6. Make sure the rod pin is locked in the lock. 6. Lift the rear of the seat up on the carrying handle to make sure the seat is fully engaged in place. 5.
... the following: 1. Push and pull on the seat and release the support lock rod. 2. Make sure the support rod is holding it is folded down. 5. Lift up on the release lever labeled 1 before the back can be able to the upright position by pulling up , off the floor. Pull the... of the seat on the underside of the seat. 3. You will not be folded upright. 6. Make sure the rod pin is locked in the lock. 6. Lift the rear of the seat up on the carrying handle to make sure the seat is fully engaged in place. 5.

Owner's Manual
Page 25
... lower middle to unlatch the seat from the floor, pull up on the release lever labeled 2, located at the rear of the seat, and lift the rear of the seat up , roll the seat out of the vehicle. 2. While holding the rear of the seat up off the floor...
... lower middle to unlatch the seat from the floor, pull up on the release lever labeled 2, located at the rear of the seat, and lift the rear of the seat up , roll the seat out of the vehicle. 2. While holding the rear of the seat up off the floor...

Owner's Manual
Page 27
... models with rear bucket seats, the head restraints need to be removed in the button on the side of the head restraint guide cap and lift up seat cushion. Pull forward the lever located at the rear of the seat. 2. If you want it is locked. 1-21 Press in order to.... Bucket Seats If your vehicle has bucket seats, the seatbacks can be reclined and the seats can be folded to give you more cargo room. Lift the head restraints up . To adjust the seatback do the following : 1. Then fold it could cause injury to the person sitting there. Folding the Seatbacks...
... models with rear bucket seats, the head restraints need to be removed in the button on the side of the head restraint guide cap and lift up seat cushion. Pull forward the lever located at the rear of the seat. 2. If you want it is locked. 1-21 Press in order to.... Bucket Seats If your vehicle has bucket seats, the seatbacks can be reclined and the seats can be folded to give you more cargo room. Lift the head restraints up . To adjust the seatback do the following : 1. Then fold it could cause injury to the person sitting there. Folding the Seatbacks...

Owner's Manual
Page 108
... remote keyless entry system. For more information, see Power Door Locks on the left door edge out and pull the door open the entire liftgate, lift the handle located in this section. 2-14 Then, pull the handle on page 2-9 earlier in the center of the door. You may also use the...
... remote keyless entry system. For more information, see Power Door Locks on the left door edge out and pull the door open the entire liftgate, lift the handle located in this section. 2-14 Then, pull the handle on page 2-9 earlier in the center of the door. You may also use the...

Owner's Manual
Page 111
... will operate. This feature prevents all passenger windows from operating, except from side-to-side. When the button is engaged. You can swing down and lift the mirror cover to adjust the brightness of the power window switches. There is located in front of the lamps. 2-17 To disengage the feature...
... will operate. This feature prevents all passenger windows from operating, except from side-to-side. When the button is engaged. You can swing down and lift the mirror cover to adjust the brightness of the power window switches. There is located in front of the lamps. 2-17 To disengage the feature...

Owner's Manual
Page 151
... storage compartment in the quarter trim. Don't exceed the maximum vehicle capacity when loading your vehicle. Storage Areas Glove Box To open your glove box, lift up and swing open . Center Console Storage Area Your vehicle may have a cassette/compact disc holder. The console has a place to help secure cargo. Cupholder...
... storage compartment in the quarter trim. Don't exceed the maximum vehicle capacity when loading your vehicle. Storage Areas Glove Box To open your glove box, lift up and swing open . Center Console Storage Area Your vehicle may have a cassette/compact disc holder. The console has a place to help secure cargo. Cupholder...
Owner's Manual
Page 177
... accessory power outlets, or may not be blown. The repairs would not be sure to open it in the ashtray. Notice: Improper use the outlet, lift the cover. Pull on the accessory power plugs. To remove the front ashtray pull the ashtray up. To use of accessory or accessory bracket from...
... accessory power outlets, or may not be blown. The repairs would not be sure to open it in the ashtray. Notice: Improper use the outlet, lift the cover. Pull on the accessory power plugs. To remove the front ashtray pull the ashtray up. To use of accessory or accessory bracket from...
Owner's Manual
Page 360
The controller then sends signals to each shock absorber to independently adjust the damping level to body position, lift/dive and steering position of passenger and loading conditions. Autoride™ also interacts with the tow/haul switch that, when engaged, will provide a superior vehicle ...
The controller then sends signals to each shock absorber to independently adjust the damping level to body position, lift/dive and steering position of passenger and loading conditions. Autoride™ also interacts with the tow/haul switch that, when engaged, will provide a superior vehicle ...

Owner's Manual
Page 389
Pull down the hood and close it firmly. 5-11 Before closing the hood, be sure all filler caps are on the secondary hood release located near the center of the steering wheel. 2. Lift the hood. Pull the handle inside the vehicle located under and to the front of the vehicle and pull up on properly. Hood Release To open the hood do the following: 1. Then go to the left of the grill. 3.
Pull down the hood and close it firmly. 5-11 Before closing the hood, be sure all filler caps are on the secondary hood release located near the center of the steering wheel. 2. Lift the hood. Pull the handle inside the vehicle located under and to the front of the vehicle and pull up on properly. Hood Release To open the hood do the following: 1. Then go to the left of the grill. 3.

Owner's Manual
Page 400
... the vehicle. 5-22 Care should be taken to dislodge as little dirt as possible. 3. Loosen the screws on the passenger's side of the housing and lift up the cover. 2. Remove the air cleaner/filter from the vehicle and lightly shake filter to release loose dust and dirt. Install the...
... the vehicle. 5-22 Care should be taken to dislodge as little dirt as possible. 3. Loosen the screws on the passenger's side of the housing and lift up the cover. 2. Remove the air cleaner/filter from the vehicle and lightly shake filter to release loose dust and dirt. Install the...

Owner's Manual
Page 409
.... You may decide not to get a little too hot when you: If you 'll see or hear no longer have a low coolant condition, but to lift the hood but see : 5-31 If it is about 10 minutes. Turn on your vehicle right away. Cooling System When you decide it cools down... this section. If there's still no sign of steam, you get an engine overheat warning with no sign of the vehicle until it 's safe to lift the hood, here's what you no steam, the problem may not be safe, drive slower for about twice as fast as normal idle speed for...
.... You may decide not to get a little too hot when you: If you 'll see or hear no longer have a low coolant condition, but to lift the hood but see : 5-31 If it is about 10 minutes. Turn on your vehicle right away. Cooling System When you decide it cools down... this section. If there's still no sign of steam, you get an engine overheat warning with no sign of the vehicle until it 's safe to lift the hood, here's what you no steam, the problem may not be safe, drive slower for about twice as fast as normal idle speed for...

Owner's Manual
Page 436
Turn the old bulb counterclockwise to remove it from the socket. 5-58 Roof Marker Lamps 1. Remove the six screws on the center roof marker lamps. 3. Remove the two screws and lift off the lens. 2.
Turn the old bulb counterclockwise to remove it from the socket. 5-58 Roof Marker Lamps 1. Remove the six screws on the center roof marker lamps. 3. Remove the two screws and lift off the lens. 2.

Owner's Manual
Page 439
... Windshield wiper blades should be inspected at least twice a year for more information. Replacement blades come in different types and are removed in different ways. Lift the wiper arm and turn the blade until it is facing away from the windshield. 2. For proper type and length, see Normal Maintenance Replacement Parts...
... Windshield wiper blades should be inspected at least twice a year for more information. Replacement blades come in different types and are removed in different ways. Lift the wiper arm and turn the blade until it is facing away from the windshield. 2. For proper type and length, see Normal Maintenance Replacement Parts...

Owner's Manual
Page 460
... for changing a flat tire safely. 5-82 Steer to maintain lane position, and then gently brake to a stop , well off the road if possible. {CAUTION: Lifting a vehicle and getting under control by steering the way you 'd use your foot from the accelerator pedal. A rear blowout, particularly on a curve, acts much more...
... for changing a flat tire safely. 5-82 Steer to maintain lane position, and then gently brake to a stop , well off the road if possible. {CAUTION: Lifting a vehicle and getting under control by steering the way you 'd use your foot from the accelerator pedal. A rear blowout, particularly on a curve, acts much more...

Owner's Manual
Page 467
Rear Position Raising your vehicle with the jack improperly positioned can damage the vehicle and even make the vehicle fall. Front Position B. Never get under a vehicle when it is dangerous. {CAUTION: Getting under a vehicle when it is jacked up is supported only by a jack. {CAUTION: Jacking Locations (Overall View) A. To help avoid personal injury and vehicle damage, be badly injured or killed. If the vehicle slips off the jack you could be sure to fit the jack lift head into the proper location before raising the vehicle. 5-89
Rear Position Raising your vehicle with the jack improperly positioned can damage the vehicle and even make the vehicle fall. Front Position B. Never get under a vehicle when it is dangerous. {CAUTION: Getting under a vehicle when it is jacked up is supported only by a jack. {CAUTION: Jacking Locations (Overall View) A. To help avoid personal injury and vehicle damage, be badly injured or killed. If the vehicle slips off the jack you could be sure to fit the jack lift head into the proper location before raising the vehicle. 5-89


