
Owner's Manual
Page 93
... ...2-7 Door Locks ...2-7 Power Door Locks ...2-8 Delayed Locking ...2-9 Programmable Automatic Door Locks ...2-10 Rear Door Security Locks (Crew Cab) ...2-12 Lockout Protection ...2-12 Rear Doors ...2-13 Tailgate ...2-13 Windows ...2-15 Manual Windows ...2-15 Power Windows ...2-16 Swing-Out Windows ...2-17 Sun Visors ...2-17 Theft-Deterrent Systems ...2-18 Content Theft-Deterrent ...2-18 Passlock...
... ...2-7 Door Locks ...2-7 Power Door Locks ...2-8 Delayed Locking ...2-9 Programmable Automatic Door Locks ...2-10 Rear Door Security Locks (Crew Cab) ...2-12 Lockout Protection ...2-12 Rear Doors ...2-13 Tailgate ...2-13 Windows ...2-15 Manual Windows ...2-15 Power Windows ...2-16 Swing-Out Windows ...2-17 Sun Visors ...2-17 Theft-Deterrent Systems ...2-18 Content Theft-Deterrent ...2-18 Passlock...
Owner's Manual
Page 101
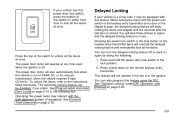
... following text. To unlock the doors, refer to the instructions listed previously. You can also program this feature. You will delay locking the doors and tailgate until five seconds after the last door is in the ignition. See "Delayed Locking" under DIC Operation and Displays on the remote keyless entry...
... following text. To unlock the doors, refer to the instructions listed previously. You can also program this feature. You will delay locking the doors and tailgate until five seconds after the last door is in the ignition. See "Delayed Locking" under DIC Operation and Displays on the remote keyless entry...
Owner's Manual
Page 105
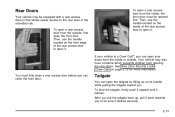
... open a rear access door from the inside or outside , first open the front door. You must be opened first. After you put the tailgate back up on the inside , the front door must fully close the front door. Then, use the handle located on its handle while pulling the... tailgate toward you to open it. Then, use the handle located on page 2-12 for more information. See Rear Door Security Locks (Crew Cab) on the ...
... open a rear access door from the inside or outside , first open the front door. You must be opened first. After you put the tailgate back up on the inside , the front door must fully close the front door. Then, use the handle located on its handle while pulling the... tailgate toward you to open it. Then, use the handle located on page 2-12 for more information. See Rear Door Security Locks (Crew Cab) on the ...

Owner's Manual
Page 106
...damage to the vehicle. Reverse the above procedure to release the left edge. With the tailgate at the right edge and then move the tailgate to the right to reinstall. Make sure the tailgate is secure. 2-14 To release the retaining cable clips, lift the cable so it ...points straight out and push the cable clip forward. 2. To remove the tailgate, do the following: 1. Raise the tailgate slightly and release both retaining cable clips. Tailgate Removal The tailgate on the tailgate at a slight upward angle, pull back on your vehicle can be removed to allow for ...
...damage to the vehicle. Reverse the above procedure to release the left edge. With the tailgate at the right edge and then move the tailgate to the right to reinstall. Make sure the tailgate is secure. 2-14 To release the retaining cable clips, lift the cable so it ...points straight out and push the cable clip forward. 2. To remove the tailgate, do the following: 1. Raise the tailgate slightly and release both retaining cable clips. Tailgate Removal The tailgate on the tailgate at a slight upward angle, pull back on your vehicle can be removed to allow for ...

Owner's Manual
Page 220
... on automatic door locks see Programmable Automatic Door Locks on to select it is shifted out of the doors will delay locking the doors and tailgate until AUTOMATIC UNLOCKING appears in the display. Automatic Unlocking Press the personalization button until five seconds after the last door or the liftgate is...
... on automatic door locks see Programmable Automatic Door Locks on to select it is shifted out of the doors will delay locking the doors and tailgate until AUTOMATIC UNLOCKING appears in the display. Automatic Unlocking Press the personalization button until five seconds after the last door or the liftgate is...

Owner's Manual
Page 461
Stoplamp B. Back-up Lamp Side Marker Lamp 5-69 Your vehicle may have one of the following taillamp assemblies: A. B. Taillamps 1. Stoplamp Turn Signal Lamp Back-up Lamp A. Open the tailgate. 2. C. Remove the two rear lamp assembly screws near the tailgate latch and pull out the lamp assembly. D. Turn Signal C.
Stoplamp B. Back-up Lamp Side Marker Lamp 5-69 Your vehicle may have one of the following taillamp assemblies: A. B. Taillamps 1. Stoplamp Turn Signal Lamp Back-up Lamp A. Open the tailgate. 2. C. Remove the two rear lamp assembly screws near the tailgate latch and pull out the lamp assembly. D. Turn Signal C.

Owner's Manual
Page 462
Close the tailgate. 5-70 Pull the old bulb straight out from the taillamp housing. 4. Press the release tab, if equipped, and turn the socket clockwise into the taillamp housing. 6. Reinstall the rear lamp assembly. 7. Press a new bulb into the socket and turn the bulb socket counterclockwise to remove it from the socket. 5. 3.
Close the tailgate. 5-70 Pull the old bulb straight out from the taillamp housing. 4. Press the release tab, if equipped, and turn the socket clockwise into the taillamp housing. 6. Reinstall the rear lamp assembly. 7. Press a new bulb into the socket and turn the bulb socket counterclockwise to remove it from the socket. 5. 3.

Owner's Manual
Page 532
... system does not need regular maintenance.) (f) Lubricate all key lock cylinders, body door hinges, hood latch assembly, secondary latch, pivots, spring anchor, release pawl, tailgate hinges, tailgatelinkage, tailgate handle pivot points, latch bolt, fuel door hinge, locks and folding seat hardware. Visually check constant velocity joints, rubber boots and axle seals for...
... system does not need regular maintenance.) (f) Lubricate all key lock cylinders, body door hinges, hood latch assembly, secondary latch, pivots, spring anchor, release pawl, tailgate hinges, tailgatelinkage, tailgate handle pivot points, latch bolt, fuel door hinge, locks and folding seat hardware. Visually check constant velocity joints, rubber boots and axle seals for...

Owner's Manual
Page 539
... GC-LB. Dielectric Silicone Grease (GM Part No. Multi-Purpose Lubricant, Superlube (GM Part No. Usage Body Door Hinge Pins, Tailgate Hinge and Linkage, Folding Seats and Fuel Door Hinge Tailgate Handle Pivot Points, Hinges, Latch Bolt and Linkage Weatherstrip Conditioning Weatherstrip Squeaks Fluid/Lubricant Multi-Purpose Lubricant, Superlube (GM Part No...
... GC-LB. Dielectric Silicone Grease (GM Part No. Multi-Purpose Lubricant, Superlube (GM Part No. Usage Body Door Hinge Pins, Tailgate Hinge and Linkage, Folding Seats and Fuel Door Hinge Tailgate Handle Pivot Points, Hinges, Latch Bolt and Linkage Weatherstrip Conditioning Weatherstrip Squeaks Fluid/Lubricant Multi-Purpose Lubricant, Superlube (GM Part No...

Owner's Manual
Page 571
... or Spare Tire, Jack and Tools ...5-105 Stuck in Sand, Mud, Ice or Snow ...4-50 Sun Visors ...2-17 Swing-Out Windows ...2-17 T Tachometer ...3-35 Tailgate ...2-13 Tailgate Removal ...2-14 Taillamps ...5-69 Taillamps (Chassis Cab Models) ...5-71 Temperature and Compass Display ...2-54 Temperature Display ...2-57 Testing the Alarm ...2-19 Theft-Deterrent, Radio ...3-126...
... or Spare Tire, Jack and Tools ...5-105 Stuck in Sand, Mud, Ice or Snow ...4-50 Sun Visors ...2-17 Swing-Out Windows ...2-17 T Tachometer ...3-35 Tailgate ...2-13 Tailgate Removal ...2-14 Taillamps ...5-69 Taillamps (Chassis Cab Models) ...5-71 Temperature and Compass Display ...2-54 Temperature Display ...2-57 Testing the Alarm ...2-19 Theft-Deterrent, Radio ...3-126...