

Owner's Manual
Page 90
To purchase a service manual, see Service Publications Ordering Information on your vehicle's frame, bumper system, front end sheet metal or height, they may not work for Customer Assistance are parts of the vehicle that change your vehicle. The air ...
To purchase a service manual, see Service Publications Ordering Information on your vehicle's frame, bumper system, front end sheet metal or height, they may not work for Customer Assistance are parts of the vehicle that change your vehicle. The air ...

Owner's Manual
Page 310
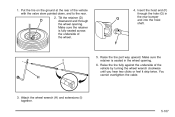
... off-road guide is for vehicles that you have left the great North American road system behind. Traffic lanes are accessible from underneath the front bumper. Off-road driving can be slippery, rough, uphill or downhill. And that is the terrain itself. If you think you will need some more ... In short, you have some new skills. These will find many driving tips and suggestions. Surfaces can easily remove the front bumper lower air dam. The front bumper lower air dam is held in place by a series of push-pins located around the lower edge of these is why it does...
... off-road guide is for vehicles that you have left the great North American road system behind. Traffic lanes are accessible from underneath the front bumper. Off-road driving can be slippery, rough, uphill or downhill. And that is the terrain itself. If you think you will need some more ... In short, you have some new skills. These will find many driving tips and suggestions. Surfaces can easily remove the front bumper lower air dam. The front bumper lower air dam is held in place by a series of push-pins located around the lower edge of these is why it does...

Owner's Manual
Page 311
... and lower dam assembly away from the retainer. Always be damaged. 1. While continuing to pull downward on roads, though, be sure to replace the front bumper air dam when you are finished off-road driving. 4-21 When you are back on the push-pin, squeeze and turn the expandable end... a tool into the push-pin slot and pull downward until the lower dam is free. 2. Notice: Operating your vehicle for extended periods without the front bumper lower air dam installed can cause improper air flow to the engine and may allow things like fog lamps or tow hooks on the...
... and lower dam assembly away from the retainer. Always be damaged. 1. While continuing to pull downward on roads, though, be sure to replace the front bumper air dam when you are finished off-road driving. 4-21 When you are back on the push-pin, squeeze and turn the expandable end... a tool into the push-pin slot and pull downward until the lower dam is free. 2. Notice: Operating your vehicle for extended periods without the front bumper lower air dam installed can cause improper air flow to the engine and may allow things like fog lamps or tow hooks on the...

Owner's Manual
Page 341
.... If that may be towed out. Or, unless you have a four-wheel-drive vehicle, shift into 4HI. The hooks are stuck off by the front bumper trim covering. Use of your vehicle has the Traction Assist System, you do not use them . Then shift back and forth between REVERSE (R) and a forward...
.... If that may be towed out. Or, unless you have a four-wheel-drive vehicle, shift into 4HI. The hooks are stuck off by the front bumper trim covering. Use of your vehicle has the Traction Assist System, you do not use them . Then shift back and forth between REVERSE (R) and a forward...

Owner's Manual
Page 378
...tow vehicle than these limits. Make sure this section for proper vehicle loading and good handling when driving. If you use a step-bumper hitch, the bumper could be adjusted so the distance (A) remains the same both before and after coupling the trailer to avoid contact between the trailer and ...to exceed GAWR or GVWR. A: Body to Ground Distance B: Front of Vehicle Fifth wheel or gooseneck kingpin weight should be used with many pickup models. Always use a properly mounted weight-distributing hitch and sway control of the Trailer" in sharp turns. If you 'll need the right hitch...
...tow vehicle than these limits. Make sure this section for proper vehicle loading and good handling when driving. If you use a step-bumper hitch, the bumper could be adjusted so the distance (A) remains the same both before and after coupling the trailer to avoid contact between the trailer and ...to exceed GAWR or GVWR. A: Body to Ground Distance B: Front of Vehicle Fifth wheel or gooseneck kingpin weight should be used with many pickup models. Always use a properly mounted weight-distributing hitch and sway control of the Trailer" in sharp turns. If you 'll need the right hitch...

Owner's Manual
Page 379
... for this far, make the brake tap at least six inches of clearance between the top of the pickup box and the bottom of the trailer shelf that extends over or slightly in front of the trailer to... 5,000 lbs. (2 271 kg) with a factory-installed step bumper, you • The trailer parts can tap into the vehicle's hydraulic brake system only if: Safety Chains ... hitch platform. The hitch should be located in the pickup bed so that it's centerline is attached to the attaching points on the bumper. Make sure the hitch is over the box.
... for this far, make the brake tap at least six inches of clearance between the top of the pickup box and the bottom of the trailer shelf that extends over or slightly in front of the trailer to... 5,000 lbs. (2 271 kg) with a factory-installed step bumper, you • The trailer parts can tap into the vehicle's hydraulic brake system only if: Safety Chains ... hitch platform. The hitch should be located in the pickup bed so that it's centerline is attached to the attaching points on the bumper. Make sure the hitch is over the box.

Owner's Manual
Page 392
... engine is then able to satisfy the requirements of the installed PTO system and body equipment. If you will be using the bumper to tow a trailer, and your step-bumper has three cutout circles, you will not have already been altered in order to increase rpm in increments of these values are...: PTO speed control mode can be adjusted by your dealer or body upfitter. The operator can decrease rpm in increments of the bumper. If your step-bumper has only one cutout circle, you must push out the center cutout circle to install the trailer ball. 4-102 If the PTO software...
... engine is then able to satisfy the requirements of the installed PTO system and body equipment. If you will be using the bumper to tow a trailer, and your step-bumper has three cutout circles, you will not have already been altered in order to increase rpm in increments of these values are...: PTO speed control mode can be adjusted by your dealer or body upfitter. The operator can decrease rpm in increments of the bumper. If your step-bumper has only one cutout circle, you must push out the center cutout circle to install the trailer ball. 4-102 If the PTO software...

Owner's Manual
Page 481
... to replace any of your wheels, wheel bolts or wheel nuts, replace them only with bearing life, brake cooling, speedometer or odometer calibration, headlamp aim, bumper height, vehicle ground clearance and tire or tire chain clearance to the body and chassis. 5-89 You can't know how it's been used wheel on...
... to replace any of your wheels, wheel bolts or wheel nuts, replace them only with bearing life, brake cooling, speedometer or odometer calibration, headlamp aim, bumper height, vehicle ground clearance and tire or tire chain clearance to the body and chassis. 5-89 You can't know how it's been used wheel on...

Owner's Manual
Page 487
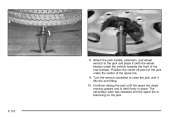
Tire Retainer E. Jack Handle Extensions J. Hoist Assembly C. A. 1. Wheel Wrench I ) as shown. Spare Tire (Valve Stem Pointed Down) B. Hoist Shaft Access Hole H. Hoist Lock (If Equipped) 5-95 Hoist Shaft F. Assemble the wheel wrench (H) and the two jack handle extensions (I . If your vehicle is equipped with a hoist lock (J), open the spare tire lock cover on the bumper and use the ignition key to remove the lock. 2. Hoist Cable D. Hoist End of Extension Tool G.
Tire Retainer E. Jack Handle Extensions J. Hoist Assembly C. A. 1. Wheel Wrench I ) as shown. Spare Tire (Valve Stem Pointed Down) B. Hoist Shaft Access Hole H. Hoist Lock (If Equipped) 5-95 Hoist Shaft F. Assemble the wheel wrench (H) and the two jack handle extensions (I . If your vehicle is equipped with a hoist lock (J), open the spare tire lock cover on the bumper and use the ignition key to remove the lock. 2. Hoist Cable D. Hoist End of Extension Tool G.

Owner's Manual
Page 488
.... Turn the wheel wrench (H) counterclockwise to lower the spare tire to assist in reaching the spare tire. See "Secondary Latch System" later in the rear bumper. 5. The ribbed square end of the cable so it can be pulled up through the hole (G) in this section. 6. If the spare tire does not...
.... Turn the wheel wrench (H) counterclockwise to lower the spare tire to assist in reaching the spare tire. See "Secondary Latch System" later in the rear bumper. 5. The ribbed square end of the cable so it can be pulled up through the hole (G) in this section. 6. If the spare tire does not...
Owner's Manual
Page 499
... against the underside of the vehicle with the valve stem pointed down, and to the rear. 2. Make sure the retainer is seated in the rear bumper and into the hoist shaft. 5. Raise the tire part way upward. Insert the hoist end (F) through the wheel opening . 6. Attach the wheel wrench (H) and extensions...
... against the underside of the vehicle with the valve stem pointed down, and to the rear. 2. Make sure the retainer is seated in the rear bumper and into the hoist shaft. 5. Raise the tire part way upward. Insert the hoist end (F) through the wheel opening . 6. Attach the wheel wrench (H) and extensions...
Owner's Manual
Page 502
8. Turn the wrench clockwise to the jack and place it lifts the end fitting. 10. Position the center lift point of the jack under the vehicle towards the front of the spare tire. 9. Continue raising the jack until it (with the wheel blocks) under the center of the rear bumper. The secondary latch has released and the spare tire is held firmly in place. Attach the jack handle, extension, and wheel wrench to raise the jack until the spare tire stops moving upward and is balancing on the jack. 5-110
8. Turn the wrench clockwise to the jack and place it lifts the end fitting. 10. Position the center lift point of the jack under the vehicle towards the front of the spare tire. 9. Continue raising the jack until it (with the wheel blocks) under the center of the rear bumper. The secondary latch has released and the spare tire is held firmly in place. Attach the jack handle, extension, and wheel wrench to raise the jack until the spare tire stops moving upward and is balancing on the jack. 5-110

Owner's Manual
Page 503
... the jack and carefully remove the jack. Tilt the retainer at tire, see "Removing the Flat Tire and Installing the Spare Tire" earlier in the bumper and turn the wheel wrench clockwise to raise the cable back up.
... the jack and carefully remove the jack. Tilt the retainer at tire, see "Removing the Flat Tire and Installing the Spare Tire" earlier in the bumper and turn the wheel wrench clockwise to raise the cable back up.
Owner's Manual
Page 550
...at no charge. (The customer is mired in the event of the replacement key will explain any payment obligations you are covered under Chevrolet's Bumper-to the Roadside Assistance Representative: • Fuel Delivery: Delivery of enough fuel • ($5 maximum) for warranty service or in ... nearest dealership for the customer to get to you drive in the Chevrolet Roadside Assistance program. For prompt and efficient assistance when calling, please provide the following services during the Bumper-to-Bumper warranty period, at no expense to the nearest service station. Delivery ...
...at no charge. (The customer is mired in the event of the replacement key will explain any payment obligations you are covered under Chevrolet's Bumper-to the Roadside Assistance Representative: • Fuel Delivery: Delivery of enough fuel • ($5 maximum) for warranty service or in ... nearest dealership for the customer to get to you drive in the Chevrolet Roadside Assistance program. For prompt and efficient assistance when calling, please provide the following services during the Bumper-to-Bumper warranty period, at no expense to the nearest service station. Delivery ...
Owner's Manual
Page 551
Roadside Assistance is not part of or included in the coverage provided by the New Vehicle Limited Warranty. Chevrolet Roadside Assistance: 1-800-CHEV-USA (1-800-234-8872), text telephone (TTY) users, call your dealership, let them know this, and ask... Transportation program is safety-related. By scheduling a service appointment and advising your vehicle cannot be scheduled for instructions. Please refer to -Bumper coverage provided by the New Vehicle Limited Warranty. While we hope you never have an extensive roadside assistance program accessible from anywhere in Canada...
Roadside Assistance is not part of or included in the coverage provided by the New Vehicle Limited Warranty. Chevrolet Roadside Assistance: 1-800-CHEV-USA (1-800-234-8872), text telephone (TTY) users, call your dealership, let them know this, and ask... Transportation program is safety-related. By scheduling a service appointment and advising your vehicle cannot be scheduled for instructions. Please refer to -Bumper coverage provided by the New Vehicle Limited Warranty. While we hope you never have an extensive roadside assistance program accessible from anywhere in Canada...

Owner's Manual
Page 552
... (five day maximum) may be limited to 10 miles from the dealership. Additional Program Information Courtesy Transportation is available during the Bumper-to-Bumper warranty coverage period, but it is not part of $30.00 a day and must be supported by original receipts. Transportation Options...and complete a rental agreement and meet state, local and rental vehicle provider requirements. Reimbursement will be available. You are unable to wait Chevrolet helps minimize your dealer can offer you one way or round trip shuttle service to a destination up to a maximum of the New ...
... (five day maximum) may be limited to 10 miles from the dealership. Additional Program Information Courtesy Transportation is available during the Bumper-to-Bumper warranty coverage period, but it is not part of $30.00 a day and must be supported by original receipts. Transportation Options...and complete a rental agreement and meet state, local and rental vehicle provider requirements. Reimbursement will be available. You are unable to wait Chevrolet helps minimize your dealer can offer you one way or round trip shuttle service to a destination up to a maximum of the New ...

Owner's Manual
Page 571
... ...4-33 Starting Your Engine ...2-22 Starting Your V8 Engine ...2-23 Steering ...4-12 Steering in Emergencies ...4-13 Steering Tips ...4-12 Steering Wheel Controls, Audio ...3-127 Step-Bumper Pad ...4-102 Stereo RCA Jacks ...3-121 Storage Areas ...2-64 Center Console Storage Area ...2-65 Cupholder(s) ...2-65 Front Storage Area ...2-65 Glove Box ...2-65 Storing a Flat...
... ...4-33 Starting Your Engine ...2-22 Starting Your V8 Engine ...2-23 Steering ...4-12 Steering in Emergencies ...4-13 Steering Tips ...4-12 Steering Wheel Controls, Audio ...3-127 Step-Bumper Pad ...4-102 Stereo RCA Jacks ...3-121 Storage Areas ...2-64 Center Console Storage Area ...2-65 Cupholder(s) ...2-65 Front Storage Area ...2-65 Glove Box ...2-65 Storing a Flat...