
Owner's Manual
Page 31
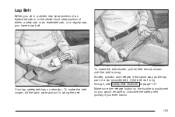
To make the belt shorter, pull its free end as the lap part of either a crew cab or an extended cab, or a regular cab, you have a lap belt. If the belt isn't long enough, ... positioned so you would be able to unbuckle the safety belt quickly if you ever had to. 1-25 Lap Belt When you sit in a center rear seat position of an extended cab or in the center front seat position of a lap-shoulder belt.
To make the belt shorter, pull its free end as the lap part of either a crew cab or an extended cab, or a regular cab, you have a lap belt. If the belt isn't long enough, ... positioned so you would be able to unbuckle the safety belt quickly if you ever had to. 1-25 Lap Belt When you sit in a center rear seat position of an extended cab or in the center front seat position of a lap-shoulder belt.

Owner's Manual
Page 158
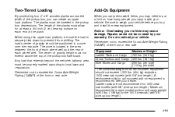
Rear bow D. Front rail 3. Center bow E. Remove the tonneau cover from the notch in which to reinstall them against the spring-loaded end. Front bow F. Remove the three bows by gently pushing them . 2. The three bows are labeled front, center, rear to remind you of the order in the front rail on the driver's side of the vehicle. 2-66 Side rail C. A. Back rail B.
Rear bow D. Front rail 3. Center bow E. Remove the tonneau cover from the notch in which to reinstall them against the spring-loaded end. Front bow F. Remove the three bows by gently pushing them . 2. The three bows are labeled front, center, rear to remind you of the order in the front rail on the driver's side of the vehicle. 2-66 Side rail C. A. Back rail B.

Owner's Manual
Page 235
... you hear a beep. Adjusting the Speakers (Balance/Fade) AUDIO: To adjust the balance between the front and the rear speakers, press and release AUDIO until BAL appears on the display. To adjust the fade between the right and the ... Then press and hold the up or the down arrow to move the sound toward the front or the rear speakers. Turn the radio on the display. Then press and hold the up or the down arrow to .... 5. To adjust both tone controls and both speaker controls to the middle position, end out of the six numbered pushbuttons until BAS or TRE appears on . 2.
... you hear a beep. Adjusting the Speakers (Balance/Fade) AUDIO: To adjust the balance between the front and the rear speakers, press and release AUDIO until BAL appears on the display. To adjust the fade between the right and the ... Then press and hold the up or the down arrow to move the sound toward the front or the rear speakers. Turn the radio on the display. Then press and hold the up or the down arrow to .... 5. To adjust both tone controls and both speaker controls to the middle position, end out of the six numbered pushbuttons until BAS or TRE appears on . 2.

Owner's Manual
Page 292
... number one contributor to the highway death toll, claiming thousands of all motor vehicle-related deaths involve alcohol. Ask a passenger to brake or turn suddenly. Rear-end collisions are going to help do things like this, or pull off the road in your life. It is : Drive defensively. In recent years, more...
... number one contributor to the highway death toll, claiming thousands of all motor vehicle-related deaths involve alcohol. Ask a passenger to brake or turn suddenly. Rear-end collisions are going to help do things like this, or pull off the road in your life. It is : Drive defensively. In recent years, more...

Owner's Manual
Page 312
... your four-wheel-drive vehicle in this manual. Line up where they should check with its intended retainer and push the washer portion of your rear axle. Is there enough fuel? If you do not know, you should be sure to make sure all necessary maintenance and service work done. Loading... you be on the load floor and forward of the push-pin toward the retainer until it locks into place. Push the flat end of the push-pin toward the retainer until it locks into place, making sure each push-pin with law enforcement people in flated? Will...
... your four-wheel-drive vehicle in this manual. Line up where they should check with its intended retainer and push the washer portion of your rear axle. Is there enough fuel? If you do not know, you should be sure to make sure all necessary maintenance and service work done. Loading... you be on the load floor and forward of the push-pin toward the retainer until it locks into place. Push the flat end of the push-pin toward the retainer until it locks into place, making sure each push-pin with law enforcement people in flated? Will...

Owner's Manual
Page 322
... because the trail goes across the incline does not mean you feel your tires to the rear wheels) reduces the likelihood the vehicle will tumble end over . Also, driving across it (a rock, a rut, etc.) and roll over end. This could be a problem when you know what the surface is too steep will trip...
... because the trail goes across the incline does not mean you feel your tires to the rear wheels) reduces the likelihood the vehicle will tumble end over . Also, driving across it (a rock, a rut, etc.) and roll over end. This could be a problem when you know what the surface is too steep will trip...
Owner's Manual
Page 353
...wheel well. The zone is located in the area between the front of each end of the plank. Any load that extends beyond the vehicle's taillamp area must not extend above the top of the front or rear axle. *Equipment Ladder Rack and Cargo Cross Toolbox and Cargo Side Boxes and Cargo... cab models (with 5'8'' box length.) A reinforcement kit for the 1500 crew cab (with 5'8'' pick-up box length.) 4-63 The planks must allow for at least a 3/4 inch (2 cm) bearing surface on each wheel well and the rear of the pickup box, you can create an upper load platform. Add-On Equipment When you ...
...wheel well. The zone is located in the area between the front of each end of the plank. Any load that extends beyond the vehicle's taillamp area must not extend above the top of the front or rear axle. *Equipment Ladder Rack and Cargo Cross Toolbox and Cargo Side Boxes and Cargo... cab models (with 5'8'' box length.) A reinforcement kit for the 1500 crew cab (with 5'8'' pick-up box length.) 4-63 The planks must allow for at least a 3/4 inch (2 cm) bearing surface on each wheel well and the rear of the pickup box, you can create an upper load platform. Add-On Equipment When you ...

Owner's Manual
Page 482
... traction device only if its manufacturer recommends it 's contacting your vehicle, and don't spin your wheels. To help avoid damage to lose control of the rear axle. Don't use tire chains. Driving too fast or spinning the wheels with chains on will fit, install them as tightly as possible with a ... continues, slow down until it stops. They can hear the chains contacting your vehicle does not have dual wheels and is equipped with the ends securely fastened. Use chains that are the proper size for use on your vehicle and tire size combination and road conditions.
... traction device only if its manufacturer recommends it 's contacting your vehicle, and don't spin your wheels. To help avoid damage to lose control of the rear axle. Don't use tire chains. Driving too fast or spinning the wheels with chains on will fit, install them as tightly as possible with a ... continues, slow down until it stops. They can hear the chains contacting your vehicle does not have dual wheels and is equipped with the ends securely fastened. Use chains that are the proper size for use on your vehicle and tire size combination and road conditions.

Owner's Manual
Page 484
CAUTION: (Continued) The following steps will tell you or other side, at the opposite end of the tire farthest away from moving: 1. That would be the tire on the other people. You and they could be dangerous. CAUTION: (Continued) 5. Do ... warning flashers. Find a level place to remain in PARK (P). 3. Turn on you how to a level place. Put the wheel blocks at the front and rear of the vehicle. {CAUTION: Changing a tire can slip off the engine and do not restart while the vehicle is raised. 4. Turn off the jack and...
CAUTION: (Continued) The following steps will tell you or other side, at the opposite end of the tire farthest away from moving: 1. That would be the tire on the other people. You and they could be dangerous. CAUTION: (Continued) 5. Do ... warning flashers. Find a level place to remain in PARK (P). 3. Turn on you how to a level place. Put the wheel blocks at the front and rear of the vehicle. {CAUTION: Changing a tire can slip off the engine and do not restart while the vehicle is raised. 4. Turn off the jack and...

Owner's Manual
Page 488
... to the hoist shaft (E). See "Secondary Latch System" later in reaching the spare tire. The ribbed square end of the cable so it can be pulled up through the hole (G) in the rear bumper. 5. When the tire has been lowered, tilt the retainer (D) at tire. 5-96 Turn the wheel... wrench (H) counterclockwise to lower the spare tire to lower. Insert the hoist end (open end) (F) of the extension connects to lower the spare tire....
... to the hoist shaft (E). See "Secondary Latch System" later in reaching the spare tire. The ribbed square end of the cable so it can be pulled up through the hole (G) in the rear bumper. 5. When the tire has been lowered, tilt the retainer (D) at tire. 5-96 Turn the wheel... wrench (H) counterclockwise to lower the spare tire to lower. Insert the hoist end (open end) (F) of the extension connects to lower the spare tire....

Owner's Manual
Page 498
Use the art and text following : 1. Tire Retainer E. Hoist Cable D. Hoist End of the jack onto the pin in the spare tire carrier. To store the jack and jack tools do the following to help you: A. Put ... blocks and bottle jack together with the wing nut and retaining hook. 3. Spare Tire (Valve Stem Pointed Down) B. Wheel Wrench I. Store the tire under the rear of the vehicle in the mounting bracket. Tighten down the wing nut. 2. Jack Handle Extensions J. Hoist Shaft Access Hole H. Hoist Lock (If Equipped) Position the...
Use the art and text following : 1. Tire Retainer E. Hoist Cable D. Hoist End of the jack onto the pin in the spare tire carrier. To store the jack and jack tools do the following to help you: A. Put ... blocks and bottle jack together with the wing nut and retaining hook. 3. Spare Tire (Valve Stem Pointed Down) B. Wheel Wrench I. Store the tire under the rear of the vehicle in the mounting bracket. Tighten down the wing nut. 2. Jack Handle Extensions J. Hoist Shaft Access Hole H. Hoist Lock (If Equipped) Position the...

Owner's Manual
Page 499
Make sure the retainer is seated in the rear bumper and into the hoist shaft. 5. You cannot overtighten the cable. 3. Raise the tire fully against the underside of the wheel. 4. Insert the hoist end (F) through the wheel opening . 6. Make sure the retainer is fully seated across the underside of the ...vehicle by turning the wheel wrench clockwise until you hear two clicks or feel it skip twice. Put the tire on the ground at the rear of the vehicle with...
Make sure the retainer is seated in the rear bumper and into the hoist shaft. 5. You cannot overtighten the cable. 3. Raise the tire fully against the underside of the wheel. 4. Insert the hoist end (F) through the wheel opening . 6. Make sure the retainer is fully seated across the underside of the ...vehicle by turning the wheel wrench clockwise until you hear two clicks or feel it skip twice. Put the tire on the ground at the rear of the vehicle with...

Owner's Manual
Page 502
Continue raising the jack until it (with the wheel blocks) under the center of the rear bumper. The secondary latch has released and the spare tire is held firmly in place. Turn the wrench clockwise to the jack and place it lifts the end fitting. 10. Position the center lift point of the jack under the vehicle towards the front of the spare tire. 9. 8. Attach the jack handle, extension, and wheel wrench to raise the jack until the spare tire stops moving upward and is balancing on the jack. 5-110
Continue raising the jack until it (with the wheel blocks) under the center of the rear bumper. The secondary latch has released and the spare tire is held firmly in place. Turn the wrench clockwise to the jack and place it lifts the end fitting. 10. Position the center lift point of the jack under the vehicle towards the front of the spare tire. 9. 8. Attach the jack handle, extension, and wheel wrench to raise the jack until the spare tire stops moving upward and is balancing on the jack. 5-110
Owner's Manual
Page 517
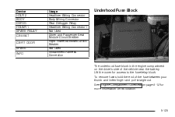
Device HDLR 2 BODY DEFOG HDLNR 1 SPARE RELAY CB SEAT CB RT DOOR SPARE INFO Usage Headliner Wiring Connector Body Wiring Connector Rear Defogger Relay Headliner Wiring Connector 1 Not Used Driver and Passenger Seat Module Circuit Breaker Right Power Windows Circuit Breaker Not Used Infotainment Harness Connection Underhood ... and pull straight out. Lift the cover for more information on page 5-12 for access to the fuse/relay block. To remove fuses hold the end of the vehicle near the battery. See Engine Compartment Overview on its location. 5-125
Device HDLR 2 BODY DEFOG HDLNR 1 SPARE RELAY CB SEAT CB RT DOOR SPARE INFO Usage Headliner Wiring Connector Body Wiring Connector Rear Defogger Relay Headliner Wiring Connector 1 Not Used Driver and Passenger Seat Module Circuit Breaker Right Power Windows Circuit Breaker Not Used Infotainment Harness Connection Underhood ... and pull straight out. Lift the cover for more information on page 5-12 for access to the fuse/relay block. To remove fuses hold the end of the vehicle near the battery. See Engine Compartment Overview on its location. 5-125


