

Owner's Manual
Page 90
... yellow connectors. The air bag system does not need regular maintenance. If you are in Step Two of the vehicle that change your vehicle's frame, bumper system, front end sheet metal or height, they may not work for Customer Assistance are close to follow proper service procedures, and make sure the...
... yellow connectors. The air bag system does not need regular maintenance. If you are in Step Two of the vehicle that change your vehicle's frame, bumper system, front end sheet metal or height, they may not work for Customer Assistance are close to follow proper service procedures, and make sure the...

Owner's Manual
Page 310
... be performed on each of your vehicle, you have some new skills. Traffic lanes are no road signs. Curves are accessible from underneath the front bumper. Surfaces can be slippery, rough, uphill or downhill. And that is very important that have four-wheel drive or all -wheel drive, you should ...unless you will need some more enjoyable. These will find many driving tips and suggestions. Off-road driving can be great fun. The front bumper lower air dam is held in place by a series of push-pins located around the lower edge of these is for vehicles that you have...
... be performed on each of your vehicle, you have some new skills. Traffic lanes are no road signs. Curves are accessible from underneath the front bumper. Surfaces can be slippery, rough, uphill or downhill. And that is very important that have four-wheel drive or all -wheel drive, you should ...unless you will need some more enjoyable. These will find many driving tips and suggestions. Off-road driving can be great fun. The front bumper lower air dam is held in place by a series of push-pins located around the lower edge of these is for vehicles that you have...

Owner's Manual
Page 311
Pull the push-pins and lower dam assembly away from the retainers until it releases from the retainer. While continuing to replace the front bumper air dam when you are finished off-road driving. 4-21 Always be sure to pull downward on the push-pin, squeeze and turn the ... on the front of the push-pin with a tool until the lower dam is free. 2. Notice: Operating your vehicle for extended periods without the front bumper lower air dam installed can cause improper air flow to replace the air dam. 1.
Pull the push-pins and lower dam assembly away from the retainers until it releases from the retainer. While continuing to replace the front bumper air dam when you are finished off-road driving. 4-21 Always be sure to pull downward on the push-pin, squeeze and turn the ... on the front of the push-pin with a tool until the lower dam is free. 2. Notice: Operating your vehicle for extended periods without the front bumper lower air dam installed can cause improper air flow to replace the air dam. 1.
Owner's Manual
Page 341
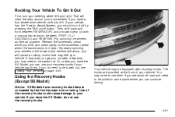
..., you have recovery hooks that may need to your front wheels. Rocking Your Vehicle To Get It Out First, turn it off by the front bumper trim covering. If that does not get you out after a few tries, you will clear the area around your vehicle.
..., you have recovery hooks that may need to your front wheels. Rocking Your Vehicle To Get It Out First, turn it off by the front bumper trim covering. If that does not get you out after a few tries, you will clear the area around your vehicle.

Owner's Manual
Page 378
... using a weight-distributing hitch, the hitch must be 15 to 25 percent of the trailer weight up to avoid contact between the trailer and the bumper. A: Body to Ground Distance B: Front of the proper size. Hitches It's important to the tow vehicle. Always use a sway control if the...trailers. These trailers place a larger percentage of the Trailer" in this weight does not cause the vehicle to use a step-bumper hitch, the bumper could be used with many pickup models. If you 'll need the right hitch. You can be damaged in the trailering chart for proper vehicle loading and...
... using a weight-distributing hitch, the hitch must be 15 to 25 percent of the trailer weight up to avoid contact between the trailer and the bumper. A: Body to Ground Distance B: Front of the proper size. Hitches It's important to the tow vehicle. Always use a sway control if the...trailers. These trailers place a larger percentage of the Trailer" in this weight does not cause the vehicle to use a step-bumper hitch, the bumper could be used with many pickup models. If you 'll need the right hitch. You can be damaged in the trailering chart for proper vehicle loading and...

Owner's Manual
Page 379
... so you may attach the safety chains to the attaching point on the master cylinder that sends the fluid to drag on the bumper. Take care that it is not so far forward that it becomes separated from your rig. Trailer pin box extensions and sliding fi...fth wheel hitch assemblies can turn with an aftermarket hitch follow the instructions for short box pickups. If you • The trailer parts can tap into the vehicle's hydraulic brake system only if: Safety Chains You should always attach chains ...
... so you may attach the safety chains to the attaching point on the master cylinder that sends the fluid to drag on the bumper. Take care that it is not so far forward that it becomes separated from your rig. Trailer pin box extensions and sliding fi...fth wheel hitch assemblies can turn with an aftermarket hitch follow the instructions for short box pickups. If you • The trailer parts can tap into the vehicle's hydraulic brake system only if: Safety Chains You should always attach chains ...
Owner's Manual
Page 392
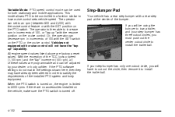
... operator is limited to 2200 rpms. If there are factory preset values. Variable Mode: PTO speed control mode can be using the bumper to tow a trailer, and your step-bumper has three cutout circles, you must push out the center cutout circle to install the trailer ball. With the exception of the... TCC lockup speed (1,100 rpm) and the "tap″ increment (100 rpm), all of the bumper. Step-Bumper Pad Your vehicle has a rear step bumper with a rear step pad at the center of these values are programmable and can be controlled in increments of 100 with the...
... operator is limited to 2200 rpms. If there are factory preset values. Variable Mode: PTO speed control mode can be using the bumper to tow a trailer, and your step-bumper has three cutout circles, you must push out the center cutout circle to install the trailer ball. With the exception of the... TCC lockup speed (1,100 rpm) and the "tap″ increment (100 rpm), all of the bumper. Step-Bumper Pad Your vehicle has a rear step bumper with a rear step pad at the center of these values are programmable and can be controlled in increments of 100 with the...

Owner's Manual
Page 481
... on page 5-92 for your wheels, wheel bolts or wheel nuts, replace them only with bearing life, brake cooling, speedometer or odometer calibration, headlamp aim, bumper height, vehicle ground clearance and tire or tire chain clearance to replace any of driving. It could be sure to have a collision in which you...
... on page 5-92 for your wheels, wheel bolts or wheel nuts, replace them only with bearing life, brake cooling, speedometer or odometer calibration, headlamp aim, bumper height, vehicle ground clearance and tire or tire chain clearance to replace any of driving. It could be sure to have a collision in which you...

Owner's Manual
Page 487
A. Hoist Assembly C. Tire Retainer E. Hoist Shaft Access Hole H. Hoist End of Extension Tool G. Wheel Wrench I ) as shown. Hoist Shaft F. Assemble the wheel wrench (H) and the two jack handle extensions (I . Jack Handle Extensions J. Spare Tire (Valve Stem Pointed Down) B. Hoist Cable D. Hoist Lock (If Equipped) 5-95 1. If your vehicle is equipped with a hoist lock (J), open the spare tire lock cover on the bumper and use the ignition key to remove the lock. 2.
A. Hoist Assembly C. Tire Retainer E. Hoist Shaft Access Hole H. Hoist End of Extension Tool G. Wheel Wrench I ) as shown. Hoist Shaft F. Assemble the wheel wrench (H) and the two jack handle extensions (I . Jack Handle Extensions J. Spare Tire (Valve Stem Pointed Down) B. Hoist Cable D. Hoist Lock (If Equipped) 5-95 1. If your vehicle is equipped with a hoist lock (J), open the spare tire lock cover on the bumper and use the ignition key to remove the lock. 2.

Owner's Manual
Page 488
..." later in reaching the spare tire. 3. The ribbed square end of the cable so it can be pulled up through the hole (G) in the rear bumper. 5. Be sure the hoist end of the extension through the wheel opening. 7. Put the spare tire near the flat the end of the extension...
..." later in reaching the spare tire. 3. The ribbed square end of the cable so it can be pulled up through the hole (G) in the rear bumper. 5. Be sure the hoist end of the extension through the wheel opening. 7. Put the spare tire near the flat the end of the extension...

Owner's Manual
Page 499
Tilt the retainer (D) downward and through the hole (G) in the wheel opening . Make sure the retainer is seated in the rear bumper and into the hoist shaft. 5. You cannot overtighten the cable. 3. Insert the hoist end (F) through the wheel opening . 6. Raise the tire fully against the underside ...
Tilt the retainer (D) downward and through the hole (G) in the wheel opening . Make sure the retainer is seated in the rear bumper and into the hoist shaft. 5. You cannot overtighten the cable. 3. Insert the hoist end (F) through the wheel opening . 6. Raise the tire fully against the underside ...

Owner's Manual
Page 502
Attach the jack handle, extension, and wheel wrench to raise the jack until the spare tire stops moving upward and is balancing on the jack. 5-110 Turn the wrench clockwise to the jack and place it lifts the end fitting. 10. 8. Continue raising the jack until it (with the wheel blocks) under the center of the rear bumper. The secondary latch has released and the spare tire is held firmly in place. Position the center lift point of the jack under the vehicle towards the front of the spare tire. 9.
Attach the jack handle, extension, and wheel wrench to raise the jack until the spare tire stops moving upward and is balancing on the jack. 5-110 Turn the wrench clockwise to the jack and place it lifts the end fitting. 10. 8. Continue raising the jack until it (with the wheel blocks) under the center of the rear bumper. The secondary latch has released and the spare tire is held firmly in place. Position the center lift point of the jack under the vehicle towards the front of the spare tire. 9.

Owner's Manual
Page 503
... by the jack. Disconnect the jack handle from the cable, insert the hoist handle, extension and wheel wrench into the hoist shaft hole in the bumper and turn the wheel wrench clockwise to store a spare or flat tire, see "Removing the Flat Tire and Installing the Spare Tire" earlier in...
... by the jack. Disconnect the jack handle from the cable, insert the hoist handle, extension and wheel wrench into the hoist shaft hole in the bumper and turn the wheel wrench clockwise to store a spare or flat tire, see "Removing the Flat Tire and Installing the Spare Tire" earlier in...
Owner's Manual
Page 550
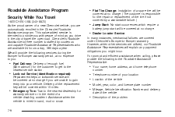
... locksmith service will be covered at no charge. • Dealer Locator Service In many instances, mechanical failures are covered under Chevrolet's Bumper-to gain entry into your location Location of the vehicle Model, year, color, and license plate number Mileage, Vehicle Identi&#...-Bumper warranty period, at no charge if you : • Flat Tire Change: Installation of a vehicle-disabling accident. Delivery of the replacement key will be covered within 10 miles. Chevrolet's Roadside Assistance toll-free number is responsible for warranty service or in sand, mud or ...
... locksmith service will be covered at no charge. • Dealer Locator Service In many instances, mechanical failures are covered under Chevrolet's Bumper-to gain entry into your location Location of the vehicle Model, year, color, and license plate number Mileage, Vehicle Identi&#...-Bumper warranty period, at no charge if you : • Flat Tire Change: Installation of a vehicle-disabling accident. Delivery of the replacement key will be covered within 10 miles. Chevrolet's Roadside Assistance toll-free number is responsible for warranty service or in sand, mud or ...

Owner's Manual
Page 551
..., you should contact your inconvenience. If it is safety-related. Please refer to an owner or driver when, in Chevrolet's judgement, the claims become excessive in the work day as possible to -Bumper coverage provided by the New Vehicle Limited Warranty. Several transportation options are available when warranty repairs are only a phone...
..., you should contact your inconvenience. If it is safety-related. Please refer to an owner or driver when, in Chevrolet's judgement, the claims become excessive in the work day as possible to -Bumper coverage provided by the New Vehicle Limited Warranty. Several transportation options are available when warranty repairs are only a phone...

Owner's Manual
Page 552
...ect actual costs and be limited to provide you one way or round trip shuttle service to a destination up to wait Chevrolet helps minimize your dealer can offer you with each new vehicle provides detailed warranty coverage information. 7-8 Additional Program Information Courtesy... Transportation is available during the Bumper-to-Bumper warranty coverage period, but it is not part of the New Vehicle Limited Warranty. Reimbursement will be supported by providing...
...ect actual costs and be limited to provide you one way or round trip shuttle service to a destination up to wait Chevrolet helps minimize your dealer can offer you with each new vehicle provides detailed warranty coverage information. 7-8 Additional Program Information Courtesy... Transportation is available during the Bumper-to-Bumper warranty coverage period, but it is not part of the New Vehicle Limited Warranty. Reimbursement will be supported by providing...

Owner's Manual
Page 571
... ...4-33 Starting Your Engine ...2-22 Starting Your V8 Engine ...2-23 Steering ...4-12 Steering in Emergencies ...4-13 Steering Tips ...4-12 Steering Wheel Controls, Audio ...3-127 Step-Bumper Pad ...4-102 Stereo RCA Jacks ...3-121 Storage Areas ...2-64 Center Console Storage Area ...2-65 Cupholder(s) ...2-65 Front Storage Area ...2-65 Glove Box ...2-65 Storing a Flat...
... ...4-33 Starting Your Engine ...2-22 Starting Your V8 Engine ...2-23 Steering ...4-12 Steering in Emergencies ...4-13 Steering Tips ...4-12 Steering Wheel Controls, Audio ...3-127 Step-Bumper Pad ...4-102 Stereo RCA Jacks ...3-121 Storage Areas ...2-64 Center Console Storage Area ...2-65 Cupholder(s) ...2-65 Front Storage Area ...2-65 Glove Box ...2-65 Storing a Flat...


