
Owner's Manual
Page 10
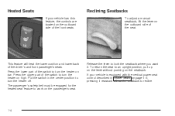
... turn the heater on page 1-3, pressing it rearward allows the seatback to lock the seatback where you want it. Reclining Seatbacks To adjust a manual seatback, lift the lever on the outboard side of the switch to turn the heater on high. Release the lever to recline. 1-4 Heated Seats If your vehicle...
... turn the heater on page 1-3, pressing it rearward allows the seatback to lock the seatback where you want it. Reclining Seatbacks To adjust a manual seatback, lift the lever on the outboard side of the switch to turn the heater on high. Release the lever to recline. 1-4 Heated Seats If your vehicle...
Owner's Manual
Page 13
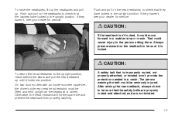
To raise the seatbacks, lift up the seatbacks and pull up until it is locked. {CAUTION: To return the head restraints to check that is raised. If they haven't, see ..., the head restraint will hit the spare tire and prevent the seatback from properly latching. The person wearing the belt could cause injury to be lifted and held upright as the seatback is improperly routed, not properly attached, or twisted won't provide the protection needed in the upright position. A safety belt...
To raise the seatbacks, lift up the seatbacks and pull up until it is locked. {CAUTION: To return the head restraints to check that is raised. If they haven't, see ..., the head restraint will hit the spare tire and prevent the seatback from properly latching. The person wearing the belt could cause injury to be lifted and held upright as the seatback is improperly routed, not properly attached, or twisted won't provide the protection needed in the upright position. A safety belt...
Owner's Manual
Page 80
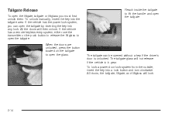
... vehicle has the power lock system, you must first unlock them. When the doors are unlocked, press the button located on the tailgate to lift the handle and open the tailgate by inserting the key into any lock. Reach inside the tailgate to open the tailgate. To unlock manually, insert...
... vehicle has the power lock system, you must first unlock them. When the doors are unlocked, press the button located on the tailgate to lift the handle and open the tailgate by inserting the key into any lock. Reach inside the tailgate to open the tailgate. To unlock manually, insert...
Owner's Manual
Page 115
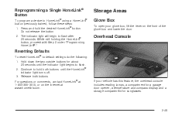
The indicator light will begin to flash. 2. If your glove box, lift the lever on the internet at 1-800-355-3515, or on the front of the glove box and lower the door. While still holding the ...
The indicator light will begin to flash. 2. If your glove box, lift the lever on the internet at 1-800-355-3515, or on the front of the glove box and lower the door. While still holding the ...
Owner's Manual
Page 122
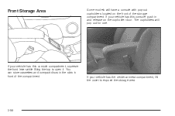
If your vehicle has the center armrest compartment, lift the cover to open it. You can store cassettes and compact discs in the slots in and release on the front of the compartment. The cupholders will have a console with pop-out cupholders located on the cupholder door. If your vehicle has this console push in front of the storage compartment. If your vehicle has this console compartment, squeeze the front lever while lifting the top to expose the storage area. 2-56 Front Storage Area Some models will pop out for use.
If your vehicle has the center armrest compartment, lift the cover to open it. You can store cassettes and compact discs in the slots in and release on the front of the compartment. The cupholders will have a console with pop-out cupholders located on the cupholder door. If your vehicle has this console push in front of the storage compartment. If your vehicle has this console compartment, squeeze the front lever while lifting the top to expose the storage area. 2-56 Front Storage Area Some models will pop out for use.
Owner's Manual
Page 287
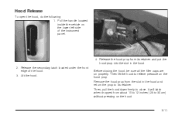
Remove the hood prop from the slot in the hood. 2. Lift the hood. Then lift the hood to its retainer and put the hood prop into the slot in the hood and return the prop to relieve pressure on the ...
Remove the hood prop from the slot in the hood. 2. Lift the hood. Then lift the hood to its retainer and put the hood prop into the slot in the hood and return the prop to relieve pressure on the ...

Owner's Manual
Page 294
If the filter remains "caked" with dirt, a new filter is required. Lift out the engine air cleaner/filter. 3. See Normal Maintenance Replacement Parts on and remove the cover. 2. How to Inspect the Engine Air Cleaner/Filter ...
If the filter remains "caked" with dirt, a new filter is required. Lift out the engine air cleaner/filter. 3. See Normal Maintenance Replacement Parts on and remove the cover. 2. How to Inspect the Engine Air Cleaner/Filter ...
Owner's Manual
Page 305
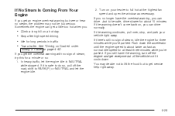
... open the window as necessary. Tow a trailer. Climb a long hill on page 4-60. Stop after high-speed driving. Sometimes the engine can drive. Just to lift the hood but see or hear no sign of steam, try this for three minutes while you get a little too hot when you 're parked...
... open the window as necessary. Tow a trailer. Climb a long hill on page 4-60. Stop after high-speed driving. Sometimes the engine can drive. Just to lift the hood but see or hear no sign of steam, try this for three minutes while you get a little too hot when you 're parked...
Owner's Manual
Page 306
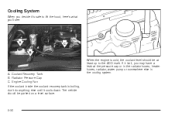
Cooling System When you decide it's safe to lift the hood, here's what you may have a leak at least up to the ADD mark. Engine Cooling Fan If the coolant inside the coolant recovery tank is cold, the coolant level should be at the pressure cap or in the radiator hoses, heater hoses, radiator, water pump or somewhere else in the cooling system. 5-30 When the engine is boiling, don't do anything else until it isn't, you 'll see: A. The vehicle should be parked on a level surface. If it cools down. Radiator Pressure Cap C. Coolant Recovery Tank B.
Cooling System When you decide it's safe to lift the hood, here's what you may have a leak at least up to the ADD mark. Engine Cooling Fan If the coolant inside the coolant recovery tank is cold, the coolant level should be at the pressure cap or in the radiator hoses, heater hoses, radiator, water pump or somewhere else in the cooling system. 5-30 When the engine is boiling, don't do anything else until it isn't, you 'll see: A. The vehicle should be parked on a level surface. If it cools down. Radiator Pressure Cap C. Coolant Recovery Tank B.
Owner's Manual
Page 327
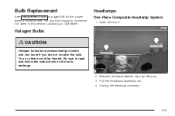
Open the hood. Pull the headlamp assembly out. 4. You or others could be injured. Be sure to read and follow the instructions on page 5-56 for the proper types of bulbs to use. Halogen Bulbs {CAUTION: Halogen bulbs have pressurized gas inside and can burst if you drop or scratch the bulb. Bulb Replacement See Replacement Bulbs on the bulb package. 2. Remove the black retainer clips by lifting up. 3. Headlamps One-Piece Composite Headlamp System 1. For any bulb changing procedure not listed in this section, contact your GM dealer. Unplug the electrical connector. 5-51
Open the hood. Pull the headlamp assembly out. 4. You or others could be injured. Be sure to read and follow the instructions on page 5-56 for the proper types of bulbs to use. Halogen Bulbs {CAUTION: Halogen bulbs have pressurized gas inside and can burst if you drop or scratch the bulb. Bulb Replacement See Replacement Bulbs on the bulb package. 2. Remove the black retainer clips by lifting up. 3. Headlamps One-Piece Composite Headlamp System 1. For any bulb changing procedure not listed in this section, contact your GM dealer. Unplug the electrical connector. 5-51
Owner's Manual
Page 328
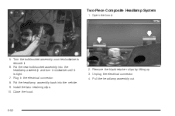
Put the new bulb/socket assembly into the vehicle. 9. Remove the black retainer clips by lifting up. 3. Install the two retaining clips. 10. Turn the bulb/socket assembly counterclockwise to remove it is tight. 7. Pull the headlamp assembly out. 5-52 Unplug the electrical connector. 4. Close the hood. 2. Open the hood. 5. Two-Piece Composite Headlamp System 1. Put the headlamp assembly back into the headlamp assembly and turn it clockwise until it . 6. Plug in the electrical connector. 8.
Put the new bulb/socket assembly into the vehicle. 9. Remove the black retainer clips by lifting up. 3. Install the two retaining clips. 10. Turn the bulb/socket assembly counterclockwise to remove it is tight. 7. Pull the headlamp assembly out. 5-52 Unplug the electrical connector. 4. Close the hood. 2. Open the hood. 5. Two-Piece Composite Headlamp System 1. Put the headlamp assembly back into the headlamp assembly and turn it clockwise until it . 6. Plug in the electrical connector. 8.
Owner's Manual
Page 332
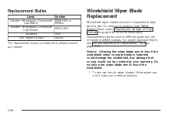
Notice: Allowing the wiper blade arm to touch the windshield. 1. To remove the old wiper blades, lift the wiper arm until it locks into a vertical position. *For replacement bulbs not listed here, please consult your warranty. See "Wiper Blade Check" under Cleaning ...
Notice: Allowing the wiper blade arm to touch the windshield. 1. To remove the old wiper blades, lift the wiper arm until it locks into a vertical position. *For replacement bulbs not listed here, please consult your warranty. See "Wiper Blade Check" under Cleaning ...
Owner's Manual
Page 354
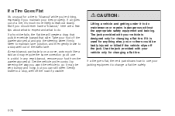
Steer to maintain lane position, and then gently brake to a stop , well off the road if possible. {CAUTION: Lifting a vehicle and getting under control by steering the way you maintain your tires properly. Gently brake to a stop well out of a tire, it is designed ...
Steer to maintain lane position, and then gently brake to a stop , well off the road if possible. {CAUTION: Lifting a vehicle and getting under control by steering the way you maintain your tires properly. Gently brake to a stop well out of a tire, it is designed ...
Owner's Manual
Page 360
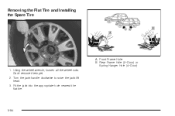
Don't remove them yet. 2. Fit the jack into the appropriate hole nearest the flat tire. 5-84 Using the wheel wrench, loosen all the wheel nuts. Rear Frame Hole (2-Door) or Spring Hanger Hole (4-Door) 1. Turn the jack handle clockwise to raise the jack lift head. 3. Removing the Flat Tire and Installing the Spare Tire A. Front Frame Hole B.
Don't remove them yet. 2. Fit the jack into the appropriate hole nearest the flat tire. 5-84 Using the wheel wrench, loosen all the wheel nuts. Rear Frame Hole (2-Door) or Spring Hanger Hole (4-Door) 1. Turn the jack handle clockwise to raise the jack lift head. 3. Removing the Flat Tire and Installing the Spare Tire A. Front Frame Hole B.
Owner's Manual
Page 361
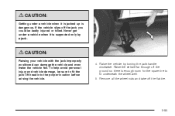
Remove all the wheel nuts and take off the ground so there is enough room for the spare tire to fit the jack lift head into the proper location before raising the vehicle. 4. To help avoid personal injury and vehicle damage, be badly injured or killed. Raise the vehicle ...
Remove all the wheel nuts and take off the ground so there is enough room for the spare tire to fit the jack lift head into the proper location before raising the vehicle. 4. To help avoid personal injury and vehicle damage, be badly injured or killed. Raise the vehicle ...

Owner's Manual
Page 429
..., or to $1,000 toward eligible aftermarket driver or passenger adaptive equipment you up to determine your vehicle's eligibility, see your vehicle (hand controls, wheelchair/ scooter lifts, etc.). Call 1-800-GM-DRIVE (463-7483) for a limited period of time from the date of vehicle purchase/lease. de C.V. The offer is available for...
..., or to $1,000 toward eligible aftermarket driver or passenger adaptive equipment you up to determine your vehicle's eligibility, see your vehicle (hand controls, wheelchair/ scooter lifts, etc.). Call 1-800-GM-DRIVE (463-7483) for a limited period of time from the date of vehicle purchase/lease. de C.V. The offer is available for...

