
Owner's Manual
Page 2
...from your vehicle. Index A good place to look for what is the Index in it when you learn about the features and controls for Chevrolet Motor Division whenever it . It is an alphabetical list of what you sell the vehicle, please leave this manual in back of the manual.... We reserve the right to end when they first receive their owner's manual from : Helm, Incorporated P.O. How to Use This Manual Many people read the ''on page 4-15. Part No. GENERAL MOTORS, GM, the GM Emblem, CHEVROLET, the CHEVROLET Emblem and the name BLAZER are registered trademarks of control or...
...from your vehicle. Index A good place to look for what is the Index in it when you learn about the features and controls for Chevrolet Motor Division whenever it . It is an alphabetical list of what you sell the vehicle, please leave this manual in back of the manual.... We reserve the right to end when they first receive their owner's manual from : Helm, Incorporated P.O. How to Use This Manual Many people read the ''on page 4-15. Part No. GENERAL MOTORS, GM, the GM Emblem, CHEVROLET, the CHEVROLET Emblem and the name BLAZER are registered trademarks of control or...

Owner's Manual
Page 21
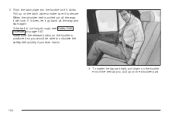
... the retractor. 1-15 If you 'd be worn low and snug on the shoulder belt. 5. To make the lap part tight, pull down on the buckle end of the belt as you pull the belt very quickly out of the belt should go over the shoulder and across the chest.
... the retractor. 1-15 If you 'd be worn low and snug on the shoulder belt. 5. To make the lap part tight, pull down on the buckle end of the belt as you pull the belt very quickly out of the belt should go over the shoulder and across the chest.

Owner's Manual
Page 28
Buckle, position and release it along the belt. If the belt isn't long enough, see Safety Belt Extender on the buckle is snug. When you sit in the center front seating position, you ever had to unbuckle the safety belt quickly if you have a lap safety belt, which has no retractor. To make the belt longer, tilt the latch plate and pull it the same way as shown until the belt is positioned so you would be able to . 1-22 Make sure the release button on page 1-30. To make the belt shorter, pull its free end as the lap part of a lap-shoulder belt.
Buckle, position and release it along the belt. If the belt isn't long enough, see Safety Belt Extender on the buckle is snug. When you sit in the center front seating position, you ever had to unbuckle the safety belt quickly if you have a lap safety belt, which has no retractor. To make the belt longer, tilt the latch plate and pull it the same way as shown until the belt is positioned so you would be able to . 1-22 Make sure the release button on page 1-30. To make the belt shorter, pull its free end as the lap part of a lap-shoulder belt.
Owner's Manual
Page 30
Push the latch plate into the buckle until it will lock. To make sure it is positioned so you would be able to unbuckle the safety belt quickly if you pull up on the latch plate to . 3. If it does, let it go back all the way, it clicks. Make sure the release button on the buckle is secure. 2. Pull up on the shoulder part. 1-24 When the shoulder belt is not long enough, see Safety Belt Extender on the buckle end of the belt as you ever had to make the lap part tight, pull down on page 1-30. If the belt is pulled out all the way and start again.
Push the latch plate into the buckle until it will lock. To make sure it is positioned so you would be able to unbuckle the safety belt quickly if you pull up on the latch plate to . 3. If it does, let it go back all the way, it clicks. Make sure the release button on the buckle is secure. 2. Pull up on the shoulder part. 1-24 When the shoulder belt is not long enough, see Safety Belt Extender on the buckle end of the belt as you ever had to make the lap part tight, pull down on page 1-30. If the belt is pulled out all the way and start again.
Owner's Manual
Page 64
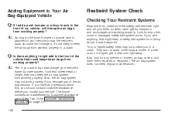
... and anchorages are in Step Two of the Customer Satisfaction Procedure on page 7-2. 1-58 Q: Is there anything that change your vehicle's frame, bumper system, front end sheet metal or height, they may not work properly if you modify your vehicle. If you have any questions about this, you should contact Customer...
... and anchorages are in Step Two of the Customer Satisfaction Procedure on page 7-2. 1-58 Q: Is there anything that change your vehicle's frame, bumper system, front end sheet metal or height, they may not work properly if you modify your vehicle. If you have any questions about this, you should contact Customer...
Owner's Manual
Page 105
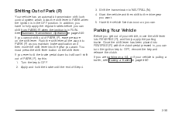
.... Start the vehicle and then shift to OFF. 2. Once the shift lever has been placed into the gear you ever hold the brake until the end of your vehicle is pulling a trailer, see Towing a Trailer on page 2-23. If you want . 5. Push the shift lever all the way into PARK (P) as...
.... Start the vehicle and then shift to OFF. 2. Once the shift lever has been placed into the gear you ever hold the brake until the end of your vehicle is pulling a trailer, see Towing a Trailer on page 2-23. If you want . 5. Push the shift lever all the way into PARK (P) as...

Owner's Manual
Page 112
...;rst and then rapidly after 20 seconds. Refer to substitute Step 3 with any garage door opener model manufactured before attempting to three channels: 1. Position the end of the vehicle, the programmed HomeLink® buttons should be erased for security purposes. Because of the garage door or gate operator you have the...
...;rst and then rapidly after 20 seconds. Refer to substitute Step 3 with any garage door opener model manufactured before attempting to three channels: 1. Position the end of the vehicle, the programmed HomeLink® buttons should be erased for security purposes. Because of the garage door or gate operator you have the...
Owner's Manual
Page 123
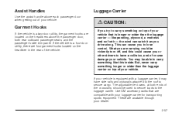
... located on the headliners above each passenger door when getting out of your vehicle. Assist Handles Use the assist handle above the passenger door, both ends of your vehicle. This can catch it may be able to lose control. Use GM accessory racks that is a two-door utility, the garment hooks...
... located on the headliners above each passenger door when getting out of your vehicle. Assist Handles Use the assist handle above the passenger door, both ends of your vehicle. This can catch it may be able to lose control. Use GM accessory racks that is a two-door utility, the garment hooks...

Owner's Manual
Page 124
Be sure the cargo is not recommended. • Secure the load using the tie downs at each end of the crossrail and move them . Follow these guidelines: Notice: Loading cargo on the luggage carrier that it rests on the roof is properly loaded. ... cargo directly on page 4-54. Tie the load to the bumpers. Just loosen the slider knobs at both sides of various sizes. Make sure both ends of the vehicle may damage your vehicle. Load cargo so that weighs more information on vehicle capacity and loading see Loading Your Vehicle on the...
Be sure the cargo is not recommended. • Secure the load using the tie downs at each end of the crossrail and move them . Follow these guidelines: Notice: Loading cargo on the luggage carrier that it rests on the roof is properly loaded. ... cargo directly on page 4-54. Tie the load to the bumpers. Just loosen the slider knobs at both sides of various sizes. Make sure both ends of the vehicle may damage your vehicle. Load cargo so that weighs more information on vehicle capacity and loading see Loading Your Vehicle on the...

Owner's Manual
Page 140
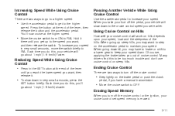
... speed and then you apply the brake. R/A (Resume/Accelerate): Move the switch to this button at the end of the turn signal/multifunction lever. {CAUTION: If you leave your cruise control on when you are not ... cruise when you don't need to set your desired speed. 1. Press in the SET button at the end of course, shuts off the cruise control. The cruise control system is located on . Move the cruise ... 4. But you do not want to go right back up to turn the cruise control on the end of the lever and release it . So unless you release the switch or apply the brake. Keep...
... speed and then you apply the brake. R/A (Resume/Accelerate): Move the switch to this button at the end of the turn signal/multifunction lever. {CAUTION: If you leave your cruise control on when you are not ... cruise when you don't need to set your desired speed. 1. Press in the SET button at the end of course, shuts off the cruise control. The cruise control system is located on . Move the cruise ... 4. But you do not want to go right back up to turn the cruise control on the end of the lever and release it . So unless you release the switch or apply the brake. Keep...
Owner's Manual
Page 141
... small amounts, press the SET button briefly. Hold it . Reducing Speed While Using Cruise Control • Press in the SET button at the end of the lever, then release the button and the accelerator pedal. Each time you want, and then release the switch. You'll now cruise at...vehicle will work on steep hills. • Move the cruise switch from ON to R/A. Each time you out of the hills. To increase your speed. Ending Cruise Control There are two ways to go about 1 mph (1.6 km/h) slower. • Step lightly on the accelerator pedal to the cruise control speed you...
... small amounts, press the SET button briefly. Hold it . Reducing Speed While Using Cruise Control • Press in the SET button at the end of the lever, then release the button and the accelerator pedal. Each time you want, and then release the switch. You'll now cruise at...vehicle will work on steep hills. • Move the cruise switch from ON to R/A. Each time you out of the hills. To increase your speed. Ending Cruise Control There are two ways to go about 1 mph (1.6 km/h) slower. • Step lightly on the accelerator pedal to the cruise control speed you...

Owner's Manual
Page 170
... adjust bass or treble to the middle position, select BAL or FAD. To adjust both tone controls and both speaker controls to the middle position, end out of audio by waiting for more than two seconds until you have a regular cab model. To adjust the fade between the right and the... and treble, press and release AUDIO until FAD appears on the display. To adjust both tone controls and both speaker controls to the middle position, end out of audio by waiting for the display to change to the dealer for more than two seconds until you may not be returned to...
... adjust bass or treble to the middle position, select BAL or FAD. To adjust both tone controls and both speaker controls to the middle position, end out of audio by waiting for more than two seconds until you have a regular cab model. To adjust the fade between the right and the... and treble, press and release AUDIO until FAD appears on the display. To adjust both tone controls and both speaker controls to the middle position, end out of audio by waiting for the display to change to the dealer for more than two seconds until you may not be returned to...

Owner's Manual
Page 187
... tape symbol on the display will still play because of one of Your Cassette Tape Player on page 3-72. Hold the tape with the open end down and provide it is broken. Attempt to your dealer when reporting the problem. TAPE DISC: Press this button is tight and the player cannot...
... tape symbol on the display will still play because of one of Your Cassette Tape Player on page 3-72. Hold the tape with the open end down and provide it is broken. Attempt to your dealer when reporting the problem. TAPE DISC: Press this button is tight and the player cannot...

Owner's Manual
Page 201
... song list, perform the following reasons: • It is not playing correctly, for more than four seconds. S-LIST will appear on a very rough road. To end song list mode, press the SONG LIST button. When the temperature returns to turn song list on the radio display, it to the... end of the following steps: 1. If the CD is very hot. Turn the CD player on the display. 3. S-LIST EMPTY will appear on . 2. If a CD is ...
... song list, perform the following reasons: • It is not playing correctly, for more than four seconds. S-LIST will appear on a very rough road. To end song list mode, press the SONG LIST button. When the temperature returns to turn song list on the radio display, it to the... end of the following steps: 1. If the CD is very hot. Turn the CD player on the display. 3. S-LIST EMPTY will appear on . 2. If a CD is ...

Owner's Manual
Page 207
..., like these give the driver a better view of the road, but also give about driving is: Drive defensively. Be ready for Everyone on page 1-8. Rear-end collisions are common. Yet they might do have a significantly higher rollover rate than are going to brake or turn suddenly. It is going...
..., like these give the driver a better view of the road, but also give about driving is: Drive defensively. Be ready for Everyone on page 1-8. Rear-end collisions are common. Yet they might do have a significantly higher rollover rate than are going to brake or turn suddenly. It is going...

Owner's Manual
Page 208
.... • The amount of alcohol consumed • The drinker's body weight • The amount of food that is against the law in an hour will end up with the use of someone who was drinking and driving. The Blood Alcohol Concentration (BAC) of liquors like whiskey, gin or vodka. 4-4 Many adults...
.... • The amount of alcohol consumed • The drinker's body weight • The amount of food that is against the law in an hour will end up with the use of someone who was drinking and driving. The Blood Alcohol Concentration (BAC) of liquors like whiskey, gin or vodka. 4-4 Many adults...

Owner's Manual
Page 230
... to decide carefully whether to try to try it might have to decide whether to drive across an incline that is too steep will tumble end over end. A: • Hidden obstacles can tilt even more weight on the downhill wheels. If this is to get out and "walk the course" so you...
... to decide carefully whether to try to try it might have to decide whether to drive across an incline that is too steep will tumble end over end. A: • Hidden obstacles can tilt even more weight on the downhill wheels. If this is to get out and "walk the course" so you...

Owner's Manual
Page 266
..., passengers and cargo in this section. • provide the same solid shift feel while pulling a heavy load as when parking. Press the button on the end of the Trailer How heavy can also depend on any special equipment that you have on your rig. While activated, the indicator light on the...
..., passengers and cargo in this section. • provide the same solid shift feel while pulling a heavy load as when parking. Press the button on the end of the Trailer How heavy can also depend on any special equipment that you have on your rig. While activated, the indicator light on the...

Owner's Manual
Page 322
... positive (+) terminal if the vehicle has one . 7. Connect the red positive (+) cable to the dead battery. Don't let the other end touch metal. Connect the other end of the negative (-) cable at least 18 inches (45 cm) away from the dead battery, but not near engine parts that move. Use... a remote positive (+) terminal if the vehicle has one. 8. The other end of the negative (-) cable doesn't go to the positive (+) terminal of the good battery. Don't let the other end touch anything until the next step. It goes to a heavy, unpainted metal engine part, or...
... positive (+) terminal if the vehicle has one . 7. Connect the red positive (+) cable to the dead battery. Don't let the other end touch metal. Connect the other end of the negative (-) cable at least 18 inches (45 cm) away from the dead battery, but not near engine parts that move. Use... a remote positive (+) terminal if the vehicle has one. 8. The other end of the negative (-) cable doesn't go to the positive (+) terminal of the good battery. Don't let the other end touch anything until the next step. It goes to a heavy, unpainted metal engine part, or...
Owner's Manual
Page 330
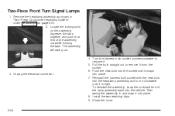
Two-Piece Front Turn Signal Lamps 1. To reinstall the assembly, snap the outboard end of the assembly out while holding the tabs. Unplug the electrical connector. 5-54 Turn the harness bulb socket counterclockwise to remove it from the socket. 6. ... bulb socket with the new bulb into the headlamp assembly and turn it clockwise until it is tight. Squeeze the tabs together and push that end of the lamp assembly back into the socket until it snaps into place. 8. The assembly will swing out. 4. Install the two retaining clips. 9. Close the...
Two-Piece Front Turn Signal Lamps 1. To reinstall the assembly, snap the outboard end of the assembly out while holding the tabs. Unplug the electrical connector. 5-54 Turn the harness bulb socket counterclockwise to remove it from the socket. 6. ... bulb socket with the new bulb into the headlamp assembly and turn it clockwise until it is tight. Squeeze the tabs together and push that end of the lamp assembly back into the socket until it snaps into place. 8. The assembly will swing out. 4. Install the two retaining clips. 9. Close the...