
Owner's Manual
Page 1
2004 Chevrolet Blazer Owner Manual Seats and Restraint Systems ...1-1 Front Seats ...1-2 Rear Seats ...1-6 Safety Belts ...1-8 Child Restraints ...1-31 Air Bag System ...1-52 Restraint System... Drive ...5-49 Front Axle ...5-50 Bulb Replacement ...5-51 Windshield Wiper Blade Replacement ...5-56 Tires ...5-59 Appearance Care ...5-93 Vehicle Identification ...5-101 Electrical System ...5-102 Capacities and Specifications ...5-108 Maintenance Schedule ...6-1 Maintenance Schedule ...6-2 Customer Assistance and Information ...7-1 Customer Assistance and Information ...7-2 Reporting Safety...
2004 Chevrolet Blazer Owner Manual Seats and Restraint Systems ...1-1 Front Seats ...1-2 Rear Seats ...1-6 Safety Belts ...1-8 Child Restraints ...1-31 Air Bag System ...1-52 Restraint System... Drive ...5-49 Front Axle ...5-50 Bulb Replacement ...5-51 Windshield Wiper Blade Replacement ...5-56 Tires ...5-59 Appearance Care ...5-93 Vehicle Identification ...5-101 Electrical System ...5-102 Capacities and Specifications ...5-108 Maintenance Schedule ...6-1 Maintenance Schedule ...6-2 Customer Assistance and Information ...7-1 Customer Assistance and Information ...7-2 Reporting Safety...

Owner's Manual
Page 59
The system checks the air bag electrical system for young children and infants. See Air Bag Readiness Light on page 1-34. Always secure children properly in flates can provide. The light ...tells you if there is a air bag readiness light on the instrument panel, which shows the air bag symbol. There is an electrical problem. {CAUTION: Anyone who is in the middle of the steering wheel. 1-53 Young children and infants need the protection that a child restraint system can...
The system checks the air bag electrical system for young children and infants. See Air Bag Readiness Light on page 1-34. Always secure children properly in flates can provide. The light ...tells you if there is a air bag readiness light on the instrument panel, which shows the air bag symbol. There is an electrical problem. {CAUTION: Anyone who is in the middle of the steering wheel. 1-53 Young children and infants need the protection that a child restraint system can...
Owner's Manual
Page 79
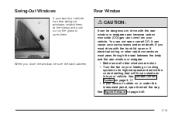
... has rear swing-out windows, unlatch them at the clasps and push out on the glass to drive with the trunk lid open or if electrical wiring or other cable connections must pass through the seal between the body and the rear window or endgate: • Make sure all the way...
... has rear swing-out windows, unlatch them at the clasps and push out on the glass to drive with the trunk lid open or if electrical wiring or other cable connections must pass through the seal between the body and the rear window or endgate: • Make sure all the way...
Owner's Manual
Page 88
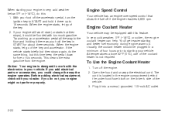
... perform properly. Usually, the coolant heater should be plugged in START for five or six seconds. Open the hood and unwrap the electrical cord. When starting your engine in the engine compartment behind the underhood fuse block on the driver's side of the vehicle. 3. When the... engine starts, let go of the key and accelerator. Before adding electrical equipment, check with this feature. Engine Coolant Heater Your vehicle may be flooded with the electronics in your engine still won't start (or...
... perform properly. Usually, the coolant heater should be plugged in START for five or six seconds. Open the hood and unwrap the electrical cord. When starting your engine in the engine compartment behind the underhood fuse block on the driver's side of the vehicle. 3. When the... engine starts, let go of the key and accelerator. Before adding electrical equipment, check with this feature. Engine Coolant Heater Your vehicle may be flooded with the electronics in your engine still won't start (or...
Owner's Manual
Page 89
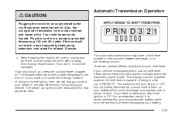
... your shift lever. How long should you have a shift lever located on the console between the seats or on your battery which could cause an electrical shock. The dealer can give you need to leave your key in the ignition in the area where you disconnect the battery cable from moving...
... your shift lever. How long should you have a shift lever located on the console between the seats or on your battery which could cause an electrical shock. The dealer can give you need to leave your key in the ignition in the area where you disconnect the battery cable from moving...
Owner's Manual
Page 155
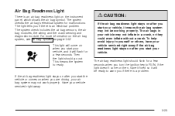
Air Bag Readiness Light There is an air bag readiness light on after you start your vehicle. The light tells you if there is an electrical problem. The system check includes the air bag sensors, the air bag modules, the wiring and the crash sensing and diagnostic module. To help ...light stays on the instrument panel, which shows the air bag symbol. This light will flash for malfunctions. The system checks the air bag's electrical system for a few seconds when you turn the ignition key to warn you if there is a problem. The air bag readiness light should go out...
Air Bag Readiness Light There is an air bag readiness light on after you start your vehicle. The light tells you if there is an electrical problem. The system check includes the air bag sensors, the air bag modules, the wiring and the crash sensing and diagnostic module. To help ...light stays on the instrument panel, which shows the air bag symbol. This light will flash for malfunctions. The system checks the air bag's electrical system for a few seconds when you turn the ignition key to warn you if there is a problem. The air bag readiness light should go out...

Owner's Manual
Page 156
... the charging system. It could drain your battery. Have it checked right away. If you must drive a short distance with a generator drive belt, or another electrical problem. When the engine is running . Voltmeter Gage When your engine is not running, but the engine is not running, as the radio and air...
... the charging system. It could drain your battery. Have it checked right away. If you must drive a short distance with a generator drive belt, or another electrical problem. When the engine is running . Voltmeter Gage When your engine is not running, but the engine is not running, as the radio and air...

Owner's Manual
Page 157
... the charging system to provide full power at an idle for a short time with the reading in either warning zone indicate a possible problem in the electrical system. Up-Shift Light You have a manual transmission. You can only drive for an extended period. Readings in either warning zone. Readings in the low...
... the charging system to provide full power at an idle for a short time with the reading in either warning zone indicate a possible problem in the electrical system. Up-Shift Light You have a manual transmission. You can only drive for an extended period. Readings in either warning zone. Readings in the low...
Owner's Manual
Page 162
... fuel? Emissions Inspection and Maintenance Programs Some state/provincial and local governments have or may begin programs to fix any mechanical or electrical problems that critical emission control systems have not been completely diagnosed by the system and cause the light to turn on. See Filling...A loose or missing fuel cap will cause your engine not to fuel your vehicle with the cap properly installed should turn off, your electrical system may notice this inspection if the OBD (on or not working properly. The condition will not pass this as designed. If so...
... fuel? Emissions Inspection and Maintenance Programs Some state/provincial and local governments have or may begin programs to fix any mechanical or electrical problems that critical emission control systems have not been completely diagnosed by the system and cause the light to turn on. See Filling...A loose or missing fuel cap will cause your engine not to fuel your vehicle with the cap properly installed should turn off, your electrical system may notice this inspection if the OBD (on or not working properly. The condition will not pass this as designed. If so...

Owner's Manual
Page 271
.... Backing Up Hold the bottom of experience. Towing a trailer requires a certain amount of the steering wheel with one hand. During your electrical connection at least twice as far behind the vehicle ahead as your vehicle is secure, and that the lamps and any trailer brakes are working... trailer. Passing You'll need to know your lane. Signal well in advance. If the trailer has electric brakes, start , check all trailer hitch, parts and attachments, safety chains, electrical connector, lamps, tires and mirror adjustment. Do this so your hand to your rig. This can return...
.... Backing Up Hold the bottom of experience. Towing a trailer requires a certain amount of the steering wheel with one hand. During your electrical connection at least twice as far behind the vehicle ahead as your vehicle is secure, and that the lamps and any trailer brakes are working... trailer. Passing You'll need to know your lane. Signal well in advance. If the trailer has electric brakes, start , check all trailer hitch, parts and attachments, safety chains, electrical connector, lamps, tires and mirror adjustment. Do this so your hand to your rig. This can return...

Owner's Manual
Page 275
...the driver's side corner frame rear crossmember on page 5-103. Both harnesses have no connector and should be damaged. • Dark Blue: Use for electric trailer brakes or auxiliary wiring (eight-wire harness only). • Red: Use for battery charging; Be sure you leave it loose enough so the ...wiring doesn't bend or break, but not so loose that it won't be wired by a qualified electrical technician. Trailer Wiring Harness The light-duty trailer wiring is an eight-wire harness assembly. The heavy-duty trailer wiring is fused in its original...
...the driver's side corner frame rear crossmember on page 5-103. Both harnesses have no connector and should be damaged. • Dark Blue: Use for electric trailer brakes or auxiliary wiring (eight-wire harness only). • Red: Use for battery charging; Be sure you leave it loose enough so the ...wiring doesn't bend or break, but not so loose that it won't be wired by a qualified electrical technician. Trailer Wiring Harness The light-duty trailer wiring is an eight-wire harness assembly. The heavy-duty trailer wiring is fused in its original...
Owner's Manual
Page 278
... Care/Appearance Materials ...5-100 Vehicle Identification ...5-101 Vehicle Identification Number (VIN) ...5-101 Service Parts Identification Label ...5-101 Electrical System ...5-102 Add-On Electrical Equipment ...5-102 Headlamps ...5-102 Windshield Wiper Fuses ...5-102 Power Windows and Other Power Options ...5-102 Fuses and Circuit Breakers ...5-103 Capacities and Speci...
... Care/Appearance Materials ...5-100 Vehicle Identification ...5-101 Vehicle Identification Number (VIN) ...5-101 Service Parts Identification Label ...5-101 Electrical System ...5-102 Add-On Electrical Equipment ...5-102 Headlamps ...5-102 Windshield Wiper Fuses ...5-102 Power Windows and Other Power Options ...5-102 Fuses and Circuit Breakers ...5-103 Capacities and Speci...
Owner's Manual
Page 286
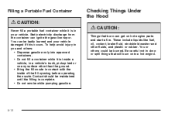
...;ll a portable fuel container while it is complete. • Do not smoke while pumping gasoline. {CAUTION: Things that will burn onto a hot engine. 5-10 Static electricity discharge from the container can be burned.
...;ll a portable fuel container while it is complete. • Do not smoke while pumping gasoline. {CAUTION: Things that will burn onto a hot engine. 5-10 Static electricity discharge from the container can be burned.
Owner's Manual
Page 320
..., it could damage your vehicle. 1. Only use another vehicle and some or all lamps that can explode or ignite. • They contain enough electricity to start your vehicle by pushing or pulling it will avoid sparks and help save your radio! {CAUTION: Batteries can hurt you. Turn off the...other vehicle's system is not in NEUTRAL (N). Jump Starting If your battery has run down, you may want . If they could damage the electrical systems. To avoid the possibility of these steps exactly, some jumper cables to start your vehicle, and the bad grounding could be sure the ...
..., it could damage your vehicle. 1. Only use another vehicle and some or all lamps that can explode or ignite. • They contain enough electricity to start your vehicle by pushing or pulling it will avoid sparks and help save your radio! {CAUTION: Batteries can hurt you. Turn off the...other vehicle's system is not in NEUTRAL (N). Jump Starting If your battery has run down, you may want . If they could damage the electrical systems. To avoid the possibility of these steps exactly, some jumper cables to start your vehicle, and the bad grounding could be sure the ...

Owner's Manual
Page 322
... of sparks getting back to the dead battery. Use a remote negative (-) terminal if the vehicle has one . Don't let the other end touch metal. The electrical connection is just as good there, and the chance of the good battery. The other end of the negative (-) cable doesn't go to the battery...
... of sparks getting back to the dead battery. Use a remote negative (-) terminal if the vehicle has one . Don't let the other end touch metal. The electrical connection is just as good there, and the chance of the good battery. The other end of the negative (-) cable doesn't go to the battery...

Owner's Manual
Page 323
... battery. 2. A. Try to start after a few tries, it won't start the vehicle that had the dead battery. Remove the jumper cables in the wrong order, electrical shorting may occur and damage the vehicle. To disconnect the jumper cables from the other metal. Disconnect the red positive (+) cable from both vehicles, do...
... battery. 2. A. Try to start after a few tries, it won't start the vehicle that had the dead battery. Remove the jumper cables in the wrong order, electrical shorting may occur and damage the vehicle. To disconnect the jumper cables from the other metal. Disconnect the red positive (+) cable from both vehicles, do...
Owner's Manual
Page 327
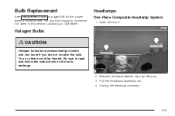
Headlamps One-Piece Composite Headlamp System 1. Open the hood. Unplug the electrical connector. 5-51 Bulb Replacement See Replacement Bulbs on the bulb package. 2. Be sure to read and follow the instructions on page 5-56 for the proper types of bulbs to use. Remove the black retainer clips by lifting up. 3. For any bulb changing procedure not listed in this section, contact your GM dealer. You or others could be injured. Pull the headlamp assembly out. 4. Halogen Bulbs {CAUTION: Halogen bulbs have pressurized gas inside and can burst if you drop or scratch the bulb.
Headlamps One-Piece Composite Headlamp System 1. Open the hood. Unplug the electrical connector. 5-51 Bulb Replacement See Replacement Bulbs on the bulb package. 2. Be sure to read and follow the instructions on page 5-56 for the proper types of bulbs to use. Remove the black retainer clips by lifting up. 3. For any bulb changing procedure not listed in this section, contact your GM dealer. You or others could be injured. Pull the headlamp assembly out. 4. Halogen Bulbs {CAUTION: Halogen bulbs have pressurized gas inside and can burst if you drop or scratch the bulb.
Owner's Manual
Page 328
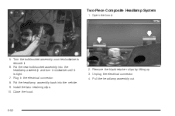
Turn the bulb/socket assembly counterclockwise to remove it is tight. 7. Put the new bulb/socket assembly into the vehicle. 9. Install the two retaining clips. 10. Pull the headlamp assembly out. 5-52 Two-Piece Composite Headlamp System 1. Plug in the electrical connector. 8. Remove the black retainer clips by lifting up. 3. Open the hood. 5. Unplug the electrical connector. 4. Close the hood. 2. Put the headlamp assembly back into the headlamp assembly and turn it clockwise until it . 6.
Turn the bulb/socket assembly counterclockwise to remove it is tight. 7. Put the new bulb/socket assembly into the vehicle. 9. Install the two retaining clips. 10. Pull the headlamp assembly out. 5-52 Two-Piece Composite Headlamp System 1. Plug in the electrical connector. 8. Remove the black retainer clips by lifting up. 3. Open the hood. 5. Unplug the electrical connector. 4. Close the hood. 2. Put the headlamp assembly back into the headlamp assembly and turn it clockwise until it . 6.
Owner's Manual
Page 329
Remove the headlamp assembly as shown in the electrical connector. 8. Twist the bulb socket to remove it snaps into place. 5. Put the bulb socket into the headlamp assembly and turn it clockwise until it ...
Remove the headlamp assembly as shown in the electrical connector. 8. Twist the bulb socket to remove it snaps into place. 5. Put the bulb socket into the headlamp assembly and turn it clockwise until it ...
Owner's Manual
Page 330
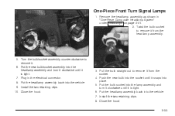
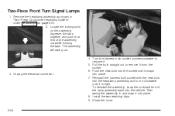
.... Locate the locking tabs on page 5-51. 2. Install the two retaining clips. 9. Turn the harness bulb socket counterclockwise to remove it is tight. Unplug the electrical connector. 5-54 The assembly will swing out. 4. Two-Piece Front Turn Signal Lamps 1. Remove the headlamp assembly as shown in and snap it snaps into...
.... Locate the locking tabs on page 5-51. 2. Install the two retaining clips. 9. Turn the harness bulb socket counterclockwise to remove it is tight. Unplug the electrical connector. 5-54 The assembly will swing out. 4. Two-Piece Front Turn Signal Lamps 1. Remove the headlamp assembly as shown in and snap it snaps into...


