
Owner's Manual
Page 74
Section 2 Features and Controls Rear Storage Area ...2-64 Cargo Cover Panels ...2-65 All-Weather Cargo Area ...2-75 Top-Box Storage ...2-80 Tonneau Cover ...2-81 Sunroof ...2-87 Vehicle Personalization ...2-88 Memory Seat ...2-88 OnStar® System ...2-57 HomeLink® Transmitter ...2-59 Programming the HomeLink® Transmitter ...2-59 Storage Areas ...2-63 Glove Box ...2-63 Center Overhead Console ...2-63 Front Armrest Storage Area ...2-63 Center Console Storage Area ...2-63 Luggage Carrier ...2-63 2-2
Section 2 Features and Controls Rear Storage Area ...2-64 Cargo Cover Panels ...2-65 All-Weather Cargo Area ...2-75 Top-Box Storage ...2-80 Tonneau Cover ...2-81 Sunroof ...2-87 Vehicle Personalization ...2-88 Memory Seat ...2-88 OnStar® System ...2-57 HomeLink® Transmitter ...2-59 Programming the HomeLink® Transmitter ...2-59 Storage Areas ...2-63 Glove Box ...2-63 Center Overhead Console ...2-63 Front Armrest Storage Area ...2-63 Center Console Storage Area ...2-63 Luggage Carrier ...2-63 2-2

Owner's Manual
Page 85
.... See Automatic Climate Control System on page 2-46. • Midgate Operation Your vehicle is equipped with a midgate and a removable rear glass panel. See Engine Exhaust on page 3-22. You can cause unconsciousness and even death. The midgate allows you must pass through the seal between the...the tailgate and midgate open because carbon monoxide (CO) gas can come into your vehicle's cargo area. 2-13 Midgate CAUTION: (Continued) {CAUTION: It can be dangerous to drive with the cargo area covered and the tailgate and the midgate open or if electrical wiring or other cable ...
.... See Automatic Climate Control System on page 2-46. • Midgate Operation Your vehicle is equipped with a midgate and a removable rear glass panel. See Engine Exhaust on page 3-22. You can cause unconsciousness and even death. The midgate allows you must pass through the seal between the...the tailgate and midgate open because carbon monoxide (CO) gas can come into your vehicle's cargo area. 2-13 Midgate CAUTION: (Continued) {CAUTION: It can be dangerous to drive with the cargo area covered and the tailgate and the midgate open or if electrical wiring or other cable ...

Owner's Manual
Page 137
... back, always be used as reference when removing, storing and reinstalling the panels. 2-65 Before removing the cargo panel(s), notice the numbers embossed on top of the panels. You or others could be equipped with the cargo panel storage bag. Cargo Cover Panels To remove a cargo panel(s), do the following: 1. The panels are also numbered labels on the bottom of the...
... back, always be used as reference when removing, storing and reinstalling the panels. 2-65 Before removing the cargo panel(s), notice the numbers embossed on top of the panels. You or others could be equipped with the cargo panel storage bag. Cargo Cover Panels To remove a cargo panel(s), do the following: 1. The panels are also numbered labels on the bottom of the...

Owner's Manual
Page 138
You only need to) in the same way and set it aside. 2-66 Remove cargo panel 2 (if you to remove as many cargo panels as needed for your cargo carrying needs. 4. Remove cargo panel 3 by pulling the left and right cargo panel latches, located on the bottom of each cargo panel, toward you need to unlock the cargo panel latches. 3. Pull the cargo panel up and then out from the side rails and set it aside. 2.
You only need to) in the same way and set it aside. 2-66 Remove cargo panel 2 (if you to remove as many cargo panels as needed for your cargo carrying needs. 4. Remove cargo panel 3 by pulling the left and right cargo panel latches, located on the bottom of each cargo panel, toward you need to unlock the cargo panel latches. 3. Pull the cargo panel up and then out from the side rails and set it aside. 2.
Owner's Manual
Page 139
After you have removed each cargo panel you need to), but notice that there are four latches to release (two left-side latches and two right-side latches). Cargo Panel Storage System The three cargo panels can store it within the cargo storage area using the storage bag. Set the panel aside. To store the panels, do the following: 5. Remove cargo panel 1 (if you can be stored on either the driver's or passenger's side of the cargo box using the cargo panel storage system. 2-67
After you have removed each cargo panel you need to), but notice that there are four latches to release (two left-side latches and two right-side latches). Cargo Panel Storage System The three cargo panels can store it within the cargo storage area using the storage bag. Set the panel aside. To store the panels, do the following: 5. Remove cargo panel 1 (if you can be stored on either the driver's or passenger's side of the cargo box using the cargo panel storage system. 2-67

Owner's Manual
Page 140
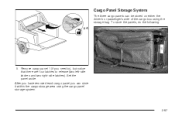
Secure the storage bag in the locked position. Use the following instructions for the proper storage sequence and location for each panel: Always use the storage bag to the tie-down locations on the cargo bag to store the cargo panels during driving. Before storing the cargo panels, be sure that the latches are parallel to the front and back edge of the storage area. 1. Panels 3, 2, 1 Loaded 2-68 The latches are in the locked position when they are in the cargo storage area by attaching the four clips on either side of the panel.
Secure the storage bag in the locked position. Use the following instructions for the proper storage sequence and location for each panel: Always use the storage bag to the tie-down locations on the cargo bag to store the cargo panels during driving. Before storing the cargo panels, be sure that the latches are parallel to the front and back edge of the storage area. 1. Panels 3, 2, 1 Loaded 2-68 The latches are in the locked position when they are in the cargo storage area by attaching the four clips on either side of the panel.

Owner's Manual
Page 141
3. Starting with cargo panel 1, load the cargo panel with latches down and facing toward you . 2-69 Store cargo panel 2 by loading the cargo panel with latches at the top of the bag and facing away from you . 2.
3. Starting with cargo panel 1, load the cargo panel with latches down and facing toward you . 2-69 Store cargo panel 2 by loading the cargo panel with latches at the top of the bag and facing away from you . 2.

Owner's Manual
Page 142
4. Store cargo panel 3 by pulling on the bag by loading the cargo panel with latches at the top of the straps. 2-70 Zip the bag shut. 6. Tighten both straps on the free end of the bag and facing toward you. 5.
4. Store cargo panel 3 by pulling on the bag by loading the cargo panel with latches at the top of the straps. 2-70 Zip the bag shut. 6. Tighten both straps on the free end of the bag and facing toward you. 5.
Owner's Manual
Page 143
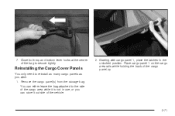
Close both top and bottom lever locks at the center of the bag to the side of the cargo area while it outside of the cargo panel up. 2-71 Remove the cargo panel(s) from the storage bag. Reinstalling the Cargo Cover Panels You only need to reinstall as many cargo panels as you can either leave the bag attached to secure tightly. Place cargo panel 1 on the cargo area rails while holding the back of the vehicle. 2. Starting with cargo panel 1, place the latches in use, or you wish. 1. 7. You can store it is not in the unlocked position.
Close both top and bottom lever locks at the center of the bag to the side of the cargo area while it outside of the cargo panel up. 2-71 Remove the cargo panel(s) from the storage bag. Reinstalling the Cargo Cover Panels You only need to reinstall as many cargo panels as you can either leave the bag attached to secure tightly. Place cargo panel 1 on the cargo area rails while holding the back of the vehicle. 2. Starting with cargo panel 1, place the latches in use, or you wish. 1. 7. You can store it is not in the unlocked position.
Owner's Manual
Page 144
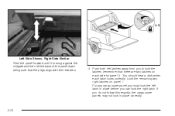
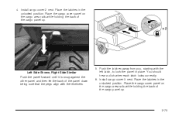
For any cargo cover panel you must lock the left latches away from you can lock the right latch. You should hear a click when each side for panel 1). Lock the remaining two right latches on each latch locks correctly. Left Side Shown, Right Side Similar Push the panel forward until it is snug against... the midgate and then let the back of the panel down being sure that there are two latches on panel 1. Push both left latch in place correctly. 2-72 If you do not follow this exactly, the cargo cover panels may not lock in place before you to lock the latches (...
For any cargo cover panel you must lock the left latches away from you can lock the right latch. You should hear a click when each side for panel 1). Lock the remaining two right latches on each latch locks correctly. Left Side Shown, Right Side Similar Push the panel forward until it is snug against... the midgate and then let the back of the panel down being sure that there are two latches on panel 1. Push both left latch in place correctly. 2-72 If you do not follow this exactly, the cargo cover panels may not lock in place before you to lock the latches (...
Owner's Manual
Page 145
...latch, to lock the panel in place. Install cargo cover 3 next. Install cargo cover 2 next. Place the latches in the unlocked position. Left Side Shown, Right Side Similar Push the panel forward until it is snug against the other panel and then let the back of the cargo panel up . 2-73 ...Push the latches away from you, starting with the receivers. 5. Place the cargo cover panel on the cargo area rails while holding the back of the cargo panel up . You should...
...latch, to lock the panel in place. Install cargo cover 3 next. Install cargo cover 2 next. Place the latches in the unlocked position. Left Side Shown, Right Side Similar Push the panel forward until it is snug against the other panel and then let the back of the cargo panel up . 2-73 ...Push the latches away from you, starting with the receivers. 5. Place the cargo cover panel on the cargo area rails while holding the back of the cargo panel up . You should...

Owner's Manual
Page 147
... is equipped with features to strap cargo in. For more information see "Cargo Cover Panels" earlier in this section and Tonneau Cover on page 2-81. 2-75 Cargo Tie Downs All-Weather Cargo Area Your vehicle has the ability to operate in many different configurations (cargo panels on or off, midgate up or... down, rear glass in or out), allowing the cargo and passenger area to be present in the ...
... is equipped with features to strap cargo in. For more information see "Cargo Cover Panels" earlier in this section and Tonneau Cover on page 2-81. 2-75 Cargo Tie Downs All-Weather Cargo Area Your vehicle has the ability to operate in many different configurations (cargo panels on or off, midgate up or... down, rear glass in or out), allowing the cargo and passenger area to be present in the ...
Owner's Manual
Page 149
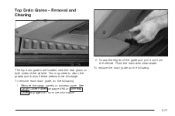
To replace the drain grate do the following : 2-77 Remove the cargo panels or tonneau cover. To remove each drain grate, do the following : 1. Flush the drain with clean water. See Cargo Cover Panels on page 2-65 or Tonneau Cover on both sides of the grate and pull it out from the vehicle. The top drain grates are located near the rear glass on page 2-81 for more information. Top Drain Grates - Removal and Cleaning 2. You may need to clean the grates and drains if there seems to be blockage. Grasp the edges of the vehicle.
To replace the drain grate do the following : 2-77 Remove the cargo panels or tonneau cover. To remove each drain grate, do the following : 1. Flush the drain with clean water. See Cargo Cover Panels on page 2-65 or Tonneau Cover on both sides of the grate and pull it out from the vehicle. The top drain grates are located near the rear glass on page 2-81 for more information. Top Drain Grates - Removal and Cleaning 2. You may need to clean the grates and drains if there seems to be blockage. Grasp the edges of the vehicle.
Owner's Manual
Page 167
B. C. Cargo/Top-Box Lamps Button. See Traction Assist System (TAS) on page 3-107. See OnStar® System on page 2-57 and Audio Steering Wheel Controls on page 4-9. F. See Instrument Panel Cluster on page 3-19. Audio System. See Interior Lamps on page 3-32. See...page 3-21 and Accessory Power Outlets on page 3-68. Q. G. See Audio System(s) on page 3-21. Dome Override Button. K. M. Instrument Panel Cluster. See Automatic Transmission Operation on page 2-36. P. Air Outlets. Automatic Transfer Case Buttons (If Equipped). See Four-Wheel Drive on page ...
B. C. Cargo/Top-Box Lamps Button. See Traction Assist System (TAS) on page 3-107. See OnStar® System on page 2-57 and Audio Steering Wheel Controls on page 4-9. F. See Instrument Panel Cluster on page 3-19. Audio System. See Interior Lamps on page 3-32. See...page 3-21 and Accessory Power Outlets on page 3-68. Q. G. See Audio System(s) on page 3-21. Dome Override Button. K. M. Instrument Panel Cluster. See Automatic Transmission Operation on page 2-36. P. Air Outlets. Automatic Transfer Case Buttons (If Equipped). See Four-Wheel Drive on page ...

Owner's Manual
Page 180
... symbol light will only have the snow plow prep package. If your vehicle has this button, your vehicle may have one cargo lamp in the cargo area of the instrument panel near the button. For further information see Adding a Snow Plow or Similar Equipment on or off the roof mounted lamp. ... this button includes wiring provisions for a dealer or a qualified service center to turn off . Some vehicles will come on in the instrument panel cluster when the cargo lamps are on and the ignition key is located on the center of your vehicle or in the top-box storage units...
... symbol light will only have the snow plow prep package. If your vehicle has this button, your vehicle may have one cargo lamp in the cargo area of the instrument panel near the button. For further information see Adding a Snow Plow or Similar Equipment on or off the roof mounted lamp. ... this button includes wiring provisions for a dealer or a qualified service center to turn off . Some vehicles will come on in the instrument panel cluster when the cargo lamps are on and the ignition key is located on the center of your vehicle or in the top-box storage units...

Owner's Manual
Page 340
... the Trailer How heavy can a trailer safely be covered by your warranty. Weight of additional optional equipment, passengers and cargo in the tow vehicle and it has all important. A light on the instrument panel will illuminate to determine how much your vehicle is required on K-1500 models. Above the 5,000 lbs. (2 268...
... the Trailer How heavy can a trailer safely be covered by your warranty. Weight of additional optional equipment, passengers and cargo in the tow vehicle and it has all important. A light on the instrument panel will illuminate to determine how much your vehicle is required on K-1500 models. Above the 5,000 lbs. (2 268...
Owner's Manual
Page 468
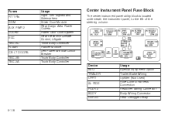
... DDM AUX PWR 2 LOCKS ECC TBC 2C FLASH CB LT DOORS TBC 2B TBC 2A Usage Right Turn Signals and Sidemarkers Driver Door Module Rear Cargo Area Power Outlets Power Door Lock System Rear Electronic Climate Control, Liftgate Truck Body Controller Flasher Module Left Power Window Circuit Breaker Truck Body Controller...
... DDM AUX PWR 2 LOCKS ECC TBC 2C FLASH CB LT DOORS TBC 2B TBC 2A Usage Right Turn Signals and Sidemarkers Driver Door Module Rear Cargo Area Power Outlets Power Door Lock System Rear Electronic Climate Control, Liftgate Truck Body Controller Flasher Module Left Power Window Circuit Breaker Truck Body Controller...

Owner's Manual
Page 471
... Center Power Feed, Front Seats, Right Doors Front Climate Control Fan Left Bussed Electrical Center, Door Modules, Door Locks, Auxiliary Power Outlet-Rear Cargo Area and Instrument Panel Accessory Power/Trailer Wiring Brake Feed Anti-Lock Brakes Vehicle Stability Ignition Power Ignition Power Fuses LBEC 1 TRL PARK RR PARK LR PARK PARK...
... Center Power Feed, Front Seats, Right Doors Front Climate Control Fan Left Bussed Electrical Center, Door Modules, Door Locks, Auxiliary Power Outlet-Rear Cargo Area and Instrument Panel Accessory Power/Trailer Wiring Brake Feed Anti-Lock Brakes Vehicle Stability Ignition Power Ignition Power Fuses LBEC 1 TRL PARK RR PARK LR PARK PARK...

Owner's Manual
Page 509
Care of Safety Belts ...5-107 Your CD and DVD Player ...3-108 Your CDs and DVDs ...3-108 Cargo Area, All-Weather ...2-75 Cargo Area Floor Drains ...2-80 Cargo Cover Panels ...2-65 Cargo Lamps ...3-18 Cargo Panel Storage System ...2-67 Cargo Tie Downs ...2-75 CD Messages ...3-80, 3-94 Center Console Storage Area ...2-63 Center Front Passenger Position, Safety Belts ...1-22 Center...
Care of Safety Belts ...5-107 Your CD and DVD Player ...3-108 Your CDs and DVDs ...3-108 Cargo Area, All-Weather ...2-75 Cargo Area Floor Drains ...2-80 Cargo Cover Panels ...2-65 Cargo Lamps ...3-18 Cargo Panel Storage System ...2-67 Cargo Tie Downs ...2-75 CD Messages ...3-80, 3-94 Center Console Storage Area ...2-63 Center Front Passenger Position, Safety Belts ...1-22 Center...
Owner's Manual
Page 518
... with OnStar®, Compass and Temperature Display ...2-48 Reclining Seatbacks ...1-5 Recommended Fluids and Lubricants ...6-13 Recreational Vehicle Towing ...4-51 REDUCED ENGINE POWER ...3-62 Reinstalling the Cargo Cover Panels ...2-71 Remote Control ...3-98 Remote Keyless Entry System ...2-4 Remote Keyless Entry System Operation ...2-5 Removing the Flat Tire and Installing the Spare Tire ...5-89 Removing...
... with OnStar®, Compass and Temperature Display ...2-48 Reclining Seatbacks ...1-5 Recommended Fluids and Lubricants ...6-13 Recreational Vehicle Towing ...4-51 REDUCED ENGINE POWER ...3-62 Reinstalling the Cargo Cover Panels ...2-71 Remote Control ...3-98 Remote Keyless Entry System ...2-4 Remote Keyless Entry System Operation ...2-5 Removing the Flat Tire and Installing the Spare Tire ...5-89 Removing...


