
Owner's Manual
Page 1
2004 Chevrolet Avalanche Owner Manual Seats and Restraint Systems ...1-1 Front Seats ...1-2 Rear Seats ...1-7 Safety Belts ...1-9 Child Restraints ...1-30 Air Bag Systems ...1-50 Restraint System Check ...1-65 Features and Controls ...2-1 Keys ...2-3 Doors and Locks ...2-8 Windows ...2-24 Theft-Deterrent Systems ...2-26 Starting and Operating Your Vehicle ...2-28 Mirrors ...2-48 OnStar® System ...2-57 HomeLink® Transmitter ...2-59...
2004 Chevrolet Avalanche Owner Manual Seats and Restraint Systems ...1-1 Front Seats ...1-2 Rear Seats ...1-7 Safety Belts ...1-9 Child Restraints ...1-30 Air Bag Systems ...1-50 Restraint System Check ...1-65 Features and Controls ...2-1 Keys ...2-3 Doors and Locks ...2-8 Windows ...2-24 Theft-Deterrent Systems ...2-26 Starting and Operating Your Vehicle ...2-28 Mirrors ...2-48 OnStar® System ...2-57 HomeLink® Transmitter ...2-59...

Owner's Manual
Page 43
Some booster seats have a shoulder belt positioner, and some high-back booster seats have a five-point harness. A booster seat can also help a child to improve the fit of the vehicle's safety belt system. A booster seat (F-G) is a child restraint designed to see out the window. 1-37 A forward-facing child seat (C-E) provides restraint for the child's body with the harness and also sometimes with surfaces such as T-shaped or shelf-like shields.
Some booster seats have a shoulder belt positioner, and some high-back booster seats have a five-point harness. A booster seat can also help a child to improve the fit of the vehicle's safety belt system. A booster seat (F-G) is a child restraint designed to see out the window. 1-37 A forward-facing child seat (C-E) provides restraint for the child's body with the harness and also sometimes with surfaces such as T-shaped or shelf-like shields.

Owner's Manual
Page 64
.... For vehicles with you 'll need some smoke and dust coming from the right front passenger air bag. • Air bags are broken by opening a window or a door. There will be hot for the right front passenger's frontal air bag. A new system will be hot. Some components of the air bag...
.... For vehicles with you 'll need some smoke and dust coming from the right front passenger air bag. • Air bags are broken by opening a window or a door. There will be hot for the right front passenger's frontal air bag. A new system will be hot. Some components of the air bag...
Owner's Manual
Page 73
... ...2-8 Door Locks ...2-8 Power Door Locks ...2-9 Delayed Locking ...2-9 Programmable Automatic Door Locks ...2-10 Rear Door Security Locks ...2-12 Lockout Protection ...2-12 Midgate ...2-13 Tailgate ...2-22 Windows ...2-24 Power Windows ...2-25 Sun Visors ...2-25 Theft-Deterrent Systems ...2-26 Content Theft-Deterrent ...2-26 Passlock® ...2-28 Starting and Operating Your Vehicle ...2-28 New Vehicle Break...
... ...2-8 Door Locks ...2-8 Power Door Locks ...2-9 Delayed Locking ...2-9 Programmable Automatic Door Locks ...2-10 Rear Door Security Locks ...2-12 Lockout Protection ...2-12 Midgate ...2-13 Tailgate ...2-22 Windows ...2-24 Power Windows ...2-25 Sun Visors ...2-25 Theft-Deterrent Systems ...2-26 Content Theft-Deterrent ...2-26 Passlock® ...2-28 Starting and Operating Your Vehicle ...2-28 New Vehicle Break...

Owner's Manual
Page 75
The children or others could operate the power windows or other controls or even make the vehicle move. Do not leave the keys in a vehicle with children. 2-3 They could be badly injured or even killed. Keys {CAUTION: Leaving children in a vehicle with the ignition key is dangerous for many reasons.
The children or others could operate the power windows or other controls or even make the vehicle move. Do not leave the keys in a vehicle with children. 2-3 They could be badly injured or even killed. Keys {CAUTION: Leaving children in a vehicle with the ignition key is dangerous for many reasons.

Owner's Manual
Page 85
... death. Midgate CAUTION: (Continued) {CAUTION: It can be dangerous to drive with the cargo area covered and the tailgate and the midgate open them all windows are shut. • Turn the fan on your heating or cooling system to extend the length of your vehicle's cargo area. 2-13 See Engine Exhaust...
... death. Midgate CAUTION: (Continued) {CAUTION: It can be dangerous to drive with the cargo area covered and the tailgate and the midgate open them all windows are shut. • Turn the fan on your heating or cooling system to extend the length of your vehicle's cargo area. 2-13 See Engine Exhaust...
Owner's Manual
Page 86
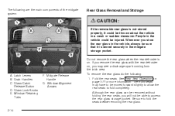
... that it could be injured. Be sure to access the rear glass storage pocket. Whenever you may have to fold completely. Latch Levers B. Window Alignment Arrows To remove the rear glass do the following are the main components of the midgate system: Rear Glass Removal and Storage {CAUTION: ... seats, you remove the rear glass with the rear defroster on page 1-7 for more information. Midgate Release Handle G. Glass-Catch Release Button D. Window Retaining Tabs F. Although the rear glass can be able to fold the seats before removing the rear glass. 2-14 The following : 1.
... that it could be injured. Be sure to access the rear glass storage pocket. Whenever you may have to fold completely. Latch Levers B. Window Alignment Arrows To remove the rear glass do the following are the main components of the midgate system: Rear Glass Removal and Storage {CAUTION: ... seats, you remove the rear glass with the rear defroster on page 1-7 for more information. Midgate Release Handle G. Glass-Catch Release Button D. Window Retaining Tabs F. Although the rear glass can be able to fold the seats before removing the rear glass. 2-14 The following : 1.
Owner's Manual
Page 88
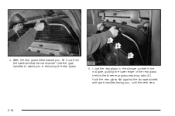
Hold the rear glass flat against the storage pocket, with grab handles facing you , lift it out from the lower window frame channel. Load the rear glass in the storage pocket in removing the rear glass. 5. With the rear glass tilted toward you , until the next step. 2-16 Use the grab handles to assist you in the midgate, guiding the lower edge of the rear glass behind the three rear glass retaining tabs (E). 4.
Hold the rear glass flat against the storage pocket, with grab handles facing you , lift it out from the lower window frame channel. Load the rear glass in the storage pocket in removing the rear glass. 5. With the rear glass tilted toward you , until the next step. 2-16 Use the grab handles to assist you in the midgate, guiding the lower edge of the rear glass behind the three rear glass retaining tabs (E). 4.
Owner's Manual
Page 90
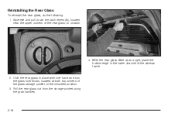
Hold the rear glass in the lower channel of the window frame. 2. Pull the rear glass out from the storage pocket using the grab handles. 2-18 With the rear glass tilted at an angle, place the bottom edge in place with one hand and turn the glass lock knobs, located at both top corners of the rear glass, to the unlocked position. 3. Squeeze and pull down the latch levers (A), located near the upper corners of the glass storage pocket, to unlatch. 4. Reinstalling the Rear Glass To reinstall the rear glass, do the following: 1.
Hold the rear glass in the lower channel of the window frame. 2. Pull the rear glass out from the storage pocket using the grab handles. 2-18 With the rear glass tilted at an angle, place the bottom edge in place with one hand and turn the glass lock knobs, located at both top corners of the rear glass, to the unlocked position. 3. Squeeze and pull down the latch levers (A), located near the upper corners of the glass storage pocket, to unlatch. 4. Reinstalling the Rear Glass To reinstall the rear glass, do the following: 1.
Owner's Manual
Page 91
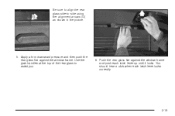
Push the rear glass flat against the window frame and push each latch lever locks correctly. 2-19 Use the grab handles at the top of the rear glass to -side using the alignment arrows (G) as shown in the picture. 5. You should hear a click when each latch lever up until it locks. Be sure to align the rear glass side-to assist you. 6. Apply a firm downward pressure and then push the rear glass flat against the window frame.
Push the rear glass flat against the window frame and push each latch lever locks correctly. 2-19 Use the grab handles at the top of the rear glass to -side using the alignment arrows (G) as shown in the picture. 5. You should hear a click when each latch lever up until it locks. Be sure to align the rear glass side-to assist you. 6. Apply a firm downward pressure and then push the rear glass flat against the window frame.

Owner's Manual
Page 96
Never leave a child, a helpless adult, or a pet alone in a vehicle, especially with the windows closed in a vehicle with the windows closed is dangerous. Windows {CAUTION: Leaving children, helpless adults, or pets in warm or hot weather. 2-24 They can be overcome by the extreme heat and suffer permanent injuries or even death from heat stroke.
Never leave a child, a helpless adult, or a pet alone in a vehicle, especially with the windows closed in a vehicle with the windows closed is dangerous. Windows {CAUTION: Leaving children, helpless adults, or pets in warm or hot weather. 2-24 They can be overcome by the extreme heat and suffer permanent injuries or even death from heat stroke.
Owner's Manual
Page 97
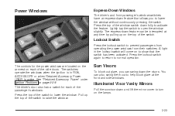
... them out to help block glare at any time by pulling up the top of the window switch down fully to lower the window. You can be interrupted at the front and side windows. The controls for each of the switch to activate the feature. The switches operate the...swing down the visors. Illuminated Visor Vanity Mirrors Pull the sunvisor down and lift the mirror cover to open the window slightly. Power Windows Express-Down Windows The driver's and front passenger's window switches have an express-down feature that the switch has been activated. A light in RUN, ACCESSORY or when...
... them out to help block glare at any time by pulling up the top of the window switch down fully to lower the window. You can be interrupted at the front and side windows. The controls for each of the switch to activate the feature. The switches operate the...swing down the visors. Illuminated Visor Vanity Mirrors Pull the sunvisor down and lift the mirror cover to open the window slightly. Power Windows Express-Down Windows The driver's and front passenger's window switches have an express-down feature that the switch has been activated. A light in RUN, ACCESSORY or when...

Owner's Manual
Page 99
...If the alarm does not sound or the headlamps do not flash, the vehicle should be blown. From inside the vehicle, lower the driver's window and open the door. You can also turn off the alarm by accident: Testing the Alarm The alarm can start your dealer. • If you... the door and wait for the security light to see Fuses and Circuit Breakers on the remote keyless entry transmitter. Then reach in through the window, unlock the door with the remote keyless entry transmitter. 3. Activate the system by pressing unlock on page 5-114. While the alarm is set off ...
...If the alarm does not sound or the headlamps do not flash, the vehicle should be blown. From inside the vehicle, lower the driver's window and open the door. You can also turn off the alarm by accident: Testing the Alarm The alarm can start your dealer. • If you... the door and wait for the security light to see Fuses and Circuit Breakers on the remote keyless entry transmitter. Then reach in through the window, unlock the door with the remote keyless entry transmitter. 3. Activate the system by pressing unlock on page 5-114. While the alarm is set off ...
Owner's Manual
Page 101
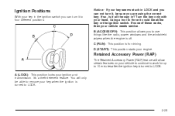
Using a tool to use things like the radio, power windows and the windshield wipers when the engine is turned to work for driving. It's a theft-deterrent feature. Turn the key only with your engine. B (ACCESSORY): ...
Using a tool to use things like the radio, power windows and the windshield wipers when the engine is turned to work for driving. It's a theft-deterrent feature. Turn the key only with your engine. B (ACCESSORY): ...

Owner's Manual
Page 118
If you ever suspect exhaust is better not to park with all the windows down to know. 2-46 CAUTION: (Continued) • Repairs were not done correctly. • Your vehicle or exhaust system had been modified improperly. Running ...
If you ever suspect exhaust is better not to park with all the windows down to know. 2-46 CAUTION: (Continued) • Repairs were not done correctly. • Your vehicle or exhaust system had been modified improperly. Running ...

Owner's Manual
Page 123
... correctly. For more information, see Passenger Sensing System on the mirror glass, just above the buttons. The mirror also includes a display in the mirror compass windows. When on the mirror as that may be displayed in the upper right corner of the following occurs: Cleaning the Mirror When cleaning the mirror...
... correctly. For more information, see Passenger Sensing System on the mirror glass, just above the buttons. The mirror also includes a display in the mirror compass windows. When on the mirror as that may be displayed in the upper right corner of the following occurs: Cleaning the Mirror When cleaning the mirror...

Owner's Manual
Page 125
... reads a direction. Compass variance is set in circles at five mph (8 km/h) or less until the new zone number appears in the mirror compass windows. The compass can be necessary to adjust for compass variance: 1. To adjust for compass variance.
... reads a direction. Compass variance is set in circles at five mph (8 km/h) or less until the new zone number appears in the mirror compass windows. The compass can be necessary to adjust for compass variance: 1. To adjust for compass variance.
Owner's Manual
Page 128
... this new position is saved in allowing you to the desired position while the vehicle is in REVERSE (R). If your vehicle has a rear window defogger, it will cause the passenger's and/or driver's mirror to tilt to a preselected position when the vehicle is shifted out of the... glare of REVERSE (R), this button. When the vehicle is located on page 3-22 for more information. Press this feature. See "Rear Window Defogger" under Automatic Climate Control System on the climate control panel. This feature may be enabled/disabled through the Driver Information Center.
... this new position is saved in allowing you to the desired position while the vehicle is in REVERSE (R). If your vehicle has a rear window defogger, it will cause the passenger's and/or driver's mirror to tilt to a preselected position when the vehicle is shifted out of the... glare of REVERSE (R), this button. When the vehicle is located on page 3-22 for more information. Press this feature. See "Rear Window Defogger" under Automatic Climate Control System on the climate control panel. This feature may be enabled/disabled through the Driver Information Center.

Owner's Manual
Page 172
... set the wiper speed for a long or short delay between wipes. If your washer until the wipers start. Hold it . The wipers will clear the window and then either stop or return to your preset speed. 8(Mist): For a single wiping cycle, turn the band to clear ice and snow from you...
... set the wiper speed for a long or short delay between wipes. If your washer until the wipers start. Hold it . The wipers will clear the window and then either stop or return to your preset speed. 8(Mist): For a single wiping cycle, turn the band to clear ice and snow from you...

Owner's Manual
Page 187
... temperature and an arrow for five seconds, 9(Off): • the current passenger's set temperature setting and an arrow for extended periods of the vehicle's windows. After ten seconds, the display will be changed by pressing the mode button. Outside air will still enter the vehicle, and will change to turn...
... temperature and an arrow for five seconds, 9(Off): • the current passenger's set temperature setting and an arrow for extended periods of the vehicle's windows. After ten seconds, the display will be changed by pressing the mode button. Outside air will still enter the vehicle, and will change to turn...


