Owner's Manual
Page 12
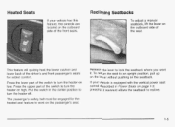
..., pull up on the lever without pushing on page 1-3, pressing it . Press the lower part of the front seats. Reclining Seatbacks To adjust a manual seatback, lift the lever on low. Heated Seats If your vehicle is equipped with the vertical power seat control described in the center position to turn the...
..., pull up on the lever without pushing on page 1-3, pressing it . Press the lower part of the front seats. Reclining Seatbacks To adjust a manual seatback, lift the lever on low. Heated Seats If your vehicle is equipped with the vertical power seat control described in the center position to turn the...

Owner's Manual
Page 15
... up until they haven't, see your dealer for more cargo space. The head restraint will automatically fold out of the seatbacks. To raise the seatbacks, lift up on the rear of the way when the seatback is folded down. 1-8 To return the head restraints to check that the latches have locked...
... up until they haven't, see your dealer for more cargo space. The head restraint will automatically fold out of the seatbacks. To raise the seatbacks, lift up on the rear of the way when the seatback is folded down. 1-8 To return the head restraints to check that the latches have locked...
Owner's Manual
Page 16
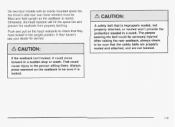
... the spare tire and prevent the seatback from properly latching. If they have locked in a crash. After raising the rear seatback, always check to be lifted and held upright as the seatback is locked. 1-9 Always to press rearward on the head restraints to the person sitting there. That could move forward...
... the spare tire and prevent the seatback from properly latching. If they have locked in a crash. After raising the rear seatback, always check to be lifted and held upright as the seatback is locked. 1-9 Always to press rearward on the head restraints to the person sitting there. That could move forward...

Owner's Manual
Page 81
... tailgate. You may also use the keyless entry system, or the power door locks (if equipped). When the doors are unlocked, press the button to lift the handle and open the glass. All the doors will lock. 2-14 The tailgate glass will not release if the vehicle is unlocked. It is...
... tailgate. You may also use the keyless entry system, or the power door locks (if equipped). When the doors are unlocked, press the button to lift the handle and open the glass. All the doors will lock. 2-14 The tailgate glass will not release if the vehicle is unlocked. It is...

Owner's Manual
Page 115
... To open while you are driving. Overhead Console Installing a Garage Door Opener To install the garage door opener, do the following: 1. If your glove box, lift the lever on and off. Reading Lamps Press the button near each lamp to point in the desired direction. The lamps can also be open...
... To open while you are driving. Overhead Console Installing a Garage Door Opener To install the garage door opener, do the following: 1. If your glove box, lift the lever on and off. Reading Lamps Press the button near each lamp to point in the desired direction. The lamps can also be open...

Owner's Manual
Page 121
...least two seconds. You can only be displayed briefly once the system is reset. Front Storage Area If your vehicle has the center armrest compartment, lift the cover to open it. Reset can store cassettes and compact discs in the slots in and release on the front of the compartment. 2-... will have a console with pop-out cupholders located on the cupholder door. If your vehicle has this console compartment, squeeze the front lever while lifting the top to expose the storage area. All functions will be performed in the AVG ECON, FUEL USED and AVG SPEED modes. To reset the...
...least two seconds. You can only be displayed briefly once the system is reset. Front Storage Area If your vehicle has the center armrest compartment, lift the cover to open it. Reset can store cassettes and compact discs in the slots in and release on the front of the compartment. 2-... will have a console with pop-out cupholders located on the cupholder door. If your vehicle has this console compartment, squeeze the front lever while lifting the top to expose the storage area. All functions will be performed in the AVG ECON, FUEL USED and AVG SPEED modes. To reset the...

Owner's Manual
Page 273
You or others could be burned. Be careful not to drop or spill things that will burn onto hot engine. Checking Things Under the Hood Hood Release To open the hood, do the following: 1. Things th burn can get on the lower left side of the instrument panel. Pull the handle located inside the vehicle on hot engine parts and start a fire. Lift the hood. 5-10 These include liquids like fuel, oil, coolant, brake fluid, windshield washer and other fluids, and plastic or rubber. a 2.
You or others could be burned. Be careful not to drop or spill things that will burn onto hot engine. Checking Things Under the Hood Hood Release To open the hood, do the following: 1. Things th burn can get on the lower left side of the instrument panel. Pull the handle located inside the vehicle on hot engine parts and start a fire. Lift the hood. 5-10 These include liquids like fuel, oil, coolant, brake fluid, windshield washer and other fluids, and plastic or rubber. a 2.

Owner's Manual
Page 274
Then lift the hood to close. 3. Release the hood prop from its retainer and put the hood prop into the slot in the hood and return the prop to 30 cm) without pressing on the hood. 5-1 1 Before closing the hood, be sure all the filler caps are on the hood prop. Then, pull the hood down firmly to relieve pressure on properly. Remove the hood prop from about 10 to 12 inches (25 to its retainer. It will latch when dropped from the slot in the hood.
Then lift the hood to close. 3. Release the hood prop from its retainer and put the hood prop into the slot in the hood and return the prop to 30 cm) without pressing on the hood. 5-1 1 Before closing the hood, be sure all the filler caps are on the hood prop. Then, pull the hood down firmly to relieve pressure on properly. Remove the hood prop from about 10 to 12 inches (25 to its retainer. It will latch when dropped from the slot in the hood.
Owner's Manual
Page 281
... engine fire.And, dirt can cause you do the following: 1. on page 5-96 to determine which will damage it stops flame if the engine backfires. Lift out the engine air cleaner/filter. If you or others to replace the engine air cleaner/filter. Insert a new air filter, if needed. Refer to...
... engine fire.And, dirt can cause you do the following: 1. on page 5-96 to determine which will damage it stops flame if the engine backfires. Lift out the engine air cleaner/filter. If you or others to replace the engine air cleaner/filter. Insert a new air filter, if needed. Refer to...
Owner's Manual
Page 291
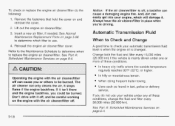
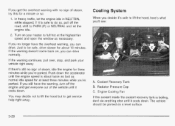
... no longer have the warning, turn off the road, shift to PARK (P) or NEUTRAL and let the engine idle. 2. You may decide not to lift the hood but to be parked on , you can drive normally. If you still have the overheat warning, you can drive. Coolant Recovery Tank B. Turn... level surface. 5-28 A. Radiator Pressure Cap C.Engine Cooling Fan If the coolant inside the coolant recovery tank is about 10 minutes. If it 's safe to lift the hood, here's what you 're parked. The vehicle should be safe, drive slower for about twice as fast as normal idle speed for a minute...
... no longer have the warning, turn off the road, shift to PARK (P) or NEUTRAL and let the engine idle. 2. You may decide not to lift the hood but to be parked on , you can drive normally. If you still have the overheat warning, you can drive. Coolant Recovery Tank B. Turn... level surface. 5-28 A. Radiator Pressure Cap C.Engine Cooling Fan If the coolant inside the coolant recovery tank is about 10 minutes. If it 's safe to lift the hood, here's what you 're parked. The vehicle should be safe, drive slower for about twice as fast as normal idle speed for a minute...

Owner's Manual
Page 312
Headlamps One-Piece Composite Headlamp System 1. I 2. Remove the black retainer clips by lifting up. 3. Pull the headlamp assembly out. 4. Unplug the electrical connector. 5-49 For any bulb changing procedure not listed in this section, contact your GM dealer. You or others could be injured. Halogen Bulbs Halogen bulbs have pressurized gas inside and can burst if you drop or scratch the bulb. Be sure to use. Bulb Replacement See Replacement Bulbs on page 5-53 for the proper types of bulbs to read and follow the instructions on the bulb package. Open the hood.
Headlamps One-Piece Composite Headlamp System 1. I 2. Remove the black retainer clips by lifting up. 3. Pull the headlamp assembly out. 4. Unplug the electrical connector. 5-49 For any bulb changing procedure not listed in this section, contact your GM dealer. You or others could be injured. Halogen Bulbs Halogen bulbs have pressurized gas inside and can burst if you drop or scratch the bulb. Be sure to use. Bulb Replacement See Replacement Bulbs on page 5-53 for the proper types of bulbs to read and follow the instructions on the bulb package. Open the hood.

Owner's Manual
Page 313
Open the hood. 5. Plug in the electrical connector. 2. Install the two retaining clips. Turn the bulb/socket assembly counterclockwise to remove it is tight. 7. Pull the headlamp assembly out. 8. IO. Close the hood. 5-50 Put the headlamp assembly back into the headlamp assembly and turn it clockwise until it . 6. Remove the black retainer clips by lifting up. 3. Put the new bulb/socket assembly into the vehicle. 9. Two-Piece Composite Headlamp System 1.
Open the hood. 5. Plug in the electrical connector. 2. Install the two retaining clips. Turn the bulb/socket assembly counterclockwise to remove it is tight. 7. Pull the headlamp assembly out. 8. IO. Close the hood. 5-50 Put the headlamp assembly back into the headlamp assembly and turn it clockwise until it . 6. Remove the black retainer clips by lifting up. 3. Put the new bulb/socket assembly into the vehicle. 9. Two-Piece Composite Headlamp System 1.

Owner's Manual
Page 317
... Normal Maintenance Replacement Partson page 5-96. Accidental bumping can cause the arm to fall back and strike the windshield. 1. To remove the old wiper blades, lift the wiper arm until it locks into a vertical position. 5-54 Replacement blades come in different types and are removed in different ways. See "Wiper Blade...
... Normal Maintenance Replacement Partson page 5-96. Accidental bumping can cause the arm to fall back and strike the windshield. 1. To remove the old wiper blades, lift the wiper arm until it locks into a vertical position. 5-54 Replacement blades come in different types and are removed in different ways. See "Wiper Blade...

Owner's Manual
Page 333
Using the wheel wrench, loosen all the wheel nuts. Turn the jack handle clockwise to the wheel. Your wheel nut caps may attach your hub cap to raise the jack lift head. 5-70 Remove these wheel nut caps before you have individual wheel nut caps that cover each nut, they must be removed in order to get to remove the wheel nut caps. Removing the Flat Tire and Installing the Spare Tire If you take off the hub cap. 1. Don't remove them yet. 2. Use the socket end of the wheel wrench to the wheel nuts.
Using the wheel wrench, loosen all the wheel nuts. Turn the jack handle clockwise to the wheel. Your wheel nut caps may attach your hub cap to raise the jack lift head. 5-70 Remove these wheel nut caps before you have individual wheel nut caps that cover each nut, they must be removed in order to get to remove the wheel nut caps. Removing the Flat Tire and Installing the Spare Tire If you take off the hub cap. 1. Don't remove them yet. 2. Use the socket end of the wheel wrench to the wheel nuts.

Owner's Manual
Page 334
... jacked up is is supported only by a jack. Front Frame Hole B. If the vehicle slipsoff the jack you could be sure to fit the jack lift head into the appropriate hole nearest the flat tire. 3. Never get under a vehicle when it is dangerous. Fit the jack into the proper location before...
... jacked up is is supported only by a jack. Front Frame Hole B. If the vehicle slipsoff the jack you could be sure to fit the jack lift head into the appropriate hole nearest the flat tire. 3. Never get under a vehicle when it is dangerous. Fit the jack into the proper location before...

Owner's Manual
Page 402
...-263-3830. 7-5 Mexico, Central America and Caribbean Islands/Countries (Except Puerto Rico and U.S. GM of vehicle purchase/lease. See your vehicle (hand controls, wheelchair/scooter lifts, etc.). All TTY users call 1-800-833-9935. All Overseas Locations Please contact the local General Motors Business Unit. Customer Assistance Center Paseo de la...
...-263-3830. 7-5 Mexico, Central America and Caribbean Islands/Countries (Except Puerto Rico and U.S. GM of vehicle purchase/lease. See your vehicle (hand controls, wheelchair/scooter lifts, etc.). All TTY users call 1-800-833-9935. All Overseas Locations Please contact the local General Motors Business Unit. Customer Assistance Center Paseo de la...


