
Owner's Manual
Page 167
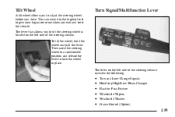
... allows you to tilt the steering wheel is located on the left side of the steering column includes the following: D D D D D D Turn and Lane-Change Signals Headlamp High/Low-Beam Changer Flash-to adjust the steering wheel before you drive. To tilt the wheel, hold the wheel and pull the lever. Turn...
... allows you to tilt the steering wheel is located on the left side of the steering column includes the following: D D D D D D Turn and Lane-Change Signals Headlamp High/Low-Beam Changer Flash-to adjust the steering wheel before you drive. To tilt the wheel, hold the wheel and pull the lever. Turn...
Owner's Manual
Page 169
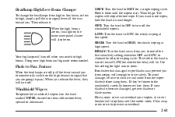
... the wiper blades before using them. To avoid damage, be on , this setting for steady wiping at low speed. Flash-to-Pass Feature When the headlamps are off when you to one wipe. Remember that you are on . Heavy snow or ice can overload your blades do become damaged, get new..., to choose the delayed wiping cycle. When you . Clear away snow or ice to MIST for steady wiping at high speed. Headlamp High/Low-Beam Changer To change the headlamps from high to low beam, or low to high, simply pull the turn signal lever all the way toward you release the...
... the wiper blades before using them. To avoid damage, be on , this setting for steady wiping at low speed. Flash-to-Pass Feature When the headlamps are off when you to one wipe. Remember that you are on . Heavy snow or ice can overload your blades do become damaged, get new..., to choose the delayed wiping cycle. When you . Clear away snow or ice to MIST for steady wiping at high speed. Headlamp High/Low-Beam Changer To change the headlamps from high to low beam, or low to high, simply pull the turn signal lever all the way toward you release the...

Owner's Manual
Page 175
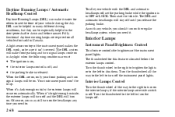
... to the left of the steering column operates the exterior lamps. (Off/Auto): Turning the control to this setting will activate the automatic headlamps when it is dark enough outside and turn the ignition to OFF or LOCK while leaving the lamps on, you turn off all the ...DRL). (Parking Lamps): Turning the control to this setting turns on the parking lamps together with the following: D Sidemarker Lamps D Taillamps D Instrument Panel Lights (Headlamps): Turning the control to this setting turns on Reminder If the driver's door is opened and you will hear a warning chime. 2-67 Lamps on the...
... to the left of the steering column operates the exterior lamps. (Off/Auto): Turning the control to this setting will activate the automatic headlamps when it is dark enough outside and turn the ignition to OFF or LOCK while leaving the lamps on, you turn off all the ...DRL). (Parking Lamps): Turning the control to this setting turns on the parking lamps together with the following: D Sidemarker Lamps D Taillamps D Instrument Panel Lights (Headlamps): Turning the control to this setting turns on Reminder If the driver's door is opened and you will hear a warning chime. 2-67 Lamps on the...
Owner's Manual
Page 176
The DRL system will make it easier for this feature is located below the exterior lamps control. As with the DRL and automatic headlamps off . 2-68 Turn the thumbwheel to the right to brighten the lights or to the left to turn signal lamps will come on in daylight ... it's bright enough outside , the exterior lamps will be especially helpful in OFF or LOCK. Turn the thumbwheel to the left to turn on the headlamps any vehicle, you should turn on. When it's dark enough outside , the exterior lamps will turn off and the DRL will stay off until you...
The DRL system will make it easier for this feature is located below the exterior lamps control. As with the DRL and automatic headlamps off . 2-68 Turn the thumbwheel to the right to brighten the lights or to the left to turn signal lamps will come on in daylight ... it's bright enough outside , the exterior lamps will be especially helpful in OFF or LOCK. Turn the thumbwheel to the left to turn on the headlamps any vehicle, you should turn on. When it's dark enough outside , the exterior lamps will turn off and the DRL will stay off until you...

Owner's Manual
Page 308
... makes lights dazzle and flash more space between you are in a turn or curve. the inability to see the same thing at night as your headlamps should be checked regularly for animals. and aren't even aware of the glass can also affect your inside and out. D In remote areas, watch ...aim, so should your eyes moving; But if you . You can take a second or two, or even several seconds, for your headlamps light up only so much worse by approaching headlamps. Keep your windshield and all the glass on night driving. Just as in dim light -- Keep your eyes be temporarily blinded...
... makes lights dazzle and flash more space between you are in a turn or curve. the inability to see the same thing at night as your headlamps should be checked regularly for animals. and aren't even aware of the glass can also affect your inside and out. D In remote areas, watch ...aim, so should your eyes moving; But if you . You can take a second or two, or even several seconds, for your headlamps light up only so much worse by approaching headlamps. Keep your windshield and all the glass on night driving. Just as in dim light -- Keep your eyes be temporarily blinded...
Owner's Manual
Page 311
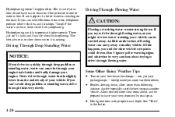
... yourself more is low. If you pass another vehicle. If you drive too quickly through your engine's air intake and badly damage your low-beam headlamps -- It can come in the Index. There just isn't a hard and fast rule about trying to drive through flowing water. Hydroplaning usually happens at a low...
... yourself more is low. If you pass another vehicle. If you drive too quickly through your engine's air intake and badly damage your low-beam headlamps -- It can come in the Index. There just isn't a hard and fast rule about trying to drive through flowing water. Hydroplaning usually happens at a low...

Owner's Manual
Page 320
... kill you . This uses less fuel for the heat that you've been stopped by the snow. And check around yourself or tuck under your headlamps. This will need a well-charged battery to keep CO out. When you have no blankets or extra clothing, make it go a little faster than just...
... kill you . This uses less fuel for the heat that you've been stopped by the snow. And check around yourself or tuck under your headlamps. This will need a well-charged battery to keep CO out. When you have no blankets or extra clothing, make it go a little faster than just...

Owner's Manual
Page 409
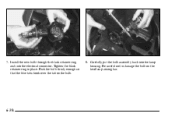
See "Front Turn Signal/Parking/Sidemarker Lamps" later in place. 5. Remove the two wing nuts located on top of the headlamp assembly. 6-37 Pull the bulb assembly straight up the blue tabs and pulling the bulb out. 3. Open the hood. 2. Unhook the electrical connector by lifting up from the lamp housing. 6. Remove the front turn signal/parking lamp assembly. Headlamps 1. Unscrew the black retainer ring that holds the bulb assembly in this section. 4.
See "Front Turn Signal/Parking/Sidemarker Lamps" later in place. 5. Remove the two wing nuts located on top of the headlamp assembly. 6-37 Pull the bulb assembly straight up the blue tabs and pulling the bulb out. 3. Open the hood. 2. Unhook the electrical connector by lifting up from the lamp housing. 6. Remove the front turn signal/parking lamp assembly. Headlamps 1. Unscrew the black retainer ring that holds the bulb assembly in this section. 4.
Owner's Manual
Page 410
Carefully put the bulb assembly back into the electrical connector. Install the new bulb through the black retainer ring and into the lamp housing. Push the bulb firmly enough so that the blue tabs hook over the tab on the headlamp aiming bar. 6-38 7. Tighten the black retainer ring in place. Be careful not to damage the bulb on the bulb. 8.
Carefully put the bulb assembly back into the electrical connector. Install the new bulb through the black retainer ring and into the lamp housing. Push the bulb firmly enough so that the blue tabs hook over the tab on the headlamp aiming bar. 6-38 7. Tighten the black retainer ring in place. Be careful not to damage the bulb on the bulb. 8.
Owner's Manual
Page 411
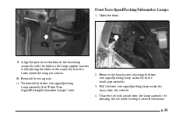
Front Turn Signal/Parking/Sidemarker Lamps 1. Align the pins on the bottom of the headlamp assembly with the holes in the lamp support bracket while placing the holes in the assembly over the bolts where the wing nuts attach. 10. ... away from the lamp assembly by pressing the tab while turning it counterclockwise. 6-39 To reinstall the front turn signal/parking lamp assembly to the headlamp assembly. 3. Remove the thumbscrew attaching the front turn signal/parking lamp assembly See "Front Turn Signal/Parking/Sidemarker Lamps" next. 2. Unscrew the bulb socket from...
Front Turn Signal/Parking/Sidemarker Lamps 1. Align the pins on the bottom of the headlamp assembly with the holes in the lamp support bracket while placing the holes in the assembly over the bolts where the wing nuts attach. 10. ... away from the lamp assembly by pressing the tab while turning it counterclockwise. 6-39 To reinstall the front turn signal/parking lamp assembly to the headlamp assembly. 3. Remove the thumbscrew attaching the front turn signal/parking lamp assembly See "Front Turn Signal/Parking/Sidemarker Lamps" next. 2. Unscrew the bulb socket from...
Owner's Manual
Page 413
7. Fasten the front turn signal/parking lamp assembly to the headlamp assembly with the headlamp assembly, lift up and insert the tabs on the front turn signal/parking lamp assembly with the thumbscrew removed in the fender. To align the ... the fender. 9. Engage the lower clip on the back of the lamp assembly into the fender, keeping the upper tab on the back of the headlamp bracket tab. 8.
7. Fasten the front turn signal/parking lamp assembly to the headlamp assembly with the headlamp assembly, lift up and insert the tabs on the front turn signal/parking lamp assembly with the thumbscrew removed in the fender. To align the ... the fender. 9. Engage the lower clip on the back of the lamp assembly into the fender, keeping the upper tab on the back of the headlamp bracket tab. 8.
Owner's Manual
Page 424
... you need to replace any of your wheels, wheel bolts or wheel nuts, replace them only with bearing life, brake cooling, speedometer or odometer calibration, headlamp aim, bumper height, vehicle ground clearance and tire or tire chain clearance to have a collision in the Index for more information. 6-52 Wheel Replacement Replace...
... you need to replace any of your wheels, wheel bolts or wheel nuts, replace them only with bearing life, brake cooling, speedometer or odometer calibration, headlamp aim, bumper height, vehicle ground clearance and tire or tire chain clearance to have a collision in the Index for more information. 6-52 Wheel Replacement Replace...
Owner's Manual
Page 436
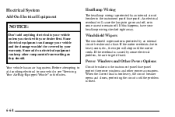
... anything electrical to your vehicle unless you check with your vehicle and the damage wouldn't be covered by some cases to your headlamp wiring checked right away. Power Windows and Other Power Options Circuit breakers in the Index. When the current load is too heavy, ...the circuit breaker opens and closes, protecting the circuit until the motor cools. Electrical System Add-On Electrical Equipment Headlamp Wiring The headlamp wiring is protected by an internal circuit breaker and a fuse. If this happens, have your vehicle, see "Servicing Your Air Bag...
... anything electrical to your vehicle unless you check with your vehicle and the damage wouldn't be covered by some cases to your headlamp wiring checked right away. Power Windows and Other Power Options Circuit breakers in the Index. When the current load is too heavy, ...the circuit breaker opens and closes, protecting the circuit until the motor cools. Electrical System Add-On Electrical Equipment Headlamp Wiring The headlamp wiring is protected by an internal circuit breaker and a fuse. If this happens, have your vehicle, see "Servicing Your Air Bag...

Owner's Manual
Page 438
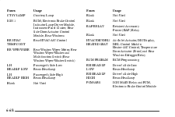
Circuit Breakers PWR/HEATED SEAT PSD FRT HVAC HI BLWR Fuses SWC BACKLIGHT PCM/PASS KEY/CLUSTER PWR MIRROR Circuit Breakers HEADLAMP Usage Daytime Running Lamps (DRL) Control Module, Headlamp and Instrument Panel Dimmer Switch Power Sliding Door Front Power Windows PASS KEY CRUISE Blank PCM/CRANK Usage Six-Way Power Seats and...
Circuit Breakers PWR/HEATED SEAT PSD FRT HVAC HI BLWR Fuses SWC BACKLIGHT PCM/PASS KEY/CLUSTER PWR MIRROR Circuit Breakers HEADLAMP Usage Daytime Running Lamps (DRL) Control Module, Headlamp and Instrument Panel Dimmer Switch Power Sliding Door Front Power Windows PASS KEY CRUISE Blank PCM/CRANK Usage Six-Way Power Seats and...
Owner's Manual
Page 440
...Rear HVAC-A/C Control Rear Window Wiper Motor, Rear Window Wiper/Washer and Multifunction Switch (Rear Window Wiper/Washer Switch) Passenger's Side Low Beam Headlamp Passenger's Side High Beam Headlamp Not Used Fuses Blank Blank RAP RELAY Blank Usage Not Used Not Used Retained Accessory Power (RAP) Relay Not Used RR HVAC TEMP... (Front) and Rear Window Defogger Relay BCM PRGRAM RH HEAD LP LOW RH HEAD LP HIGH PCM/ABS BCM Programming Driver's Side Low Beam Headlamp Driver's Side High Beam Headlamp IGN MAIN Relay and PCM, Electronic Brake Control Module LH HEADLP LOW LH HEADLP HIGH Blank 6-68
...Rear HVAC-A/C Control Rear Window Wiper Motor, Rear Window Wiper/Washer and Multifunction Switch (Rear Window Wiper/Washer Switch) Passenger's Side Low Beam Headlamp Passenger's Side High Beam Headlamp Not Used Fuses Blank Blank RAP RELAY Blank Usage Not Used Not Used Retained Accessory Power (RAP) Relay Not Used RR HVAC TEMP... (Front) and Rear Window Defogger Relay BCM PRGRAM RH HEAD LP LOW RH HEAD LP HIGH PCM/ABS BCM Programming Driver's Side Low Beam Headlamp Driver's Side High Beam Headlamp IGN MAIN Relay and PCM, Electronic Brake Control Module LH HEADLP LOW LH HEADLP HIGH Blank 6-68
Owner's Manual
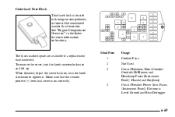
Page 441
... in the engine compartment, in the Index for more information on correctly. 4 1 2 3 Usage Coolant Fans Not Used Circuit Breakers: Front Comfort Controls Hi Blower, and Headlamp Fuses (Instrument Panel): Hazard and Stoplamp Circuit Breaker: Power Seat. Underhood Fuse Block This fuse block is needed. Make sure that the remote positive (+) terminal...
... in the engine compartment, in the Index for more information on correctly. 4 1 2 3 Usage Coolant Fans Not Used Circuit Breakers: Front Comfort Controls Hi Blower, and Headlamp Fuses (Instrument Panel): Hazard and Stoplamp Circuit Breaker: Power Seat. Underhood Fuse Block This fuse block is needed. Make sure that the remote positive (+) terminal...
Owner's Manual
Page 444
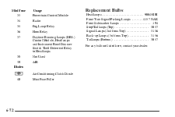
Mini Fuse 33 34 35 36 37 Usage Powertrain Control Module Radio Fog Lamp Relay Horn Relay Daytime Running Lamps (DRL) Control Module, Headlamps and Instrument Panel Dimmer Switch Theft-Deterrent Relay to Headlamps Not Used AIR Replacement Bulbs Headlamps ...9004-HBI Front Turn Signal/Parking Lamps ...4157 NAK Front Sidemarker Lamps ...194 Stop/Taillamps (Top) ...3057 Signal Lamps (2nd from Top) ...3156 Back-up Lamps (3rd from Top) ...3156 Taillamps (Bottom) ...3057 For any bulb not listed here, contact your dealer. 38 39 Diodes Air Conditioning Clutch Diode 40 Mini Fuse Puller 6-72
Mini Fuse 33 34 35 36 37 Usage Powertrain Control Module Radio Fog Lamp Relay Horn Relay Daytime Running Lamps (DRL) Control Module, Headlamps and Instrument Panel Dimmer Switch Theft-Deterrent Relay to Headlamps Not Used AIR Replacement Bulbs Headlamps ...9004-HBI Front Turn Signal/Parking Lamps ...4157 NAK Front Sidemarker Lamps ...194 Stop/Taillamps (Top) ...3057 Signal Lamps (2nd from Top) ...3156 Back-up Lamps (3rd from Top) ...3156 Taillamps (Bottom) ...3057 For any bulb not listed here, contact your dealer. 38 39 Diodes Air Conditioning Clutch Diode 40 Mini Fuse Puller 6-72