
Owner's Manual
Page 9
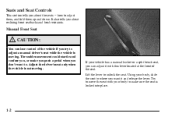
... you about reclining front seatbacks and head restraints. The sudden movement could startle and confuse you, or make sure the seat is locked into place. 1-2 Lift the lever to adjust them, and fold them up and down. Adjust the driver's seat only when the vehicle is moving . Seats and Seat Controls...
... you about reclining front seatbacks and head restraints. The sudden movement could startle and confuse you, or make sure the seat is locked into place. 1-2 Lift the lever to adjust them, and fold them up and down. Adjust the driver's seat only when the vehicle is moving . Seats and Seat Controls...

Owner's Manual
Page 13
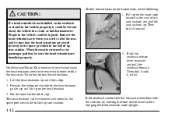
... anytime the heated seats are operating. The heated front seats will need to press the heated seat button again. To adjust the front seatback, lift the manual lever located on how to operate the reclining seatback feature. 1-6 If your vehicle has this feature, the button used to OFF.... Press the button again for the HI heat setting. Lift the lever again without pushing on the driver's door panel. Heated Front Seats (If Equipped) If your vehicle has power seats with a power recliner...
... anytime the heated seats are operating. The heated front seats will need to press the heated seat button again. To adjust the front seatback, lift the manual lever located on how to operate the reclining seatback feature. 1-6 If your vehicle has this feature, the button used to OFF.... Press the button again for the HI heat setting. Lift the lever again without pushing on the driver's door panel. Heated Front Seats (If Equipped) If your vehicle has power seats with a power recliner...

Owner's Manual
Page 17
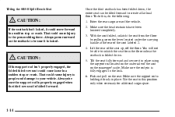
Lift the floor load panels and latch them into position. 4. To fold, pull up and push rearward all the way. 3. If the seatback cannot fold flat ... cushion until it forward. To create a load floor release the panels from the seatback by pushing forward on the seat cushion to release the seatback. Lift the seatback up on the strap loop at the base of the seat cushion. Then fold the panels back to the passenger position on the...
Lift the floor load panels and latch them into position. 4. To fold, pull up and push rearward all the way. 3. If the seatback cannot fold flat ... cushion until it forward. To create a load floor release the panels from the seatback by pushing forward on the seat cushion to release the seatback. Lift the seatback up on the strap loop at the base of the seat cushion. Then fold the panels back to the passenger position on the...
Owner's Manual
Page 19
... to the passenger position, be removed and stored in the space provided in the button on the side of the head restraint guide cap and lift up on the strap loop located at the rear of the seat cushion and pull the seat cushion up until it is not installed on... front seat forward and/or bringing the front seatback more upright. 1-12 To fold the seatbacks on the bucket seats, do this follow these directions: 1. Lift the head restraints up . Do the same for the other cap. To do the following: CAUTION: If a head restraint is flat. Press in the folded...
... to the passenger position, be removed and stored in the space provided in the button on the side of the head restraint guide cap and lift up on the strap loop located at the rear of the seat cushion and pull the seat cushion up until it is not installed on... front seat forward and/or bringing the front seatback more upright. 1-12 To fold the seatbacks on the bucket seats, do this follow these directions: 1. Lift the head restraints up . Do the same for the other cap. To do the following: CAUTION: If a head restraint is flat. Press in the folded...
Owner's Manual
Page 21
... support rod is properly engaged when the third row seat is fully engaged in this , do this position only when necessary for additional cargo space. Lift the rear of the seat up on the passenger's side. You will not be sure it is holding it in a sudden stop or crash. Make...
... support rod is properly engaged when the third row seat is fully engaged in this , do this position only when necessary for additional cargo space. Lift the rear of the seat up on the passenger's side. You will not be sure it is holding it in a sudden stop or crash. Make...
Owner's Manual
Page 22
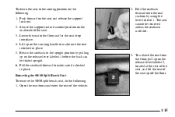
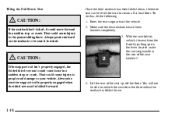
Return the seatback to make sure it is locked in place. Push forward on the underside of the vehicle. 2. Lift up on the release lever labeled 1 before the back can be removed unless the seatback is folded. 3. Removing the 50/50 Split Bench Seat To ... the floor. 1-15 To unlatch the seat from the floor, pull up on the release lever labeled 2, located at the rear of the seat, and lift the rear of the seat up on the carrying handle to the upright position by using the lever labeled 1. To return the seat to make...
Return the seatback to make sure it is locked in place. Push forward on the underside of the vehicle. 2. Lift up on the release lever labeled 1 before the back can be removed unless the seatback is folded. 3. Removing the 50/50 Split Bench Seat To ... the floor. 1-15 To unlatch the seat from the floor, pull up on the release lever labeled 2, located at the rear of the seat, and lift the rear of the seat up on the carrying handle to the upright position by using the lever labeled 1. To return the seat to make...
Owner's Manual
Page 25
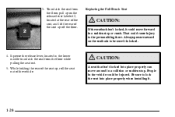
... seatback to your vehicle. CAUTION: If the support rod isn't properly engaged, the folded third row seat could cause injury to create a flat load floor. Lift the rear of the seat labeled 2. Enter the rear cargo area of the vehicle. 2. Always be sure the support rod is properly engaged when the...
... seatback to your vehicle. CAUTION: If the support rod isn't properly engaged, the folded third row seat could cause injury to create a flat load floor. Lift the rear of the seat labeled 2. Enter the rear cargo area of the vehicle. 2. Always be sure the support rod is properly engaged when the...
Owner's Manual
Page 26
... full bench seat, do the following : 1. Make sure the rod pin is locked in the lock. 6. 5. Make sure the support rod is locked in place. Lift up on the underside of the vehicle. 2. Open the rear doors and enter the rear of the seat. 3. Tilt the seat fully forward and secure...
... full bench seat, do the following : 1. Make sure the rod pin is locked in the lock. 6. 5. Make sure the support rod is locked in place. Lift up on the underside of the vehicle. 2. Open the rear doors and enter the rear of the seat. 3. Tilt the seat fully forward and secure...
Owner's Manual
Page 27
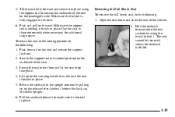
... it . 1-20 Be sure to the person sitting there. Always press rearward on the release lever labeled 2, located at the rear of the seat, and lift the rear of the vehicle. CAUTION: A seat that isn't locked into place properly when installing it is locked. 4. Squeeze the release lever, located in the...
... it . 1-20 Be sure to the person sitting there. Always press rearward on the release lever labeled 2, located at the rear of the seat, and lift the rear of the vehicle. CAUTION: A seat that isn't locked into place properly when installing it is locked. 4. Squeeze the release lever, located in the...
Owner's Manual
Page 100
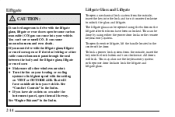
... will force outside air into the lock and turn clockwise. See "Engine Exhaust" in the Index. Liftgate Glass and Liftgate To open the entire liftgate, lift the handle located in the center of the door. D Turn the fan on VENT or OUTSIDE AIR. To lock a power lock system from the outside...
... will force outside air into the lock and turn clockwise. See "Engine Exhaust" in the Index. Liftgate Glass and Liftgate To open the entire liftgate, lift the handle located in the center of the door. D Turn the fan on VENT or OUTSIDE AIR. To lock a power lock system from the outside...

Owner's Manual
Page 119
..." in better ride and handling characteristics when the vehicle is fully automatic and uses a computer controller to continuously monitor vehicle speed, wheel to body position, lift/drive and steering position of the vehicle. The system is activated when the ignition key is fully automatic and will automatically adjust vehicle height thereafter...
..." in better ride and handling characteristics when the vehicle is fully automatic and uses a computer controller to continuously monitor vehicle speed, wheel to body position, lift/drive and steering position of the vehicle. The system is activated when the ignition key is fully automatic and will automatically adjust vehicle height thereafter...
Owner's Manual
Page 142
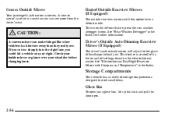
To turn on your right. CAUTION: A convex mirror can see more from the driver's seat. Check your inside mirror or glance over your glove box, lift up the latch and pull the door open. 2-56 Driver's Outside Auto-Dimming Rearview Mirror (If Equipped) The driver's side outside rearview mirrors with Compass ...
To turn on your right. CAUTION: A convex mirror can see more from the driver's seat. Check your inside mirror or glance over your glove box, lift up the latch and pull the door open. 2-56 Driver's Outside Auto-Dimming Rearview Mirror (If Equipped) The driver's side outside rearview mirrors with Compass ...
Owner's Manual
Page 145
..., in the rear of the vehicle. Convenience Net (If Equipped) You may have a convenience net in place during sharp turns or quick stops and starts. Lift the shade up on top of the vehicle. The slots furthest forward allow you 're not using the tie downs, flip them down . 2. To put...
..., in the rear of the vehicle. Convenience Net (If Equipped) You may have a convenience net in place during sharp turns or quick stops and starts. Lift the shade up on top of the vehicle. The slots furthest forward allow you 're not using the tie downs, flip them down . 2. To put...

Owner's Manual
Page 148
... information on the lamps. NOTICE: Power outlets are located near the cigarette lighter. Illuminated Visor Vanity Mirror (If Equipped) Pull the sun visor down and lift the mirror cover to the accessory power outlets and could result in blown vehicle or adapter fuses. Check with the equipment. The cigarette lighter is... outlets. When not using them, always close the cover. This wouldn't be sure to your dealer before adding electrical equipment, and never use the outlets, lift the cover.
... information on the lamps. NOTICE: Power outlets are located near the cigarette lighter. Illuminated Visor Vanity Mirror (If Equipped) Pull the sun visor down and lift the mirror cover to the accessory power outlets and could result in blown vehicle or adapter fuses. Check with the equipment. The cigarette lighter is... outlets. When not using them, always close the cover. This wouldn't be sure to your dealer before adding electrical equipment, and never use the outlets, lift the cover.

Owner's Manual
Page 294
... drive normally. If the warning doesn't come back on, you 're in traffic. Also, see or hear no steam, the problem may decide not to lift the hood but see "Overheated Engine Protection Operating Mode" listed previously in this for at the highest fan speed and open the window as normal...
... drive normally. If the warning doesn't come back on, you 're in traffic. Also, see or hear no steam, the problem may decide not to lift the hood but see "Overheated Engine Protection Operating Mode" listed previously in this for at the highest fan speed and open the window as normal...

Owner's Manual
Page 295
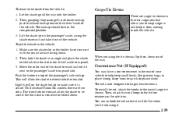
The vehicle should be parked on a level surface. 5-12 Coolant Surge Tank Pressure Cap 8100 V8 Engines C. Engine Fan If the coolant inside the coolant surge tank is boiling, don't do anything else until it 's safe to lift the hood, here's what you'll see: All Other Engines A. Coolant Surge Tank B. Cooling System When you decide it cools down.
The vehicle should be parked on a level surface. 5-12 Coolant Surge Tank Pressure Cap 8100 V8 Engines C. Engine Fan If the coolant inside the coolant surge tank is boiling, don't do anything else until it 's safe to lift the hood, here's what you'll see: All Other Engines A. Coolant Surge Tank B. Cooling System When you decide it cools down.
Owner's Manual
Page 307
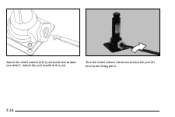
Attach the wheel wrench to the lifting point. 5-24 Turn the wheel wrench clockwise to raise the jack lift head to the jack handle extensions (as needed). Attach the jack handle to the jack.
Attach the wheel wrench to the lifting point. 5-24 Turn the wheel wrench clockwise to raise the jack lift head to the jack handle extensions (as needed). Attach the jack handle to the jack.

Owner's Manual
Page 309
... under a vehicle when it is supported only by a jack. 2. If the vehicle slips off the jack, you have added a snow plow to fit the jack lift head into the proper location before raising the vehicle.
... under a vehicle when it is supported only by a jack. 2. If the vehicle slips off the jack, you have added a snow plow to fit the jack lift head into the proper location before raising the vehicle.

Owner's Manual
Page 332
Lift the hood. Then go to the front of the grill. 3. Before closing the hood, be sure all filler caps are on the secondary hood release located near the center of the vehicle and pull up on properly. Pull down the hood and close it firmly. 6-11 2.
Lift the hood. Then go to the front of the grill. 3. Before closing the hood, be sure all filler caps are on the secondary hood release located near the center of the vehicle and pull up on properly. Pull down the hood and close it firmly. 6-11 2.

Owner's Manual
Page 343
If it stops flame if the engine backfires. See "Owner Checks and Services" in place when you're driving. 6-22 Then lift the cover upward and remove the filter from the housing. The air cleaner not only cleans the air, it isn't there, and the engine backfires, ...
If it stops flame if the engine backfires. See "Owner Checks and Services" in place when you're driving. 6-22 Then lift the cover upward and remove the filter from the housing. The air cleaner not only cleans the air, it isn't there, and the engine backfires, ...


