Owner's Manual
Page 4
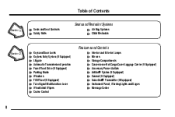
... (If Equipped) Turn Signal/Multifunction Lever Windshield Wipers Cruise Control Interior and Exterior Lamps Mirrors Storage Compartments Convenience Net/Cargo Cover/Luggage Carrier (If Equipped) Accessory Power Outlets OnStar® System (If Equipped) Sunroof (If Equipped) HomeLink® Transmitter (If Equipped) Instrument Panel, Warning Lights and Gages Message Center EE
... (If Equipped) Turn Signal/Multifunction Lever Windshield Wipers Cruise Control Interior and Exterior Lamps Mirrors Storage Compartments Convenience Net/Cargo Cover/Luggage Carrier (If Equipped) Accessory Power Outlets OnStar® System (If Equipped) Sunroof (If Equipped) HomeLink® Transmitter (If Equipped) Instrument Panel, Warning Lights and Gages Message Center EE

Owner's Manual
Page 90
... in . Your steering wheel will only be able to remove your ignition switch to LOCK. 2-14 Follow this time your ignition, steering wheel and transmission. ACCESSORY (A): ACCESSORY lets you . Ignition Positions You can mean premature wear and earlier replacement. for the first 500 miles (805 km). Push in guideline every time you...
... in . Your steering wheel will only be able to remove your ignition switch to LOCK. 2-14 Follow this time your ignition, steering wheel and transmission. ACCESSORY (A): ACCESSORY lets you . Ignition Positions You can mean premature wear and earlier replacement. for the first 500 miles (805 km). Push in guideline every time you...

Owner's Manual
Page 91
It doesn't lock the steering wheel like LOCK. Retained Accessory Power (If Equipped) Your vehicle may be sure you must have your shift lever... steering wheel left and right while you turn off (for example, if your key seems stuck in RUN or ACCESSORY. Your radio, power windows and overhead console will continue to work when the ignition key is in LOCK and you... To restart when you could break the key or the ignition switch. But turn the key only with a Retained Accessory Power (RAP) feature which will allow certain features on your vehicle to continue to work up to PARK (P) or ...
It doesn't lock the steering wheel like LOCK. Retained Accessory Power (If Equipped) Your vehicle may be sure you must have your shift lever... steering wheel left and right while you turn off (for example, if your key seems stuck in RUN or ACCESSORY. Your radio, power windows and overhead console will continue to work when the ignition key is in LOCK and you... To restart when you could break the key or the ignition switch. But turn the key only with a Retained Accessory Power (RAP) feature which will allow certain features on your vehicle to continue to work up to PARK (P) or ...

Owner's Manual
Page 93
... to work with your vehicle towed, see the part of the engine compartment, near the power steering fluid reservoir. 3. If you add electrical parts or accessories, you don't, your vehicle.
... to work with your vehicle towed, see the part of the engine compartment, near the power steering fluid reservoir. 3. If you add electrical parts or accessories, you don't, your vehicle.

Owner's Manual
Page 111
... open the window partway, lightly tap the switch until the window is engaged. The driver's door has a switch for one second to ACCESSORY or RUN or when Retained Accessory Power (RAP) is not engaged, the rear power windows will work when the ignition has been turned to activate the express down mode... on it to lower the window or the front to raise it to the highest level to lock the wheel in the Index. See "Retained Accessory Power" in place. 2-35 Press and hold the steering wheel and pull the lever located on the lower left of the switch with the power...
... open the window partway, lightly tap the switch until the window is engaged. The driver's door has a switch for one second to ACCESSORY or RUN or when Retained Accessory Power (RAP) is not engaged, the rear power windows will work when the ignition has been turned to activate the express down mode... on it to lower the window or the front to raise it to the highest level to lock the wheel in the Index. See "Retained Accessory Power" in place. 2-35 Press and hold the steering wheel and pull the lever located on the lower left of the switch with the power...

Owner's Manual
Page 120
The system may be able to see the front of the instrument panel in OFF, LOCK or ACCESSORY. You may also turn off your vehicle with the automatic headlamp system off, set the parking brake while the ignition is off. The DRL system ...
The system may be able to see the front of the instrument panel in OFF, LOCK or ACCESSORY. You may also turn off your vehicle with the automatic headlamp system off, set the parking brake while the ignition is off. The DRL system ...

Owner's Manual
Page 136
... retainer spring and pull the ashtray toward you. To replace the ashtray, place the ashtray on the passenger side and in and let go . Accessory Power Outlets NOTICE: Holding a cigarette lighter in all the way in the rear of the center floor compartment (if equipped with your hand while ...to the right of its original position. Power outlets are located near the cigarette lighter. Two accessory power outlets are also located in the rear cargo area on the slides at the side of the accessory power outlets. To use , always cover the rear outlet with vehicle electrical systems. The ...
... retainer spring and pull the ashtray toward you. To replace the ashtray, place the ashtray on the passenger side and in and let go . Accessory Power Outlets NOTICE: Holding a cigarette lighter in all the way in the rear of the center floor compartment (if equipped with your hand while ...to the right of its original position. Power outlets are located near the cigarette lighter. Two accessory power outlets are also located in the rear cargo area on the slides at the side of the accessory power outlets. To use , always cover the rear outlet with vehicle electrical systems. The ...

Owner's Manual
Page 137
... the sunroof to function properly. Illuminated Visor Vanity Mirror (If Equipped) Pull the sun visor down the top and bottom visors (if equipped). See "Retained Accessory Power" in the tracts. Press and release the rear side of the button located in the front overhead console to express-open for additional glare...
... the sunroof to function properly. Illuminated Visor Vanity Mirror (If Equipped) Pull the sun visor down the top and bottom visors (if equipped). See "Retained Accessory Power" in the tracts. Press and release the rear side of the button located in the front overhead console to express-open for additional glare...

Owner's Manual
Page 141
... this step up to three times) to make sure that the training was successful. OnStarR System (If Equipped) OnStar is provided with the OnStar System. Accessories Accessories for two to flash (after following services are available through a subscription with Location Remote Diagnostics OnStar MED-NET Accident Assist Remote Door Unlock Route Support...
... this step up to three times) to make sure that the training was successful. OnStarR System (If Equipped) OnStar is provided with the OnStar System. Accessories Accessories for two to flash (after following services are available through a subscription with Location Remote Diagnostics OnStar MED-NET Accident Assist Remote Door Unlock Route Support...

Owner's Manual
Page 143
Automatic Transfer Case/Traction Assist System (If Equipped) E. Tow/Haul Selector Switch I. Lamp Controls C. Air Outlets D. Instrument Cluster G. Gearshift Lever H. Tilt Lever (If Equipped) O. Lighter and Accessory Power Outlets Q. Storage Area or Compact Disc Player (If Equipped) S. A. Hood Release M. Audio System J. Rear Window Defogger Switch (If Equipped) R. Glove Box 2-67 Instrument Panel Fuse Block L. Center Instrument Panel Utility Block N. Parking Brake Release P. Multifunction Lever F. Comfort Control System K. Dome Lamp Switch B. Ashtray T.
Automatic Transfer Case/Traction Assist System (If Equipped) E. Tow/Haul Selector Switch I. Lamp Controls C. Air Outlets D. Instrument Cluster G. Gearshift Lever H. Tilt Lever (If Equipped) O. Lighter and Accessory Power Outlets Q. Storage Area or Compact Disc Player (If Equipped) S. A. Hood Release M. Audio System J. Rear Window Defogger Switch (If Equipped) R. Glove Box 2-67 Instrument Panel Fuse Block L. Center Instrument Panel Utility Block N. Parking Brake Release P. Multifunction Lever F. Comfort Control System K. Dome Lamp Switch B. Ashtray T.

Owner's Manual
Page 148
... light will flash when you . Readings in the low warning zone may occur when a large number of electrical accessories are increased, this condition should come on briefly when you turn off all unnecessary accessories. If you need both parts working , the other part can only drive for an extended period. If one...
... light will flash when you . Readings in the low warning zone may occur when a large number of electrical accessories are increased, this condition should come on briefly when you turn off all unnecessary accessories. If you need both parts working , the other part can only drive for an extended period. If one...
Owner's Manual
Page 159
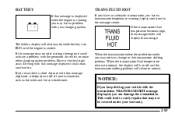
... charging system problem. If the transmission fluid temperature becomes high, the message center will also stay on after starting the engine it could drain your accessories, such as the radio and the air conditioner. When the transmission fluid temperature returns to costly repairs that may not be covered under your charging...
... charging system problem. If the transmission fluid temperature becomes high, the message center will also stay on after starting the engine it could drain your accessories, such as the radio and the air conditioner. When the transmission fluid temperature returns to costly repairs that may not be covered under your charging...

Owner's Manual
Page 187
... radio off . CD Adapter Kits It is in the Index. It will flash for two seconds, indicating the feature is pressed. 3-23 to RUN or ACCESSORY. 2. To activate the bypass feature, use a portable CD player adapter kit with either the ignition or radio off , press EJECT before loading the cassette. The...
... radio off . CD Adapter Kits It is in the Index. It will flash for two seconds, indicating the feature is pressed. 3-23 to RUN or ACCESSORY. 2. To activate the bypass feature, use a portable CD player adapter kit with either the ignition or radio off , press EJECT before loading the cassette. The...

Owner's Manual
Page 196
.... 3-32 Press MN and 000 will appear on the display. 6. Press MN again to make the last two digits agree with your secret code to ACCESSORY or RUN. 3. Hold them down . Press AM-FM after you have confirmed that you need to repeat Steps 5 through all nine steps before starting the...
.... 3-32 Press MN and 000 will appear on the display. 6. Press MN again to make the last two digits agree with your secret code to ACCESSORY or RUN. 3. Hold them down . Press AM-FM after you have confirmed that you need to repeat Steps 5 through all nine steps before starting the...

Owner's Manual
Page 197
... you lose or forget your code, contact your secret code as follows; If you have confirmed that the radio is removed and later applied to ACCESSORY or RUN. 2. Press HR to enter the correct code before you can try again.
... you lose or forget your code, contact your secret code as follows; If you have confirmed that the radio is removed and later applied to ACCESSORY or RUN. 2. Press HR to enter the correct code before you can try again.

Owner's Manual
Page 199
... your cassette tape player needs to indicate that is equipped with pads which scrub the tape head as possible to prevent damage to RUN or ACCESSORY. 2. If they aren't, they may not operate properly or may display CLN to be stored in sound quality, try a known good cassette to see if...
... your cassette tape player needs to indicate that is equipped with pads which scrub the tape head as possible to prevent damage to RUN or ACCESSORY. 2. If they aren't, they may not operate properly or may display CLN to be stored in sound quality, try a known good cassette to see if...

Owner's Manual
Page 200
...'s recommended cleaning time. The radio will flash, showing that the cut tape detection feature is active again. Turn the ignition to RUN or ACCESSORY. 2. Insert the scrubbing action cleaning cassette. 5. A non-scrubbing action cleaner may also choose a non-scrubbing action, wet-type cleaner which...Player: 1. The use of cleaning cassette will flash for five seconds to clean the tape head. Turn the ignition to RUN or ACCESSORY. 2. Eject the cleaning cassette after the manufacturer's recommended cleaning time. Press and hold EJECT for two seconds. 4. Always make ...
...'s recommended cleaning time. The radio will flash, showing that the cut tape detection feature is active again. Turn the ignition to RUN or ACCESSORY. 2. Insert the scrubbing action cleaning cassette. 5. A non-scrubbing action cleaner may also choose a non-scrubbing action, wet-type cleaner which...Player: 1. The use of cleaning cassette will flash for five seconds to clean the tape head. Turn the ignition to RUN or ACCESSORY. 2. Eject the cleaning cassette after the manufacturer's recommended cleaning time. Press and hold EJECT for two seconds. 4. Always make ...

Owner's Manual
Page 250
.../certification label, as shown in front of your front GAWR. It is in this example. (W x (A+W.B.)) / W.B.= Weight the accessory is adding to the front axle In order to calculate the amount of weight any front accessory is the difference between your front GAWR and the front axle weight of the front axle W.B.= Vehicle...
.../certification label, as shown in front of your front GAWR. It is in this example. (W x (A+W.B.)) / W.B.= Weight the accessory is adding to the front axle In order to calculate the amount of weight any front accessory is the difference between your front GAWR and the front axle weight of the front axle W.B.= Vehicle...

Owner's Manual
Page 270
... be damaged. 2. Keep hands, clothing and tools away from any underhood electric fan. 5-4 You wouldn't be covered by your radio! Unplug unnecessary accessories plugged into the cigarette lighter or accessory power outlets. The repairs wouldn't be able to start procedure. If they are, it could be sure the vehicles aren't touching each...
... be damaged. 2. Keep hands, clothing and tools away from any underhood electric fan. 5-4 You wouldn't be covered by your radio! Unplug unnecessary accessories plugged into the cigarette lighter or accessory power outlets. The repairs wouldn't be able to start procedure. If they are, it could be sure the vehicles aren't touching each...

Owner's Manual
Page 271
...and tools away from any underhood electric fan. 5-5 Open the hoods and locate the positive (+) and negative (-) terminal locations on the engine accessory drive bracket. The remote negative (-) terminal is there. You should always use the remote positive (+) and the remote negative (-) terminals instead of... that can burn you don't, explosive gas could be sure the right amount of the engine accessory drive bracket. If you . 4. If you . The remote positive (+) terminal is located behind a red plastic cover near a battery can...
...and tools away from any underhood electric fan. 5-5 Open the hoods and locate the positive (+) and negative (-) terminal locations on the engine accessory drive bracket. The remote negative (-) terminal is there. You should always use the remote positive (+) and the remote negative (-) terminals instead of... that can burn you don't, explosive gas could be sure the right amount of the engine accessory drive bracket. If you . 4. If you . The remote positive (+) terminal is located behind a red plastic cover near a battery can...


