
Owner's Manual
Page 17
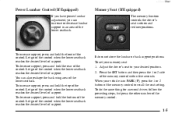
... 1 or 2 side of support. To increase support, press and hold the rear of support. To do the same thing for a second driver, follow the preceding steps, but press the other number of the control. You can increase or decrease lumbar support in PARK (P), press the 1 or 2 button of the memory control...
... 1 or 2 side of support. To increase support, press and hold the rear of support. To do the same thing for a second driver, follow the preceding steps, but press the other number of the control. You can increase or decrease lumbar support in PARK (P), press the 1 or 2 button of the memory control...
Owner's Manual
Page 46
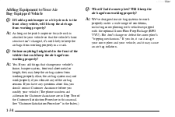
...? Yes. See "Customer Satisfaction Procedure" in a crash. Also, the air bag system may not work properly under a wide range of the Customer Satisfaction Procedure in Step Two of conditions, including snow plowing with vehicles equipped with the optional Snow Plow Prep Package (RPO VYU). Will it 's not likely to keep the...
...? Yes. See "Customer Satisfaction Procedure" in a crash. Also, the air bag system may not work properly under a wide range of the Customer Satisfaction Procedure in Step Two of conditions, including snow plowing with vehicles equipped with the optional Snow Plow Prep Package (RPO VYU). Will it 's not likely to keep the...
Owner's Manual
Page 83
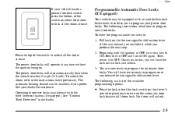
... at any time without the ignition being on the driver's side door panel once to turn your key to program once you perform the next step. The following instructions detail how to : 1. Programmable Automatic Door Locks (If Equipped) Your vehicle may interact with an auto lock/unlock feature which enables you...
... at any time without the ignition being on the driver's side door panel once to turn your key to program once you perform the next step. The following instructions detail how to : 1. Programmable Automatic Door Locks (If Equipped) Your vehicle may interact with an auto lock/unlock feature which enables you...

Owner's Manual
Page 85
... three seconds and the horn will come on the key transmitter is necessary. You may notice a decrease in the Index. blocking the signal. Take a few steps to 30 seconds. D Check the location. D If you may be D Check to stand closer during rainy or snowy weather. The parking lamps will flash and...
... three seconds and the horn will come on the key transmitter is necessary. You may notice a decrease in the Index. blocking the signal. Take a few steps to 30 seconds. D Check the location. D If you may be D Check to stand closer during rainy or snowy weather. The parking lamps will flash and...

Owner's Manual
Page 91
... you lock the doors with the manual door lock and open , or with the remote keyless entry transmitter. This should be tested by following these steps: 1. The horn fuse may be locked with the door key after the doors are closed. keyless entry transmitter. D If you can be serviced by accident...
... you lock the doors with the manual door lock and open , or with the remote keyless entry transmitter. This should be tested by following these steps: 1. The horn fuse may be locked with the door key after the doors are closed. keyless entry transmitter. D If you can be serviced by accident...

Owner's Manual
Page 113
... is not fully in PARK (P) with your shift lever is in NEUTRAL (N). not in a drive gear -- If you 're on fairly level ground, use the steps that follow. So, be injured. If you . 2-35 Your vehicle can move , even when you have left the engine running, the vehicle can roll.
... is not fully in PARK (P) with your shift lever is in NEUTRAL (N). not in a drive gear -- If you 're on fairly level ground, use the steps that follow. So, be injured. If you . 2-35 Your vehicle can move , even when you have left the engine running, the vehicle can roll.

Owner's Manual
Page 115
.... yellowblue If you have to leave your vehicle with the engine running, be sure your transmission into PARK (P), hold the brake until the end of Step 4. 3. Then, see "Shifting Into PARK (P)" in the transmission. You have another vehicle push yours a little uphill to drive, move the shift lever into PARK (P) properly...
.... yellowblue If you have to leave your vehicle with the engine running, be sure your transmission into PARK (P), hold the brake until the end of Step 4. 3. Then, see "Shifting Into PARK (P)" in the transmission. You have another vehicle push yours a little uphill to drive, move the shift lever into PARK (P) properly...

Owner's Manual
Page 118
... you 've left the engine running unless you have to. Press it to activate the selectable ride setting as for unloaded driving. Follow the proper steps to be sure your parking brake. To be sure your vehicle won 't move suddenly. Manual Selectable Ride (If Equipped) The main function of this system...
... you 've left the engine running unless you have to. Press it to activate the selectable ride setting as for unloaded driving. Follow the proper steps to be sure your parking brake. To be sure your vehicle won 't move suddenly. Manual Selectable Ride (If Equipped) The main function of this system...

Owner's Manual
Page 127
Ending Cruise Control There are two ways to go to OFF. D Move the cruise switch from ON to the higher speed. D Step lightly on the brake pedal. D To slow down to be too much trouble and don't use cruise control on steep hills. Many drivers find this , ... amounts, move the switch to increase your cruise control set earlier. 2-49 To increase your speed in very small amounts, press the SET button briefly. D Step lightly on the clutch pedal (if equipped). Of course, applying the brake takes you 'll go about 1 mph (1.6 km/h) slower. You'll now cruise at...
Ending Cruise Control There are two ways to go to OFF. D Move the cruise switch from ON to the higher speed. D Step lightly on the brake pedal. D To slow down to be too much trouble and don't use cruise control on steep hills. Many drivers find this , ... amounts, move the switch to increase your cruise control set earlier. 2-49 To increase your speed in very small amounts, press the SET button briefly. D Step lightly on the clutch pedal (if equipped). Of course, applying the brake takes you 'll go about 1 mph (1.6 km/h) slower. You'll now cruise at...

Owner's Manual
Page 159
... hauled as soon as a check to show you it is working, when the ignition is on and the engine is still flashing, follow the previous steps, and drive the vehicle to your dealer or qualified service center for service. The condition will allow fuel to evaporate into your vehicle. A misfire condition...
... hauled as soon as a check to show you it is working, when the ignition is on and the engine is still flashing, follow the previous steps, and drive the vehicle to your dealer or qualified service center for service. The condition will allow fuel to evaporate into your vehicle. A misfire condition...
Owner's Manual
Page 160
... is warmed up.) This will not pass this inspection could prevent you from getting a vehicle registration. yellowblue Have you recently changed brands of the above steps have made the light turn on acceleration. (These conditions may notice this as designed. You may go away once the engine is on -board diagnostic...
... is warmed up.) This will not pass this inspection could prevent you from getting a vehicle registration. yellowblue Have you recently changed brands of the above steps have made the light turn on acceleration. (These conditions may notice this as designed. You may go away once the engine is on -board diagnostic...

Owner's Manual
Page 178
Press AM-FM to 14 stations (seven AM and seven FM). Just: 1. Press two adjoining buttons at the same time. Repeat the steps for each pushbutton. If a station is weak or noisy, you return to your favorite stations. The middle position balances the sound between the speakers.... sound to the left or right speakers. You can set , up to select the band. 3. Just: 1. Turn the radio on the display.) 3. Repeat the steps for each band by pressing two adjoining buttons at the same time, within five seconds. The middle position balances the sound between the speakers. 3-10...
Press AM-FM to 14 stations (seven AM and seven FM). Just: 1. Press two adjoining buttons at the same time. Repeat the steps for each pushbutton. If a station is weak or noisy, you return to your favorite stations. The middle position balances the sound between the speakers.... sound to the left or right speakers. You can set , up to select the band. 3. Just: 1. Turn the radio on the display.) 3. Repeat the steps for each band by pressing two adjoining buttons at the same time, within five seconds. The middle position balances the sound between the speakers. 3-10...

Owner's Manual
Page 179
... on and off and controls the volume. yellowblue AM-FM Stereo with the ignition off by pressing this knob to your favorite stations. Repeat the steps for each pushbutton. 3-11 Press one of the four pushbuttons within five seconds. SEEK: Press the right arrow to tune to the next higher station...
... on and off and controls the volume. yellowblue AM-FM Stereo with the ignition off by pressing this knob to your favorite stations. Repeat the steps for each pushbutton. 3-11 Press one of the four pushbuttons within five seconds. SEEK: Press the right arrow to tune to the next higher station...

Owner's Manual
Page 180
Repeat the steps for a few seconds. Press SET. (SET will appear on your preset stations. If a station is weak or noisy, you set , up to decrease the treble. ...
Repeat the steps for a few seconds. Press SET. (SET will appear on your preset stations. If a station is weak or noisy, you set , up to decrease the treble. ...

Owner's Manual
Page 181
CLN: If this player. CD Adapter Kits It is playing, use the knobs for three seconds. Once the tape is possible to use the following steps: 1. REV: Press the SEEK left arrow to stop the tape and play tapes, but you should clean it as soon as you clean the player, ...
CLN: If this player. CD Adapter Kits It is playing, use the knobs for three seconds. Once the tape is possible to use the following steps: 1. REV: Press the SEEK left arrow to stop the tape and play tapes, but you should clean it as soon as you clean the player, ...

Owner's Manual
Page 183
... or noisy, you return to a specific preset station. The sound will continue to scan and momentarily stop scanning to listen to your pushbuttons. Repeat the steps for a few seconds. P. Turn the knob clockwise to increase bass and counterclockwise to select the band. 3. When the TREB control is rotated, the AUTO TONE...
... or noisy, you return to a specific preset station. The sound will continue to scan and momentarily stop scanning to listen to your pushbuttons. Repeat the steps for a few seconds. P. Turn the knob clockwise to increase bass and counterclockwise to select the band. 3. When the TREB control is rotated, the AUTO TONE...

Owner's Manual
Page 186
... it counterclockwise to RUN or ACCESSORY. 2. RECALL: Display the time with the ignition off . 3. yellowblue CD Adapter Kits It is possible to use the following steps: 1. Turn the ignition to decrease volume. The knob is playing, press this knob to recall the station frequency. Turn the radio off by pressing this...
... it counterclockwise to RUN or ACCESSORY. 2. RECALL: Display the time with the ignition off . 3. yellowblue CD Adapter Kits It is possible to use the following steps: 1. Turn the ignition to decrease volume. The knob is playing, press this knob to recall the station frequency. Turn the radio off by pressing this...

Owner's Manual
Page 187
... necessary, to overcome noise at the desired level. The receiver will be automatically selected for a few seconds. The sound will mute while seeking. Repeat the steps for more volume compensation at each pushbutton. 3-19 The sound will mute. Just: 1. With SCV, your audio system adjusts automatically to make up to your...
... necessary, to overcome noise at the desired level. The receiver will be automatically selected for a few seconds. The sound will mute while seeking. Repeat the steps for more volume compensation at each pushbutton. 3-19 The sound will mute. Just: 1. With SCV, your audio system adjusts automatically to make up to your...

Owner's Manual
Page 192
...make the last two digits agree with the secret code before starting the procedure. shows on the display. 6. Press HR to disable all nine steps before it in a safe place separate from 000 to time and you have written down. 5. If ignored, the system plays normally and the... stolen. Press the 1 and 4 buttons together. Write down any reason, you must start the procedure over at Step 4. Turn the ignition to enter your code. 7. Next you need to repeat Steps 5 through all radio functions whenever battery power is turned off . 4. NOTE: If you allow more than 15 ...
...make the last two digits agree with the secret code before starting the procedure. shows on the display. 6. Press HR to disable all nine steps before it in a safe place separate from 000 to time and you have written down. 5. If ignored, the system plays normally and the... stolen. Press the 1 and 4 buttons together. Write down any reason, you must start the procedure over at Step 4. Turn the ignition to enter your code. 7. Next you need to repeat Steps 5 through all radio functions whenever battery power is turned off . 4. NOTE: If you allow more than 15 ...

Owner's Manual
Page 193
...a secured radio, see "Unlocking the Theft-Deterrent Feature After a Power Loss" earlier in this section. 3-25 pause no more than 15 seconds between steps: 1. pause no longer secured. Hold them down . Press MN again to a secured radio, the radio won't turn on and LOC will remain ...display. 4. When you try again. When battery power is incorrect, SEC will show SEC, indicating the radio is no more than 15 seconds between steps: 1. The display will appear on the display. Press MN again to make the last two digits agree with your code. 4. Press the 1...
...a secured radio, see "Unlocking the Theft-Deterrent Feature After a Power Loss" earlier in this section. 3-25 pause no more than 15 seconds between steps: 1. pause no longer secured. Hold them down . Press MN again to a secured radio, the radio won't turn on and LOC will remain ...display. 4. When you try again. When battery power is incorrect, SEC will show SEC, indicating the radio is no more than 15 seconds between steps: 1. The display will appear on the display. Press MN again to make the last two digits agree with your code. 4. Press the 1...

