Owner's Manual
Page 71
... holder of 40 seconds has elapsed or the doors are locked with you when you press the horn button on the RKE transmitter, your vehicle's headlamps will flash, the horn will honk repeatedly and your interior lamps will not unlock your vehicle. When the dealer matches the replacement transmitter to activate...
... holder of 40 seconds has elapsed or the doors are locked with you when you press the horn button on the RKE transmitter, your vehicle's headlamps will flash, the horn will honk repeatedly and your interior lamps will not unlock your vehicle. When the dealer matches the replacement transmitter to activate...
Owner's Manual
Page 74
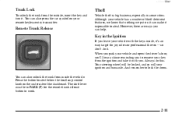
... trunk release button to steal. The shift lever must be locked, and so will your key from inside , it . Press the button located below the headlamp control knob on the underside of theft-deterrent features, we know that nothing we put on your vehicle with you to lock the doors. Remote...
... trunk release button to steal. The shift lever must be locked, and so will your key from inside , it . Press the button located below the headlamp control knob on the underside of theft-deterrent features, we know that nothing we put on your vehicle with you to lock the doors. Remote...
Owner's Manual
Page 77
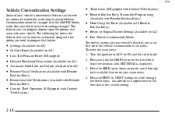
... the SEEK up or down arrows to off. 2. D D D D D D Settings (Available for All) Oil Life Reset (Available for All) Low Tire Pressure Reset (If Equipped) Delayed Headlamp Illumination (Available for All) Automatic Door Lock and Unlock (Available for at least five seconds until SETTINGS is the current setting. yellowblue Vehicle Customization Settings...
... the SEEK up or down arrows to off. 2. D D D D D D Settings (Available for All) Oil Life Reset (Available for All) Low Tire Pressure Reset (If Equipped) Delayed Headlamp Illumination (Available for All) Automatic Door Lock and Unlock (Available for at least five seconds until SETTINGS is the current setting. yellowblue Vehicle Customization Settings...
Owner's Manual
Page 78
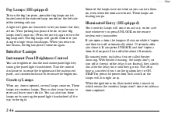
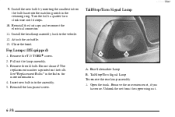
... for a fixed amount of time after an oil change . Be careful not to select. Display Current Settings OIL LIFE - To customize delayed headlamp illumination: 1. Scroll, using the SEEK up or down arrows, until OIL LIFE appears on the display. 2. TIRE MON (Check Tire Pressure Reset.... yellowblue The following options: D OFF - Press the DISP button to stay on the display. 2. LT DELAY (Delayed Headlamp Illumination): This feature allows the vehicle's headlamps and parking lamps to reset. Press the DISP reset. Scroll, using the SEEK up or down arrows, until LT DELAY ...
... for a fixed amount of time after an oil change . Be careful not to select. Display Current Settings OIL LIFE - To customize delayed headlamp illumination: 1. Scroll, using the SEEK up or down arrows, until OIL LIFE appears on the display. 2. TIRE MON (Check Tire Pressure Reset.... yellowblue The following options: D OFF - Press the DISP button to stay on the display. 2. LT DELAY (Delayed Headlamp Illumination): This feature allows the vehicle's headlamps and parking lamps to reset. Press the DISP reset. Scroll, using the SEEK up or down arrows, until LT DELAY ...

Owner's Manual
Page 101
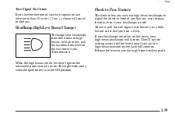
... a lane change, just raise or lower the lever until you complete your turn signal. The lever will return automatically. Turn Signal and Lane Change Indicator Headlamp High/Low Beam Changer Flash-to flash. To signal a turn, move the lever all when you release it there until the arrow starts to -Pass...
... a lane change, just raise or lower the lever until you complete your turn signal. The lever will return automatically. Turn Signal and Lane Change Indicator Headlamp High/Low Beam Changer Flash-to flash. To signal a turn, move the lever all when you release it there until the arrow starts to -Pass...
Owner's Manual
Page 102
... Changer To change your turn signal lever toward you a little, but not so far that you want to alert you. It works even if your headlamps are on, this blue light on the instrument panel also will be on and drive more than 3/4 mile (1.2 km), a chime will turn the high-beam.... 2-39 yellowblue Turn Signal On Chime If you leave either one of you that you hear a click. If your headlamps are off . Flash-to turn on low beam, your high-beam headlamps to low, pull the multifunction lever all the way toward you use it . Release the lever to -Pass Feature This...
... Changer To change your turn signal lever toward you a little, but not so far that you want to alert you. It works even if your headlamps are on, this blue light on the instrument panel also will be on and drive more than 3/4 mile (1.2 km), a chime will turn the high-beam.... 2-39 yellowblue Turn Signal On Chime If you leave either one of you that you hear a click. If your headlamps are off . Flash-to turn on low beam, your high-beam headlamps to low, pull the multifunction lever all the way toward you use it . Release the lever to -Pass Feature This...
Owner's Manual
Page 107
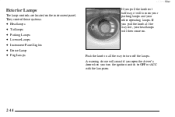
They control these systems: D D D D D D D Headlamps Taillamps Parking Lamps License Lamps Instrument Panel Lights Dome Lamp Fog Lamps If you pull the knob out halfway, it will turn on . A warning chime will then come on your parking lamps and your headlamps will sound if you open the driver's door when you pull the knob all the way to OFF or ACC with the lamps on the instrument panel. Push the knob in all the way out, your other operating lamps. If you turn the ignition switch to turn off the lamps. yellowblue Exterior Lamps The lamp controls are located on . 2-44
They control these systems: D D D D D D D Headlamps Taillamps Parking Lamps License Lamps Instrument Panel Lights Dome Lamp Fog Lamps If you pull the knob out halfway, it will turn on . A warning chime will then come on your parking lamps and your headlamps will sound if you open the driver's door when you pull the knob all the way to OFF or ACC with the lamps on the instrument panel. Push the knob in all the way out, your other operating lamps. If you turn the ignition switch to turn off the lamps. yellowblue Exterior Lamps The lamp controls are located on . 2-44
Owner's Manual
Page 108
...make it 's bright enough outside , your high-beam headlamps will turn off and your high-beam headlamps come on with the headlamp switch in the parking lamp or headlamp position, the delayed headlamp illumination cycle will not occur. The headlamps, taillamps, sidemarker and other lamps that come on at ... The other lamps won 't be especially helpful in PARK (P) and the parking brake is on . Delayed Headlamp Illumination Delayed headlamp illumination provides a period of your headlamps will go off , the gearshift is not in the short periods after dawn and before sunset. The feature...
...make it 's bright enough outside , your high-beam headlamps will turn off and your high-beam headlamps come on with the headlamp switch in the parking lamp or headlamp position, the delayed headlamp illumination cycle will not occur. The headlamps, taillamps, sidemarker and other lamps that come on at ... The other lamps won 't be especially helpful in PARK (P) and the parking brake is on . Delayed Headlamp Illumination Delayed headlamp illumination provides a period of your headlamps will go off , the gearshift is not in the short periods after dawn and before sunset. The feature...
Owner's Manual
Page 109
... end of the lamps have switches so you press UNLOCK on or your vehicle. These lamps are reading lamps. If you change to high-beam headlamps. With theater dimming, the lamps don't just turn off whenever you press UNLOCK and don't open and then turn off . Interior Lamps Instrument Panel Brightness...
... end of the lamps have switches so you press UNLOCK on or your vehicle. These lamps are reading lamps. If you change to high-beam headlamps. With theater dimming, the lamps don't just turn off whenever you press UNLOCK and don't open and then turn off . Interior Lamps Instrument Panel Brightness...
Owner's Manual
Page 110
... it again to turn them on. Rearview Mirror Reading Lamps Use the switch next to each lamp to turn this lamp on by turning the headlamp knob clockwise. Reading Lamps The reading lamps are on in the roof. These lamps and the interior courtesy lamps come on when you in seeing... the instrument cluster and radio if your headlamps are located on the assist handles in the daylight. D the ignition is in ON, D the doors are activated D or an illumination period of time after...
... it again to turn them on. Rearview Mirror Reading Lamps Use the switch next to each lamp to turn this lamp on by turning the headlamp knob clockwise. Reading Lamps The reading lamps are on in the roof. These lamps and the interior courtesy lamps come on when you in seeing... the instrument cluster and radio if your headlamps are located on the assist handles in the daylight. D the ignition is in ON, D the doors are activated D or an illumination period of time after...

Owner's Manual
Page 111
... are sitting in a comfortable driving position. Note that if your power windows, audio system and sunroof will continue to work if the headlamps are left on for 10 minutes, the headlamps and the parking lamps will flash three times. If you leave any of the mirror toward you . 2-48 After having been...
... are sitting in a comfortable driving position. Note that if your power windows, audio system and sunroof will continue to work if the headlamps are left on for 10 minutes, the headlamps and the parking lamps will flash three times. If you leave any of the mirror toward you . 2-48 After having been...
Owner's Manual
Page 112
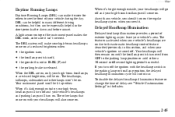
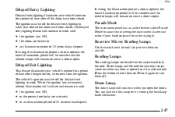
Another photocell, facing rearward, senses headlamps behind you can see the side of your vehicle. 2-49 Adjust each mirror so you . Power Outside Mirrors The power mirror control switch is becoming ... mirror's two outer buttons operate the lights on the armrest. Press any of the four buttons located below the top switch to reduce glare from headlamps behind your vehicle and the area behind you. Push the button in the center of the mirror. One photocell on the front of the mirror...
Another photocell, facing rearward, senses headlamps behind you can see the side of your vehicle. 2-49 Adjust each mirror so you . Power Outside Mirrors The power mirror control switch is becoming ... mirror's two outer buttons operate the lights on the armrest. Press any of the four buttons located below the top switch to reduce glare from headlamps behind your vehicle and the area behind you. Push the button in the center of the mirror. One photocell on the front of the mirror...
Owner's Manual
Page 139
... or durability. The message will stay on if you are in the Index. 2-76 The message will also hear four chimes. Have your high-beam headlamps. If you have a problem with your vehicle serviced as soon as possible.
... or durability. The message will stay on if you are in the Index. 2-76 The message will also hear four chimes. Have your high-beam headlamps. If you have a problem with your vehicle serviced as soon as possible.
Owner's Manual
Page 200
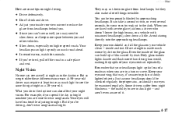
... Just as in the daytime. D Don't drink and drive. D Slow down a little. Your D In remote areas, watch for your eyes moving; But as from headlamps, but they also make a lot of your vehicle clean -- When you 're driving, don't wear sunglasses at night is made much worse by dirt on... out dimly lighted objects. Even the inside of a roadway when you and other vehicles. Keep your eyes to readjust to wear sunglasses. D Adjust your headlamps light up far less of the glass can 't see as well at night as much road ahead. Remember that way, it . and aren't even ...
... Just as in the daytime. D Don't drink and drive. D Slow down a little. Your D In remote areas, watch for your eyes moving; But as from headlamps, but they also make a lot of your vehicle clean -- When you 're driving, don't wear sunglasses at night is made much worse by dirt on... out dimly lighted objects. Even the inside of a roadway when you and other vehicles. Keep your eyes to readjust to wear sunglasses. D Adjust your headlamps light up far less of the glass can 't see as well at night as much road ahead. Remember that way, it . and aren't even ...
Owner's Manual
Page 213
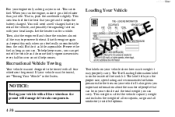
When you run for signaling later on your engine only as long as you can be towed, see "Towing Your Vehicle" in your headlamps. Start the engine again and repeat this only when you can . Loading Your Vehicle Recreational Vehicle Towing Your vehicle was not designed to be towed ...
When you run for signaling later on your engine only as long as you can be towed, see "Towing Your Vehicle" in your headlamps. Start the engine again and repeat this only when you can . Loading Your Vehicle Recreational Vehicle Towing Your vehicle was not designed to be towed ...
Owner's Manual
Page 291
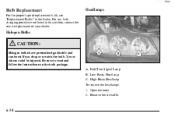
... Signal Lamp B. yellowblue Bulb Replacement For the proper type of replacement bulb, see "Replacement Bulbs" in this section, contact the service department of your dealer. Headlamps Halogen Bulbs CAUTION: Halogen bulbs have pressurized gas inside and can burst if you drop or scratch the bulb. You or others could be injured...
... Signal Lamp B. yellowblue Bulb Replacement For the proper type of replacement bulb, see "Replacement Bulbs" in this section, contact the service department of your dealer. Headlamps Halogen Bulbs CAUTION: Halogen bulbs have pressurized gas inside and can burst if you drop or scratch the bulb. You or others could be injured...

Owner's Manual
Page 292
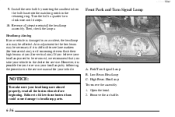
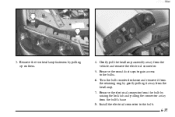
Turn the bulb counterclockwise and remove it from the retaining ring by gently pulling it away from the bulb's base. 8. Remove the two headlamp fasteners by raising the lock tab and pulling the connector away from the headlamp. 7. Remove the electrical connector from the bulb by pulling up on them. 4. Gently pull the headlamp assembly away from the vehicle and remove the electrical connector. 5. Install the electrical connector to the bulbs. 6. yellowblue 3. Remove the round dust caps to gain access to the new bulb. 6-35
Turn the bulb counterclockwise and remove it from the retaining ring by gently pulling it away from the bulb's base. 8. Remove the two headlamp fasteners by raising the lock tab and pulling the connector away from the headlamp. 7. Remove the electrical connector from the bulb by pulling up on them. 4. Gently pull the headlamp assembly away from the vehicle and remove the electrical connector. 5. Install the electrical connector to the bulbs. 6. yellowblue 3. Remove the round dust caps to gain access to the new bulb. 6-35
Owner's Manual
Page 293
...damage to see lane markers (for horizontal aim), or if oncoming drivers flash their high beams at you believe your headlamps need to reinstall the headlamp assembly. yellowblue 9. Install the new bulb by following the procedure in the retaining ring. Reverse all the instructions before ...beginning. Headlamp Aiming If your vehicle to re-aim your headlamps by inserting the smallest tab on the bulb base into the matching notch in the service manual for service. ...
...damage to see lane markers (for horizontal aim), or if oncoming drivers flash their high beams at you believe your headlamps need to reinstall the headlamp assembly. yellowblue 9. Install the new bulb by following the procedure in the retaining ring. Reverse all the instructions before ...beginning. Headlamp Aiming If your vehicle to re-aim your headlamps by inserting the smallest tab on the bulb base into the matching notch in the service manual for service. ...
Owner's Manual
Page 294
Install the electrical connector to the bulbs. 6. Remove the two headlamp fasteners by gently pulling it away from the headlamp. 7. Remove the round dust caps to gain access to the bulb. 6-37 Remove the electrical connector from the bulb by raising the lock tab and pulling the connector away from the vehicle and remove the electrical connector. 5. yellowblue 3. Gently pull the headlamp assembly away from the bulb's base. 8. Turn the bulb counterclockwise and remove it from the retaining ring by pulling up on them. 4.
Install the electrical connector to the bulbs. 6. Remove the two headlamp fasteners by gently pulling it away from the headlamp. 7. Remove the round dust caps to gain access to the bulb. 6-37 Remove the electrical connector from the bulb by raising the lock tab and pulling the connector away from the vehicle and remove the electrical connector. 5. yellowblue 3. Gently pull the headlamp assembly away from the bulb's base. 8. Turn the bulb counterclockwise and remove it from the retaining ring by pulling up on them. 4.
Owner's Manual
Page 295
... the air baffle. 13. Do not discard! Insert new bulb into the matching notch in the Index for more information. 4. Rear Sidemarker Lamp B. Install the headlamp assembly back to the vehicle. 12. Close the hood. Pull out the lamp assembly. 1. A. Tail/Stop/Turn Signal Lamp To remove the rear lamp assembly...
... the air baffle. 13. Do not discard! Insert new bulb into the matching notch in the Index for more information. 4. Rear Sidemarker Lamp B. Install the headlamp assembly back to the vehicle. 12. Close the hood. Pull out the lamp assembly. 1. A. Tail/Stop/Turn Signal Lamp To remove the rear lamp assembly...


