Owner's Manual
Page 49
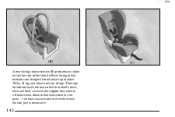
the base stays secured in a frontal crash. This type of restraint faces the rear so that the infant's head, neck and body can have the support they need in the vehicle and the seat part is removable. 1-42 Rear-facing infant restraints are designed for infants of up to face the rear of the vehicle. Some infant seats come in two parts -- yellowblue A rear-facing infant restraint (B) positions an infant to about 20 lbs. (9 kg) and about one year of age.
the base stays secured in a frontal crash. This type of restraint faces the rear so that the infant's head, neck and body can have the support they need in the vehicle and the seat part is removable. 1-42 Rear-facing infant restraints are designed for infants of up to face the rear of the vehicle. Some infant seats come in two parts -- yellowblue A rear-facing infant restraint (B) positions an infant to about 20 lbs. (9 kg) and about one year of age.

Owner's Manual
Page 142
... D An error of the vehicle's speed sensor or fuel sender will be traveled with the display showing all segments of half a second. The reset is based on the last few hours of driving. A reset can be displayed. D INST ECON (Instantaneous Fuel Economy): This shows fuel economy for at least 10 seconds...
... D An error of the vehicle's speed sensor or fuel sender will be traveled with the display showing all segments of half a second. The reset is based on the last few hours of driving. A reset can be displayed. D INST ECON (Instantaneous Fuel Economy): This shows fuel economy for at least 10 seconds...
Owner's Manual
Page 195
... accelerate until you can "drive" through a sharp curve. Of course, the posted speeds are times when steering can lose control. Steering in Emergencies There are based on the space available. 4-12 You can be more effective than braking. Both control systems -- You can avoid these . yellowblue Suppose you can stop in...
... accelerate until you can "drive" through a sharp curve. Of course, the posted speeds are times when steering can lose control. Steering in Emergencies There are based on the space available. 4-12 You can be more effective than braking. Both control systems -- You can avoid these . yellowblue Suppose you can stop in...
Owner's Manual
Page 212
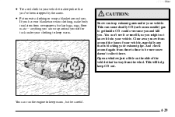
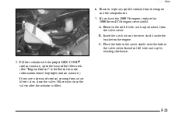
... to be careful. 4-29 You can wrap around you. anything you can 't see it or smell it is blocking your vehicle. And check around the base of the vehicle that is in your exhaust pipe. CAUTION: Snow can cause deadly CO (carbon monoxide) gas to keep CO out. D Put on the...
... to be careful. 4-29 You can wrap around you. anything you can 't see it or smell it is blocking your vehicle. And check around the base of the vehicle that is in your exhaust pipe. CAUTION: Snow can cause deadly CO (carbon monoxide) gas to keep CO out. D Put on the...
Owner's Manual
Page 242
Rinse or wipe any spilled coolant from the valve cover. Remove the oil fill tube, with the proper DEX-COOLR coolant mixture, up to the base of coolant coming from an air bleed valve, close the valves after the radiator is filled. 5-21 Place the hole in the cover shield over ...
Rinse or wipe any spilled coolant from the valve cover. Remove the oil fill tube, with the proper DEX-COOLR coolant mixture, up to the base of coolant coming from an air bleed valve, close the valves after the radiator is filled. 5-21 Place the hole in the cover shield over ...
Owner's Manual
Page 243
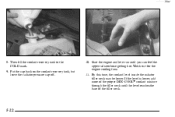
Watch out for the engine cooling fans. 11. Then fill the coolant recovery tank to the COLD mark. 9. Start the engine and let it run until the level reaches the base of the proper DEX-COOLR coolant mixture through the filler neck until you can feel the upper radiator hose getting hot. If the level is lower, add more of the filler neck. 5-22 yellowblue 8. Put the cap back on the coolant recovery tank, but leave the radiator pressure cap off. 10. By this time, the coolant level inside the radiator filler neck may be lower.
Watch out for the engine cooling fans. 11. Then fill the coolant recovery tank to the COLD mark. 9. Start the engine and let it run until the level reaches the base of the proper DEX-COOLR coolant mixture through the filler neck until you can feel the upper radiator hose getting hot. If the level is lower, add more of the filler neck. 5-22 yellowblue 8. Put the cap back on the coolant recovery tank, but leave the radiator pressure cap off. 10. By this time, the coolant level inside the radiator filler neck may be lower.
Owner's Manual
Page 274
... won't detect dust in a dusty area, be heard to verify the exit. Remember to reset the CHG OIL SOON light whenever the oil is not based on mileage, but on before 3,000 miles (5 000 km). Turn the ignition to enter the submenu. Press the DISP button to exit programming. A chime will...
... won't detect dust in a dusty area, be heard to verify the exit. Remember to reset the CHG OIL SOON light whenever the oil is not based on mileage, but on before 3,000 miles (5 000 km). Turn the ignition to enter the submenu. Press the DISP button to exit programming. A chime will...
Owner's Manual
Page 288
This will help keep dirt from a sealed container only. For example, just a few drops of mineral-based oil, such as engine oil, in your brake system, your vehicle. Always clean the brake fluid reservoir cap and the area around the cap before ...
This will help keep dirt from a sealed container only. For example, just a few drops of mineral-based oil, such as engine oil, in your brake system, your vehicle. Always clean the brake fluid reservoir cap and the area around the cap before ...

Owner's Manual
Page 292
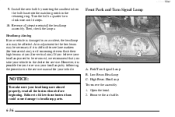
Gently pull the headlamp assembly away from the headlamp. 7. Remove the round dust caps to gain access to the new bulb. 6-35 Install the electrical connector to the bulbs. 6. Turn the bulb counterclockwise and remove it from the retaining ring by gently pulling it away from the vehicle and remove the electrical connector. 5. Remove the electrical connector from the bulb by pulling up on them. 4. yellowblue 3. Remove the two headlamp fasteners by raising the lock tab and pulling the connector away from the bulb's base. 8.
Gently pull the headlamp assembly away from the headlamp. 7. Remove the round dust caps to gain access to the new bulb. 6-35 Install the electrical connector to the bulbs. 6. Turn the bulb counterclockwise and remove it from the retaining ring by gently pulling it away from the vehicle and remove the electrical connector. 5. Remove the electrical connector from the bulb by pulling up on them. 4. yellowblue 3. Remove the two headlamp fasteners by raising the lock tab and pulling the connector away from the bulb's base. 8.
Owner's Manual
Page 293
Install the new bulb by inserting the smallest tab on the bulb base into the matching notch in an accident, the headlamp aim may be necessary if it is possible for you to re-aim your headlamps by ...
Install the new bulb by inserting the smallest tab on the bulb base into the matching notch in an accident, the headlamp aim may be necessary if it is possible for you to re-aim your headlamps by ...
Owner's Manual
Page 294
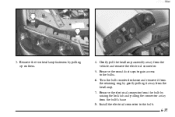
Turn the bulb counterclockwise and remove it from the retaining ring by gently pulling it away from the vehicle and remove the electrical connector. 5. Remove the round dust caps to gain access to the bulb. 6-37 Gently pull the headlamp assembly away from the headlamp. 7. Remove the two headlamp fasteners by raising the lock tab and pulling the connector away from the bulb's base. 8. Remove the electrical connector from the bulb by pulling up on them. 4. Install the electrical connector to the bulbs. 6. yellowblue 3.
Turn the bulb counterclockwise and remove it from the retaining ring by gently pulling it away from the vehicle and remove the electrical connector. 5. Remove the round dust caps to gain access to the bulb. 6-37 Gently pull the headlamp assembly away from the headlamp. 7. Remove the two headlamp fasteners by raising the lock tab and pulling the connector away from the bulb's base. 8. Remove the electrical connector from the bulb by pulling up on them. 4. Install the electrical connector to the bulbs. 6. yellowblue 3.
Owner's Manual
Page 295
... matching notch in the Index for more information. 4. Open the trunk. Reinstall the lamps and screw. yellowblue 9. The replacement number is printed on the bulb base into the assembly. 5. A. Remove the convenience net, if you have one. Unhook the net from the upper wing nut. 6-38 Attach the air baffle. 13...
... matching notch in the Index for more information. 4. Open the trunk. Reinstall the lamps and screw. yellowblue 9. The replacement number is printed on the bulb base into the assembly. 5. A. Remove the convenience net, if you have one. Unhook the net from the upper wing nut. 6-38 Attach the air baffle. 13...

Owner's Manual
Page 298
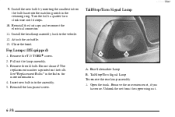
... rear of the trunk lid. 2. Tighten the socket by turning it out. 5. Remove the old bulb from the small prongs extending from the dome lamp base plate; Remove the two screws with a E8 TORXR socket. 4. Back-Up Lamp 1. Pull the bulb out. Do not twist it. 6.
... rear of the trunk lid. 2. Tighten the socket by turning it out. 5. Remove the old bulb from the small prongs extending from the dome lamp base plate; Remove the two screws with a E8 TORXR socket. 4. Back-Up Lamp 1. Pull the bulb out. Do not twist it. 6.
Owner's Manual
Page 306
...: Mixing tires could cause you to Federal safety requirements and additional General Motors Tire Performance Criteria (TPC) standards. Treadwear The treadwear grade is a comparative rating based on a specified government test course. CAUTION: If you use bias-ply tires on your vehicle, the wheel rim flanges could develop cracks after many miles...
...: Mixing tires could cause you to Federal safety requirements and additional General Motors Tire Performance Criteria (TPC) standards. Treadwear The treadwear grade is a comparative rating based on a specified government test course. CAUTION: If you use bias-ply tires on your vehicle, the wheel rim flanges could develop cracks after many miles...
Owner's Manual
Page 307
... loose, the wheel, wheel bolts and wheel nuts should be repaired). A, B, C The temperature grades are AA, A, B, and C. Warning: The temperature grade for a tire that is based on your dealer if any wheel that is bent, cracked, or badly rusted or corroded. If you need to the generation of wheel you notice...
... loose, the wheel, wheel bolts and wheel nuts should be repaired). A, B, C The temperature grades are AA, A, B, and C. Warning: The temperature grade for a tire that is based on your dealer if any wheel that is bent, cracked, or badly rusted or corroded. If you need to the generation of wheel you notice...
Owner's Manual
Page 312
... later. If abrasive cleaners are used on leather. Sprays containing silicones or waxes may cause annoying reflections in the Index.) Don't use oils, varnishes, solvent-based or abrasive cleaners, furniture polish or shoe polish on the inside rear window, since they may affect the surface finish. 6-55 Avoid placing decals on...
... later. If abrasive cleaners are used on leather. Sprays containing silicones or waxes may cause annoying reflections in the Index.) Don't use oils, varnishes, solvent-based or abrasive cleaners, furniture polish or shoe polish on the inside rear window, since they may affect the surface finish. 6-55 Avoid placing decals on...
Owner's Manual
Page 313
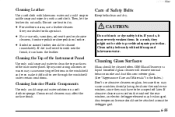
... very cold, damp weather more frequent application may be flushed promptly and not allowed to enter your vehicle. Don't use cleaning agents that are petroleum based, or that look worn. Dry the finish with water. Then rinse the blade with a clean cloth at least every six months. Washing Your Vehicle The...
... very cold, damp weather more frequent application may be flushed promptly and not allowed to enter your vehicle. Don't use cleaning agents that are petroleum based, or that look worn. Dry the finish with water. Then rinse the blade with a clean cloth at least every six months. Washing Your Vehicle The...

Owner's Manual
Page 315
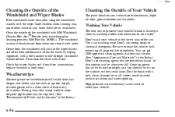
Petroleum-based products may develop into the paint surface. This damage can create a chemical fallout. At least every spring, flush these are not removed, accelerated corrosion (rust) ..., whichever occurs first. Chemical Paint Spotting Some weather and atmospheric conditions can take care to the owner, the surfaces of new vehicles damaged by this , Chevrolet will corrode quickly and may damage the paint finish and tires. Airborne pollutants can occur on your dealer or other debris can be repaired with...
Petroleum-based products may develop into the paint surface. This damage can create a chemical fallout. At least every spring, flush these are not removed, accelerated corrosion (rust) ..., whichever occurs first. Chemical Paint Spotting Some weather and atmospheric conditions can take care to the owner, the surfaces of new vehicles damaged by this , Chevrolet will corrode quickly and may damage the paint finish and tires. Airborne pollutants can occur on your dealer or other debris can be repaired with...