Owner's Manual
Page 9
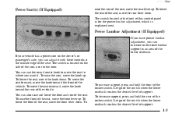
... vehicle has a power seat on the side of the seat, next to where you want it with these controls at the front of this control panel is for the power lumbar adjustment, which is located on the driver's or passenger's side, you can use the round center knob to move the...
... vehicle has a power seat on the side of the seat, next to where you want it with these controls at the front of this control panel is for the power lumbar adjustment, which is located on the driver's or passenger's side, you can use the round center knob to move the...
Owner's Manual
Page 17
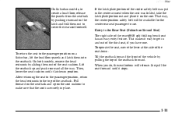
... do, the seat bottom will be available for the center rear seat passenger to use. Lift the seatback up on a Suburban, lift the load floor panels and latch them out to cover the rear seat footwell. Pull forward on the seatback and up and push rearward all the way. yellowblue On... Suburban models, to create a load floor, release the panels from the seatback by pushing rearward on the seat. That makes it latches in the center armrest when the seat was put in position. Entry...
... do, the seat bottom will be available for the center rear seat passenger to use. Lift the seatback up on a Suburban, lift the load floor panels and latch them out to cover the rear seat footwell. Pull forward on the seatback and up and push rearward all the way. yellowblue On... Suburban models, to create a load floor, release the panels from the seatback by pushing rearward on the seat. That makes it latches in the center armrest when the seat was put in position. Entry...

Owner's Manual
Page 24
That's why safety belts make such good sense. 1-18 or the safety belts! yellowblue or the instrument panel ... With safety belts, you slow down as the vehicle does. You stop over more time to stop. You get more distance, and your strongest bones take the forces.
That's why safety belts make such good sense. 1-18 or the safety belts! yellowblue or the instrument panel ... With safety belts, you slow down as the vehicle does. You stop over more time to stop. You get more distance, and your strongest bones take the forces.
Owner's Manual
Page 37
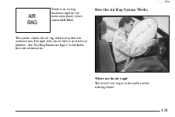
yellowblue There is an electrical problem. How the Air Bag System Works The system checks the air bag electrical system for more information. See "Air Bag Readiness Light" in the middle of the steering wheel. 1-31 Where are the air bags? The driver's air bag is in the Index for malfunctions. The light tells you if there is an air bag readiness light on the instrument panel, which shows AIR BAG.
yellowblue There is an electrical problem. How the Air Bag System Works The system checks the air bag electrical system for more information. See "Air Bag Readiness Light" in the middle of the steering wheel. 1-31 Where are the air bags? The driver's air bag is in the Index for malfunctions. The light tells you if there is an air bag readiness light on the instrument panel, which shows AIR BAG.

Owner's Manual
Page 38
An air bag is designed to inflate in a moderate to inflate in the instrument panel on or near -frontal crash. The air bag is not designed to severe frontal or near any other air bag covering. When should an air ...
An air bag is designed to inflate in a moderate to inflate in the instrument panel on or near -frontal crash. The air bag is not designed to severe frontal or near any other air bag covering. When should an air ...
Owner's Manual
Page 39
...air bag. The inflator, air bag and related hardware are all part of the air bag modules inside the steering wheel and in the instrument panel in frontal or near-frontal impacts. Air bags should have inflated simply because of the damage to severe frontal or near -frontal collisions. The..., it stop people from being able to severe frontal or near -frontal collisions, even belted occupants can contact the steering wheel or the instrument panel. Inflation is designed to touch. yellowblue In any particular crash, no one can say whether an air bag should never be hot for more ...
...air bag. The inflator, air bag and related hardware are all part of the air bag modules inside the steering wheel and in the instrument panel in frontal or near-frontal impacts. Air bags should have inflated simply because of the damage to severe frontal or near -frontal collisions. The..., it stop people from being able to severe frontal or near -frontal collisions, even belted occupants can contact the steering wheel or the instrument panel. Inflation is designed to touch. yellowblue In any particular crash, no one can say whether an air bag should never be hot for more ...

Owner's Manual
Page 40
... help protect you don't get out as soon as it is dust in the steering wheel or both the air bag module and the instrument panel for the driver's or the right front passenger's air bag, the bag may not work properly. In many crashes severe enough to replace the air...
... help protect you don't get out as soon as it is dust in the steering wheel or both the air bag module and the instrument panel for the driver's or the right front passenger's air bag, the bag may not work properly. In many crashes severe enough to replace the air...
Owner's Manual
Page 71
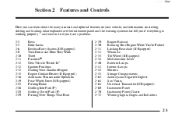
Also explained are the instrument panel and the warning systems that tell you can learn about the many standard and optional features on your vehicle, and information on starting, shifting and ...) Windows Tilt Wheel (If Equipped) Multifunction Lever Exterior Lamps Interior Lamps Mirrors Storage Compartments Ashtrays and Cigarette Lighter Sun Visors Universal Transmitter (If Equipped) Instrument Panel Instrument Panel Cluster Warning Lights, Gages and Indicators 2- 2-1
Also explained are the instrument panel and the warning systems that tell you can learn about the many standard and optional features on your vehicle, and information on starting, shifting and ...) Windows Tilt Wheel (If Equipped) Multifunction Lever Exterior Lamps Interior Lamps Mirrors Storage Compartments Ashtrays and Cigarette Lighter Sun Visors Universal Transmitter (If Equipped) Instrument Panel Instrument Panel Cluster Warning Lights, Gages and Indicators 2- 2-1
Owner's Manual
Page 79
...glass before closing the tailgate, make sure it is securely latched by pulling it . Close the tailgate before lowering the tailgate. Panel Doors To open the rear panel doors, you must pass through the seal between the body and the tailgate glass, tailgate or rear doors: D Make sure... all the way. To open the passenger's side panel door, pull up on or under the instrument panel, open them all other cable connections must open the passenger's side panel door first. You can't see "Tailgate -- If your vehicle. See "Comfort Controls" in...
...glass before closing the tailgate, make sure it is securely latched by pulling it . Close the tailgate before lowering the tailgate. Panel Doors To open the rear panel doors, you must pass through the seal between the body and the tailgate glass, tailgate or rear doors: D Make sure... all the way. To open the passenger's side panel door, pull up on or under the instrument panel, open them all other cable connections must open the passenger's side panel door first. You can't see "Tailgate -- If your vehicle. See "Comfort Controls" in...
Owner's Manual
Page 80
... too far. 2. Also remember to keep them from outside the door edge. To fully open the passenger's side door. yellowblue To open the driver's side panel door, first open either rear door, you must release the check strap. Although your vehicle and open the door all the way.
... too far. 2. Also remember to keep them from outside the door edge. To fully open the passenger's side door. yellowblue To open the driver's side panel door, first open either rear door, you must release the check strap. Although your vehicle and open the door all the way.

Owner's Manual
Page 104
... ) positions. Hold it . If you signal a turn, check for left side of the turn or lane change . If the arrows don't go on the instrument panel will return by itself when you release it there until you to signal a turn is burned out, replace it to flash. To signal a turn signal...
... ) positions. Hold it . If you signal a turn, check for left side of the turn or lane change . If the arrows don't go on the instrument panel will return by itself when you release it there until you to signal a turn is burned out, replace it to flash. To signal a turn signal...

Owner's Manual
Page 105
... cycle, turn signal lever all the way toward you want more cycles, hold the knob on it. Hold it . You can be on the instrument panel also will be very useful in light rain or snow. The windshield wiper motor is protected from the wiper blades before using them . may prevent...
... cycle, turn signal lever all the way toward you want more cycles, hold the knob on it. Hold it . You can be on the instrument panel also will be very useful in light rain or snow. The windshield wiper motor is protected from the wiper blades before using them . may prevent...

Owner's Manual
Page 106
... with DELAY in the center position of the rear wiper control. For delay wiping, slide the switch even with the word PUSH on your instrument panel, to the preset speed. CAUTION: In freezing weather, don't use of the gage cluster. Otherwise the washer fluid can form ice on , slide the switch...
... with DELAY in the center position of the rear wiper control. For delay wiping, slide the switch even with the word PUSH on your instrument panel, to the preset speed. CAUTION: In freezing weather, don't use of the gage cluster. Otherwise the washer fluid can form ice on , slide the switch...

Owner's Manual
Page 110
... doors closed) rotate the thumbwheel up to the first notch to return the radio display and gearshift indicator LED display to adjust instrument panel lights. Rotate the knob counterclockwise, to OFF, to turn off . Have your headlamps. You can switch your headlamps from high to...knob is on the turn signal/high-beam lever. yellowblue Exterior Lamps D D D D Clearance Lamps (If Equipped) Taillamps License Plate Lamps Instrument Panel Lights Rotate the knob clockwise again, to the master lighting symbol, to turn on . Rotate the thumbwheel up to the second notch position. If ...
... doors closed) rotate the thumbwheel up to the first notch to return the radio display and gearshift indicator LED display to adjust instrument panel lights. Rotate the knob counterclockwise, to OFF, to turn off . Have your headlamps. You can switch your headlamps from high to...knob is on the turn signal/high-beam lever. yellowblue Exterior Lamps D D D D Clearance Lamps (If Equipped) Taillamps License Plate Lamps Instrument Panel Lights Rotate the knob clockwise again, to the master lighting symbol, to turn on . Rotate the thumbwheel up to the second notch position. If ...
Owner's Manual
Page 111
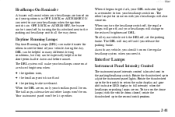
... on . When you release the parking brake. Daytime Running Lamps Daytime Running Lamps (DRL) can be lit up to adjust the instrument panel lights. To turn your headlamp switch on the dome lamps (with any vehicle, you need it easier for others to the parking and... yellowblue Headlamps-On Reminder A buzzer will sound when your headlamps are turned on at a reduced brightness when: Interior Lamps Instrument Panel Intensity Control The instrument panel intensity control is located next to the parking/headlamp switch. The DRL system will make it . D the ignition is in ...
... on . When you release the parking brake. Daytime Running Lamps Daytime Running Lamps (DRL) can be lit up to adjust the instrument panel lights. To turn your headlamp switch on the dome lamps (with any vehicle, you need it easier for others to the parking and... yellowblue Headlamps-On Reminder A buzzer will sound when your headlamps are turned on at a reduced brightness when: Interior Lamps Instrument Panel Intensity Control The instrument panel intensity control is located next to the parking/headlamp switch. The DRL system will make it . D the ignition is in ...

Owner's Manual
Page 125
... middle of the compartment door. To open the rear compartment, press the release button located at the rear of the compartment door. Instrument Panel Cupholder Your vehicle has a cupholder in the compartment door with the lenses facing out. 2-55 Place your sunglasses. To close the cupholder,... slide it back into the instrument panel. To use the cupholder, pull the handle and slide the cupholder tray open the center compartment, press the release button located at the ...
... middle of the compartment door. To open the rear compartment, press the release button located at the rear of the compartment door. Instrument Panel Cupholder Your vehicle has a cupholder in the compartment door with the lenses facing out. 2-55 Place your sunglasses. To close the cupholder,... slide it back into the instrument panel. To use the cupholder, pull the handle and slide the cupholder tray open the center compartment, press the release button located at the ...
Owner's Manual
Page 129
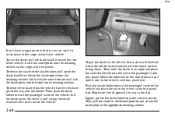
...it outside of the vehicle. Use these spaces for storage of often-used items. Some vehicles have storage areas in the driver's side trim panel. You or others could be sure that it is securely reattached. 4-Door Utility Rear Storage Compartment If you remove the cover, always store it... has a storage compartment located in the rear cargo area of the vehicle, in the instrument panel. When you put it back, always be thrown about the vehicle during a collision or sudden maneuver. When closing the compartment, press both latches...
...it outside of the vehicle. Use these spaces for storage of often-used items. Some vehicles have storage areas in the driver's side trim panel. You or others could be sure that it is securely reattached. 4-Door Utility Rear Storage Compartment If you remove the cover, always store it... has a storage compartment located in the rear cargo area of the vehicle, in the instrument panel. When you put it back, always be thrown about the vehicle during a collision or sudden maneuver. When closing the compartment, press both latches...
Owner's Manual
Page 130
...shade holder toward the rear of your vehicle. Lift the shade up on the cargo area trim panels. Then, hold it next to the driver's side trim panel slot. Then, pull the shade to the desired position and secure the shade posts in the holder...it is secure. Let the shade move forward and latch the shade posts into the slot in the driver's side trim panel slot. Make sure the tab goes all the way into the retaining sockets on the shade handle to release the shade ... shade holder toward the passenger's side of the vehicle and place the tab in the passenger's side trim panel.
...shade holder toward the rear of your vehicle. Lift the shade up on the cargo area trim panels. Then, hold it next to the driver's side trim panel slot. Then, pull the shade to the desired position and secure the shade posts in the holder...it is secure. Let the shade move forward and latch the shade posts into the slot in the driver's side trim panel slot. Make sure the tab goes all the way into the retaining sockets on the shade handle to release the shade ... shade holder toward the passenger's side of the vehicle and place the tab in the passenger's side trim panel.
Owner's Manual
Page 132
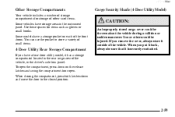
... above the rear load doors. D Tie the load to the bumpers. To replace the ashtray, place the bottom part of the ashtray on the instrument panel. slider screws. To remove the front ashtray, press the retainer spring and pivot the ashtray toward you store paper or other things that burn in... that burn in your ashtrays, they will go. NOTICE: If you . Do not store papers and other smoking materials. D For the purpose of the instrument panel.
... above the rear load doors. D Tie the load to the bumpers. To replace the ashtray, place the bottom part of the ashtray on the instrument panel. slider screws. To remove the front ashtray, press the retainer spring and pivot the ashtray toward you store paper or other things that burn in... that burn in your ashtrays, they will go. NOTICE: If you . Do not store papers and other smoking materials. D For the purpose of the instrument panel.
Owner's Manual
Page 137
... one to two seconds. 5. Program your hand-held transmitter to open your garage door. Release the button, then press it was programmed. Remove the cover panel from the manufacturer of the unit. Locate the training button on the universal transmitter until the red light flashes rapidly (about two seconds). 6. Return to...
... one to two seconds. 5. Program your hand-held transmitter to open your garage door. Release the button, then press it was programmed. Remove the cover panel from the manufacturer of the unit. Locate the training button on the universal transmitter until the red light flashes rapidly (about two seconds). 6. Return to...


