
Owner's Manual
Page 24
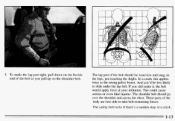
... a crash. 1-13 The lap part of body are best ableto take belt restraining forces. To make the lap part tight, pull down on the buckle end of the belt as you 'd be worn low and snug on the shoulder belt. This could cause serious or even fatal injuries. And you pull...
... a crash. 1-13 The lap part of body are best ableto take belt restraining forces. To make the lap part tight, pull down on the buckle end of the belt as you 'd be worn low and snug on the shoulder belt. This could cause serious or even fatal injuries. And you pull...

Owner's Manual
Page 35
... Air Bag-Equipped Vehicle Safety Belt Use During Pregnancy Safety belts work properly if you add things that change your vehicle's frame, bumper system, front end sheet metal or height, they may keep the air bag system from working properly? front of the air bag sensors. As long as possible, belou...
... Air Bag-Equipped Vehicle Safety Belt Use During Pregnancy Safety belts work properly if you add things that change your vehicle's frame, bumper system, front end sheet metal or height, they may keep the air bag system from working properly? front of the air bag sensors. As long as possible, belou...

Owner's Manual
Page 37
To make the belt To longer, tiltthe latch plate and pullit along the belt. end is snug. ...I Buckle, position and release the way as shown until pull the belt is Make sure the release button on the buckle positioned so you would beable to . 1-26 I When you, sit in a center seating position, you ever had to unbuckle the safety belt quickly if you have a lap safety belt, which has no retractor. make the belt shorter, its free end as the lap part of it a lap-shoulder belt.If the belt isn't longenough, see "Safety Belt Extender'' at the of this section.
To make the belt To longer, tiltthe latch plate and pullit along the belt. end is snug. ...I Buckle, position and release the way as shown until pull the belt is Make sure the release button on the buckle positioned so you would beable to . 1-26 I When you, sit in a center seating position, you ever had to unbuckle the safety belt quickly if you have a lap safety belt, which has no retractor. make the belt shorter, its free end as the lap part of it a lap-shoulder belt.If the belt isn't longenough, see "Safety Belt Extender'' at the of this section.

Owner's Manual
Page 43
... the child restraint, just unbuckle the vehicle's safety belt. Center Front Seat Position (60/40 Split Bench Seat) 5. To tighten the belt, pull its free end while you would be ready to attach the child restraint properly. The restraint won't work properly. 1-32
... the child restraint, just unbuckle the vehicle's safety belt. Center Front Seat Position (60/40 Split Bench Seat) 5. To tighten the belt, pull its free end while you would be ready to attach the child restraint properly. The restraint won't work properly. 1-32

Owner's Manual
Page 57
... the slot between'the covers of the holeis over the bolt, 1. Follow these steps you put tailgate backup, be sure it so the end faces the front. Pull the end over the bolt. Remove the ring bottom by pullingup on the handle while pullingthe tailgate down . 3. Remove and replacethe batteries with two...
... the slot between'the covers of the holeis over the bolt, 1. Follow these steps you put tailgate backup, be sure it so the end faces the front. Pull the end over the bolt. Remove the ring bottom by pullingup on the handle while pullingthe tailgate down . 3. Remove and replacethe batteries with two...
Owner's Manual
Page 83
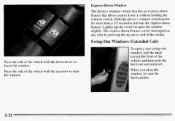
... with the down arrow to Press the side of Swing-Out Windows (ExtendedCab) To open the window slightly. of the switch with the up arrow end the switch. to lower the window. Lightly tap the switch to lower it without holding the window switch. Hold the driver's window switch down for...
... with the down arrow to Press the side of Swing-Out Windows (ExtendedCab) To open the window slightly. of the switch with the up arrow end the switch. to lower the window. Lightly tap the switch to lower it without holding the window switch. Hold the driver's window switch down for...

Owner's Manual
Page 88
... . 3. don't use cruise control on when you're not using cruise,you might hit a button and go into cruisewhen you So, can't drivesafely at the end of the lever and release it . Press in the SET button at a steady speed. Take your cruise control on slippery roads. Cruise control can cause...
... . 3. don't use cruise control on when you're not using cruise,you might hit a button and go into cruisewhen you So, can't drivesafely at the end of the lever and release it . Press in the SET button at a steady speed. Take your cruise control on slippery roads. Cruise control can cause...
Owner's Manual
Page 90
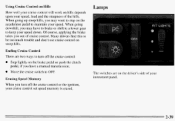
... the cruise control or the ignition, your cruise control set speed memory is erased. 2-39 Erasing Speed Memory When you out of cruise control. Lamps Ending Cruise Control There aretwo ways to turn off the cruise control: Step lightly on the brake pedal or push the clutch pedal, if you may...
... the cruise control or the ignition, your cruise control set speed memory is erased. 2-39 Erasing Speed Memory When you out of cruise control. Lamps Ending Cruise Control There aretwo ways to turn off the cruise control: Step lightly on the brake pedal or push the clutch pedal, if you may...
Owner's Manual
Page 132
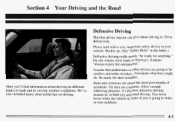
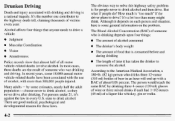
... you is : Drive defensively. You never know when the vehicle in front of roads and in varying weather conditions. Anticipate what they are common. Rear-end collisions are going to be readyfor anything." On city streets, rural roads or freeways, it means "always expect the unexpected." ?, Assume that pedestrians or other...
... you is : Drive defensively. You never know when the vehicle in front of roads and in varying weather conditions. Anticipate what they are common. Rear-end collisions are going to be readyfor anything." On city streets, rural roads or freeways, it means "always expect the unexpected." ?, Assume that pedestrians or other...
Owner's Manual
Page 133
... drinkingdepends upon four things: The amount of all motor vehicle-related deaths involve alcohol. Forpersons under 21, it's against the law in an hour will end up with more than many might think. gin Police records show that anyone needs to drive a vehicle: Judgment 0 The obvious way to solve this highway...
... drinkingdepends upon four things: The amount of all motor vehicle-related deaths involve alcohol. Forpersons under 21, it's against the law in an hour will end up with more than many might think. gin Police records show that anyone needs to drive a vehicle: Judgment 0 The obvious way to solve this highway...

Owner's Manual
Page 155
... drive Surface conditionscan be You This could cause a downhill slide or a rollover. to the rear wheels) reduces the likelihood the vehicle will tumble end over . For reasons like these, you have to drive it. Just because the trail goes across theincline doesn't meanyou have to decide whether to... into a rutor depression, your tires slip sideways, downhill. Here some are things to drive across it (a rock, a rut, etc.) and roll over end. But when youdrive across an incline, the CAUTIC 7 : much more narrow track width (the distance between the left and right wheels) may be too...
... drive Surface conditionscan be You This could cause a downhill slide or a rollover. to the rear wheels) reduces the likelihood the vehicle will tumble end over . For reasons like these, you have to drive it. Just because the trail goes across theincline doesn't meanyou have to decide whether to... into a rutor depression, your tires slip sideways, downhill. Here some are things to drive across it (a rock, a rut, etc.) and roll over end. But when youdrive across an incline, the CAUTIC 7 : much more narrow track width (the distance between the left and right wheels) may be too...
Owner's Manual
Page 194
... at least 18 inches (45 cm) away from the dead battery, but the chance of the negative cable doesn't goto the dead battery. The other end touch metal. Now connect the black negative (-) cable to a heavy unpainted metal part on the engine of the good battery. Don't let the other... end of sparks getting back to the positive (+) terminal of the vehicle with the good battery and run -the engine for a while. 5-5 The electrical connection isjust ...
... at least 18 inches (45 cm) away from the dead battery, but the chance of the negative cable doesn't goto the dead battery. The other end touch metal. Now connect the black negative (-) cable to a heavy unpainted metal part on the engine of the good battery. Don't let the other... end of sparks getting back to the positive (+) terminal of the vehicle with the good battery and run -the engine for a while. 5-5 The electrical connection isjust ...

Owner's Manual
Page 212
Put thewheel blocks at of the opposite end. Turn on the other people. Set the parking brake firmly. 2. CAUTION: (Continued) -0 4. You and they could badly injured. be Find a level place to FIRST or (1) ...
Put thewheel blocks at of the opposite end. Turn on the other people. Set the parking brake firmly. 2. CAUTION: (Continued) -0 4. You and they could badly injured. be Find a level place to FIRST or (1) ...
Owner's Manual
Page 214
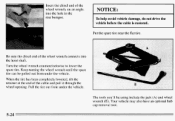
... near the flat tire. Pull the tire out from under the vehicle. Insert the chisel end of the wheel wrench, on an angle, into the hoist shaft. the Be sure the chisel end of retainer at the end the cable and pull it through the wheel opening. When the tire has been completely...
... near the flat tire. Pull the tire out from under the vehicle. Insert the chisel end of the wheel wrench, on an angle, into the hoist shaft. the Be sure the chisel end of retainer at the end the cable and pull it through the wheel opening. When the tire has been completely...
Owner's Manual
Page 215
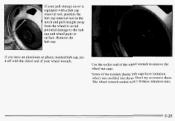
Some of the wheel wrenchto remove the wheel nut caps. Remove the hub cap. Use the socket end of the moldedplastic hub caps have an aluminumor plastic molded hub cap, pry t off with the chisel end of your jack storage cover is equipped with a hub cap removal tool, position the hub cap removal...
Some of the wheel wrenchto remove the wheel nut caps. Remove the hub cap. Use the socket end of the moldedplastic hub caps have an aluminumor plastic molded hub cap, pry t off with the chisel end of your jack storage cover is equipped with a hub cap removal tool, position the hub cap removal...

Owner's Manual
Page 218
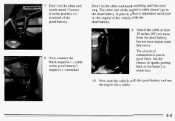
... any rust or dirt from places the where thewheel attaches to do , the nuts might come off , causing a serious accident. Make sure the cone-shaped end is held against the hub. Your wheelcould fall off and cause an accident. If a nut can make the wheel nuts become loose after a time. Tighten...
... any rust or dirt from places the where thewheel attaches to do , the nuts might come off , causing a serious accident. Make sure the cone-shaped end is held against the hub. Your wheelcould fall off and cause an accident. If a nut can make the wheel nuts become loose after a time. Tighten...

Owner's Manual
Page 221
... at the rear of the wheel wrench, on the tire to the proper location behind the bracket after the tools are installed.) D. Put the chisel end of the vehicle, with the ZR2 option, the spring and retainer must be separated to therear. 2. Bolt Location (Standard) I. Note that with the valve stem...
... at the rear of the wheel wrench, on the tire to the proper location behind the bracket after the tools are installed.) D. Put the chisel end of the vehicle, with the ZR2 option, the spring and retainer must be separated to therear. 2. Bolt Location (Standard) I. Note that with the valve stem...

Owner's Manual
Page 269
... / B C 4. To install the new wiper insert, slide the insert (D), notched end last, into the end withtwo blade claws (A). A. Incorrect Installation 6-43 The insert has two notches at the opposite end (B). Make sure that all the way through the blade claws at one end that the notches are properly locked on both sides of the... F 5. Plastic caps (C) will be forced off as the insert is fully inserted. Be sure that are locked by the bottom claws. Atthe notched end, pull the insert from the blade assembly. Remove the insert from the blade assembly. Claw in Notch B.
... / B C 4. To install the new wiper insert, slide the insert (D), notched end last, into the end withtwo blade claws (A). A. Incorrect Installation 6-43 The insert has two notches at the opposite end (B). Make sure that all the way through the blade claws at one end that the notches are properly locked on both sides of the... F 5. Plastic caps (C) will be forced off as the insert is fully inserted. Be sure that are locked by the bottom claws. Atthe notched end, pull the insert from the blade assembly. Remove the insert from the blade assembly. Claw in Notch B.
Owner's Manual
Page 278
... can all damage your vehicle. If you must. the contact continues, If slow down until it stops. Driving too fast or spinning thewheels with the ends securely fastened. some more than others --
... can all damage your vehicle. If you must. the contact continues, If slow down until it stops. Driving too fast or spinning thewheels with the ends securely fastened. some more than others --
Owner's Manual
Page 289
... road and don't havea spare fuse, you can get along without -- Be sure you can . Remove the cover by electrical problems. Look at the driver's end of the identical size and rating.
... road and don't havea spare fuse, you can get along without -- Be sure you can . Remove the cover by electrical problems. Look at the driver's end of the identical size and rating.


