Owner's Manual
Page 81
... shift from 2HI to 4HI or from 4HI to give you take your vehicle. Turn the INT LIGHTS switch located to the right of your headlamp switch to dim your transfer case indicator light when your front axle to 2HI. Do not press the transfer case shift lever button when shiftingfrom... 2HI to 4HI or from 4HI to dim. 4LO: This setting also engages your headlamps or parking lamps are applied. 3. The front axle portion of the diagram on . You might choose 4LO if you were driving off-road in most...
... shift from 2HI to 4HI or from 4HI to give you take your vehicle. Turn the INT LIGHTS switch located to the right of your headlamp switch to dim your transfer case indicator light when your front axle to 2HI. Do not press the transfer case shift lever button when shiftingfrom... 2HI to 4HI or from 4HI to dim. 4LO: This setting also engages your headlamps or parking lamps are applied. 3. The front axle portion of the diagram on . You might choose 4LO if you were driving off-road in most...
Owner's Manual
Page 94
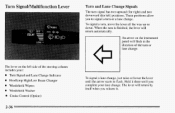
... downward (for left side of the turn or lane change . Hold it . 0 2-36 These positions allow you complete your : 0 0 0 0 Turn Signal and Lane Change Indicator Headlamp HighLow Beam Changer WindshieldWipers WindshieldWasher Cruise Control(Option) To signal a lane change . When the turn , move the lever all the way or up down. The...
... downward (for left side of the turn or lane change . Hold it . 0 2-36 These positions allow you complete your : 0 0 0 0 Turn Signal and Lane Change Indicator Headlamp HighLow Beam Changer WindshieldWipers WindshieldWasher Cruise Control(Option) To signal a lane change . When the turn , move the lever all the way or up down. The...
Owner's Manual
Page 95
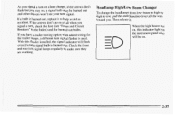
... . , As you signal a turnor a'lane change, the arrows don't if flash but just on, asignal bulb may be on at all the way toward you. Headlamp High/Low Beam Changer Toxhange theheadlamps from low-beam to high or high to low, pull the multifunction lever all when you signal a turn, check...
... . , As you signal a turnor a'lane change, the arrows don't if flash but just on, asignal bulb may be on at all the way toward you. Headlamp High/Low Beam Changer Toxhange theheadlamps from low-beam to high or high to low, pull the multifunction lever all when you signal a turn, check...

Owner's Manual
Page 101
Lamps Press the top switch withthe parking lamps symbol on it to turn on: Parking Lamps 0 0 Sidemarker Lamps Taillamps License Plate Lamps InstrumentPanelLights Transfer Case Indicator Light (if you have one) 0 0 Press the bottom switch with the master lamps symbol on it to turn on the left side of the switch marked OFF to turn off your instrument panel. 2-43 Press the side of your lamps. The switches are on all the lamps listed as well as the headlamps.
Lamps Press the top switch withthe parking lamps symbol on it to turn on: Parking Lamps 0 0 Sidemarker Lamps Taillamps License Plate Lamps InstrumentPanelLights Transfer Case Indicator Light (if you have one) 0 0 Press the bottom switch with the master lamps symbol on it to turn on the left side of the switch marked OFF to turn off your instrument panel. 2-43 Press the side of your lamps. The switches are on all the lamps listed as well as the headlamps.
Owner's Manual
Page 102
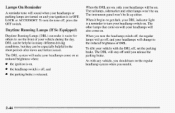
... front of your vehicle during the day. As with theDRL off , press the OFF switch. Lamps On Reminder A reminder tone will sound when your headlamps or parking lamps are on . The instrument panel won 't be especially helpful in many different driving conditions, but they can make your... or ACCESSORY. When it begins to turn the tone off , set the parking brake. The taillamps, sidemarker and other lamps that come on with your headlamps will also come on at reduced brightness when: the ignition is released. 2-44 Daytime Running Lamps (If So Equipped) Daytime Running Lamps (DRL) can...
... front of your vehicle during the day. As with theDRL off , press the OFF switch. Lamps On Reminder A reminder tone will sound when your headlamps or parking lamps are on . The instrument panel won 't be especially helpful in many different driving conditions, but they can make your... or ACCESSORY. When it begins to turn the tone off , set the parking brake. The taillamps, sidemarker and other lamps that come on with your headlamps will also come on at reduced brightness when: the ignition is released. 2-44 Daytime Running Lamps (If So Equipped) Daytime Running Lamps (DRL) can...
Owner's Manual
Page 103
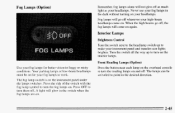
...light will glow in the desired direction. 3 AL Front Reading Lamps (Option) Use your fog lamps for your fog lamps to make your high-beam headlamps come on for better vision in the dark without turning on . Never use your fog lamps in foggy or misty conditions. 'Your parkinglamps or low...-beam headlamps must be swiveled to turn them off whenever your instrument panel and transfer case lights brighter. Fog lamps will go off, the fog lamps ...
...light will glow in the desired direction. 3 AL Front Reading Lamps (Option) Use your fog lamps for your fog lamps to make your high-beam headlamps come on for better vision in the dark without turning on . Never use your fog lamps in foggy or misty conditions. 'Your parkinglamps or low...-beam headlamps must be swiveled to turn them off whenever your instrument panel and transfer case lights brighter. Fog lamps will go off, the fog lamps ...
Owner's Manual
Page 105
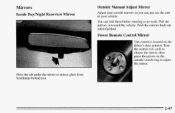
You can just see the side of your outside switch ring to adjust the mirror. 2-47 Turn the control to L or R to choose the mirror, then press the arrows on the driver's door armrest. Power Remote Control Mirror The control is located on the outside mirrors so you . Mirrors Inside Daymight Rearview Mirror Outside Manual Adjust Mirror Adjust your vehicle. Push the mirrors back out when finished. Pull the mirrors in toward the vehicle. I Press the tab under the mirrorto reduce glare from headlamps behind you can fold them before entering a car wash.
You can just see the side of your outside switch ring to adjust the mirror. 2-47 Turn the control to L or R to choose the mirror, then press the arrows on the driver's door armrest. Power Remote Control Mirror The control is located on the outside mirrors so you . Mirrors Inside Daymight Rearview Mirror Outside Manual Adjust Mirror Adjust your vehicle. Push the mirrors back out when finished. Pull the mirrors in toward the vehicle. I Press the tab under the mirrorto reduce glare from headlamps behind you can fold them before entering a car wash.
Owner's Manual
Page 131
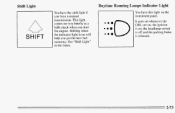
This light comes on very briefly as a bulb check when you get the best fuel economy. Daytime Running Lamps Indicator Light You have a manual transmission. See "Shift Light" in the Index. SHIFT 2-73 Shift Light You have the shift light if you have this light on the instrument panel. It goes on whenever the DRL are on, the ignition is released. Shifting when the indicator light is on , the headlamp switch is off and the parking brake is on will help you start the engine.
This light comes on very briefly as a bulb check when you get the best fuel economy. Daytime Running Lamps Indicator Light You have a manual transmission. See "Shift Light" in the Index. SHIFT 2-73 Shift Light You have the shift light if you have this light on the instrument panel. It goes on whenever the DRL are on, the ignition is released. Shifting when the indicator light is on , the headlamp switch is off and the parking brake is on will help you start the engine.
Owner's Manual
Page 138
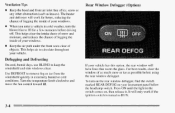
... path under the front seats clear of objects. It will workfar better, reducing the chance of fogging the inside of your instrument panel below the headlamp switch. Turn the temperature knob clockwise and move the fan control toward HI. For best results, clear the window of as much snow or ice...
... path under the front seats clear of objects. It will workfar better, reducing the chance of fogging the inside of your instrument panel below the headlamp switch. Turn the temperature knob clockwise and move the fan control toward HI. For best results, clear the window of as much snow or ice...
Owner's Manual
Page 184
...driving. 0 0 Drivedefensively. Dirty glass makes lights dazzle and flash more space between you may need to the dark. Justas your headlamps should your headlamps light up onlyso much light tosee the same thing at night. Night Vision No one can see in the daytime can build ...increase. Keep your eyes contract repeatedly. Remember that way, it . inside rearview mirror to pick out dimly lighted objects. Some drivers suffer from headlamps, butthey also make a lot of it 'seasier to reduce the glare from a driver who doesn't lower the high beams, or a vehicle...
...driving. 0 0 Drivedefensively. Dirty glass makes lights dazzle and flash more space between you may need to the dark. Justas your headlamps should your headlamps light up onlyso much light tosee the same thing at night. Night Vision No one can see in the daytime can build ...increase. Keep your eyes contract repeatedly. Remember that way, it . inside rearview mirror to pick out dimly lighted objects. Some drivers suffer from headlamps, butthey also make a lot of it 'seasier to reduce the glare from a driver who doesn't lower the high beams, or a vehicle...

Owner's Manual
Page 197
.... 2. Release the parking brake only after the vehicle being towed to the hitch manufacturer's instructions. 6. This places the key in gear, for vehicles with your headlamps. That is in the OFF position, which unlocks the steering column while preventing battery drain. To help comes. 4. Thisis because the transfer case overrides the...
.... 2. Release the parking brake only after the vehicle being towed to the hitch manufacturer's instructions. 6. This places the key in gear, for vehicles with your headlamps. That is in the OFF position, which unlocks the steering column while preventing battery drain. To help comes. 4. Thisis because the transfer case overrides the...

Owner's Manual
Page 281
Put the retainer on the headlamp and install and tighten the screws. 6-33 Pull the headlamp out and remove retainer. Unplug and remove the headlamp. 4. Plug in the new headlamp and put it in place. 5. the 3. Headlamps Sealed Beam Lamps 1. Remove the screws from the headlamp retainer. I 2.
Put the retainer on the headlamp and install and tighten the screws. 6-33 Pull the headlamp out and remove retainer. Unplug and remove the headlamp. 4. Plug in the new headlamp and put it in place. 5. the 3. Headlamps Sealed Beam Lamps 1. Remove the screws from the headlamp retainer. I 2.

Owner's Manual
Page 282
Use a hex socket to unscrew the pins. ~ ~ ~~~ 4. Open the hood. 3. Unplug the electrical connector. 6-34 Pull the headlamp lens assembly out. (Some vehicles may have side-by-side bulbs.) removal pins at the top of the radiator support. Composite Headlamps 1.
Use a hex socket to unscrew the pins. ~ ~ ~~~ 4. Open the hood. 3. Unplug the electrical connector. 6-34 Pull the headlamp lens assembly out. (Some vehicles may have side-by-side bulbs.) removal pins at the top of the radiator support. Composite Headlamps 1.
Owner's Manual
Page 283
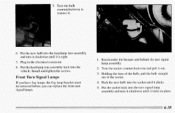
... socket counterclockwise and pull it is tight. 7. Reach under the bumper and behind the turn signal lamps. 4. Push the new bulb into the headlamp lens assembly and turn it clockwise until it out. 3. Front Turn Signal Lamps If you have fog lamps, the fog lampbracket must be removed ...the front turn signal lamp assembly. 8. Put the socket back into the vehicle. Turn the bulb counterclockwise to remove it clicks. 5. Put the headlamp lens assembly back into the turn signal lamp assembly and turn it clockwise until it locks in the electrical connector. 1. Plug in place. 6-...
... socket counterclockwise and pull it is tight. 7. Reach under the bumper and behind the turn signal lamps. 4. Push the new bulb into the headlamp lens assembly and turn it clockwise until it out. 3. Front Turn Signal Lamps If you have fog lamps, the fog lampbracket must be removed ...the front turn signal lamp assembly. 8. Put the socket back into the vehicle. Turn the bulb counterclockwise to remove it clicks. 5. Put the headlamp lens assembly back into the turn signal lamp assembly and turn it clockwise until it locks in the electrical connector. 1. Plug in place. 6-...
Owner's Manual
Page 306
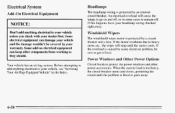
Some electrical equipment can keep other power accessories. Electrical System Add-on Electrical Equipment Headlamps The headlamp wiring is causedby some electrical problem, be covered by an internal circuit breaker. An electrical overload will stop until the problem is fixedor goes away. 6-...
Some electrical equipment can keep other power accessories. Electrical System Add-on Electrical Equipment Headlamps The headlamp wiring is causedby some electrical problem, be covered by an internal circuit breaker. An electrical overload will stop until the problem is fixedor goes away. 6-...

Owner's Manual
Page 310
Replacement Bulbs Lamps Halogen Headlamps, Sealed Beam Halogen Headlamps, Composite Low-Beam Halogen Headlamps, Composite High-Beam Tail and Stoplamps Front Sidemarker Lamps Turn Signal Lamps Underhood Lamp Visor Vanity MirrorLamps Overhead Console Reading Lamps Quantity 2 2 2 Number 2E I 9006 HB4 9005 HB3 3057 194 3157 NA 93 74 4 2 2 1 4 2 194 6-62
Replacement Bulbs Lamps Halogen Headlamps, Sealed Beam Halogen Headlamps, Composite Low-Beam Halogen Headlamps, Composite High-Beam Tail and Stoplamps Front Sidemarker Lamps Turn Signal Lamps Underhood Lamp Visor Vanity MirrorLamps Overhead Console Reading Lamps Quantity 2 2 2 Number 2E I 9006 HB4 9005 HB3 3057 194 3157 NA 93 74 4 2 2 1 4 2 194 6-62
Owner's Manual
Page 384
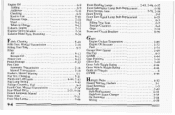
... ...Exhaust. Manual Transmission ...2- 19 2-21. 6-20 Four-wheel Drive ...11 French Language Manual ...FrontAxle ...6-21 Front Map'Lamps ...2-46 1 Halogen Bulbs ..., ...Hazard Warning Flashers' .' ...HeadRestraints ...Headlamps ...BulbReplacement ...High/Low Beam Changer ...OnReminder ...Wiring ... 6-32 5-1 1-5 2-43 6-33 2-37 2-44 6-58 9-4
... ...Exhaust. Manual Transmission ...2- 19 2-21. 6-20 Four-wheel Drive ...11 French Language Manual ...FrontAxle ...6-21 Front Map'Lamps ...2-46 1 Halogen Bulbs ..., ...Hazard Warning Flashers' .' ...HeadRestraints ...Headlamps ...BulbReplacement ...High/Low Beam Changer ...OnReminder ...Wiring ... 6-32 5-1 1-5 2-43 6-33 2-37 2-44 6-58 9-4

Owner's Manual
Page 390
... Manual ...Power ...2-33 Swing-Out ...2-35 WindshieldWasher ...2-38 Fluid ...6-26 FluidLevelCheck ...7-47 WindshieldWiper ...2-38 BladeReplacement ...6-38. 6-63 Fuses ...6-58 Rear ...2-39 Winter Driving ...4-39 Wiring. Headlamp ...6-58 WreckerTowinE ...5-7 9-10 VehicleDimensions ...6-64 Vehicle Identification Number ...6-57 Vehicle Loading ...4-44 Vehicle Storage ...6-32 VentilationSystem ...3-3 Visors.Sun ...2-58 Voltmeter ...2-67 w a r n i n g Devices...
... Manual ...Power ...2-33 Swing-Out ...2-35 WindshieldWasher ...2-38 Fluid ...6-26 FluidLevelCheck ...7-47 WindshieldWiper ...2-38 BladeReplacement ...6-38. 6-63 Fuses ...6-58 Rear ...2-39 Winter Driving ...4-39 Wiring. Headlamp ...6-58 WreckerTowinE ...5-7 9-10 VehicleDimensions ...6-64 Vehicle Identification Number ...6-57 Vehicle Loading ...4-44 Vehicle Storage ...6-32 VentilationSystem ...3-3 Visors.Sun ...2-58 Voltmeter ...2-67 w a r n i n g Devices...