

Owner's Manual
Page 15
But don't havea seatback reclined if your vehicleis moving. 1-3 I Reclining Front Seatbacks (Bucket Seats or60/40 Bench) To adjust the seatback, lift the lever on the outer sideof the seat. Pull up onthe lever and the seat will go to lock the seatback where you want it. Release the lever to an upright position.
But don't havea seatback reclined if your vehicleis moving. 1-3 I Reclining Front Seatbacks (Bucket Seats or60/40 Bench) To adjust the seatback, lift the lever on the outer sideof the seat. Pull up onthe lever and the seat will go to lock the seatback where you want it. Release the lever to an upright position.
Owner's Manual
Page 16
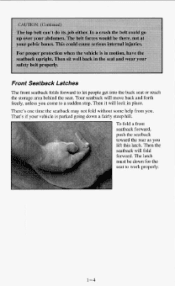
Front Seatback Latches The front seatback folds forward to work properly. 1-4 Then the seatback willfold forward. The latch must be downfor the seat to let people get into the back seat or reac the storage area behind the seat. a it There's one time the seatback may not fold without some help from you lift this latch. seatback will lockin place. To fold a front seatback forward, push the seatback toward the rear as you . That's if your vehicle is parked going down a fairly steep hill. Then will move back and forth Your freely, unless you come to sudden stop.
Front Seatback Latches The front seatback folds forward to work properly. 1-4 Then the seatback willfold forward. The latch must be downfor the seat to let people get into the back seat or reac the storage area behind the seat. a it There's one time the seatback may not fold without some help from you lift this latch. seatback will lockin place. To fold a front seatback forward, push the seatback toward the rear as you . That's if your vehicle is parked going down a fairly steep hill. Then will move back and forth Your freely, unless you come to sudden stop.
Owner's Manual
Page 51
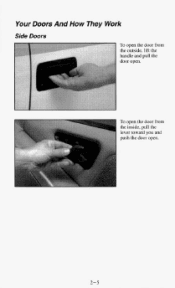
Your Doors And How They Work Side Doors To open the door from the inside, pull the lever toward you and push the door open . To open the door from the outside,lift the handle and pull the door open . 2-5
Your Doors And How They Work Side Doors To open the door from the inside, pull the lever toward you and push the door open . To open the door from the outside,lift the handle and pull the door open . 2-5
Owner's Manual
Page 54
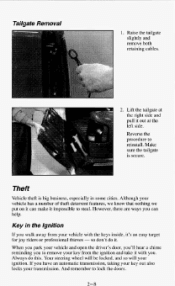
... vehicle and open the driver's door, you'll hear a chime reminding you . Theft Vehicle theft is secure. Always do it out at the left side. Lift the tailgate at the right side and pull it . Although your transmission. And remember to reinstall. Key in some cities. Reverse the procedure to lock...
... vehicle and open the driver's door, you'll hear a chime reminding you . Theft Vehicle theft is secure. Always do it out at the left side. Lift the tailgate at the right side and pull it . Although your transmission. And remember to reinstall. Key in some cities. Reverse the procedure to lock...
Owner's Manual
Page 97
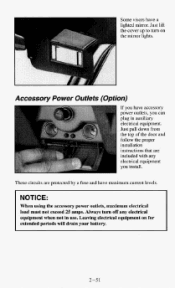
.... Just pull down from the topof the door and follow the proper installation instructions that are protected by a fuse and have maximum current levels. Just lift the cover up to turn any electrical equipment you can plug in auxiliary electrical equipment. NOTICE: When using the accessory power outlets, maximum electrical load...
.... Just pull down from the topof the door and follow the proper installation instructions that are protected by a fuse and have maximum current levels. Just lift the cover up to turn any electrical equipment you can plug in auxiliary electrical equipment. NOTICE: When using the accessory power outlets, maximum electrical load...
Owner's Manual
Page 98
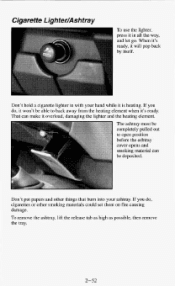
... to open position before the ashtray cover opens and smoking material can make overload, damaging the lighter and the heating element. To remove the ashtray, lift the release tab as high as possible, then remove the tray. 2-52 Don't holda cigarette lighter in with your ashtray.If you do, bum cigarettes...
... to open position before the ashtray cover opens and smoking material can make overload, damaging the lighter and the heating element. To remove the ashtray, lift the release tab as high as possible, then remove the tray. 2-52 Don't holda cigarette lighter in with your ashtray.If you do, bum cigarettes...
Owner's Manual
Page 99
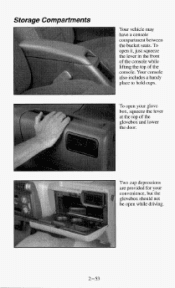
Storage Compartments Your vehicle may have a console compartment between the bucket seats.To open while driving,. 2-53 Your console also includes a handy place to hold cups. Two cup aepressions are provided €or your glove box, squeeze the lever at the top the of the console. To open your conve~ence, the but gkovebox should not be open it, just squeeze the lever in the front of the console while lifting the top of glovebox and lower the door.
Storage Compartments Your vehicle may have a console compartment between the bucket seats.To open while driving,. 2-53 Your console also includes a handy place to hold cups. Two cup aepressions are provided €or your glove box, squeeze the lever at the top the of the console. To open your conve~ence, the but gkovebox should not be open it, just squeeze the lever in the front of the console while lifting the top of glovebox and lower the door.
Owner's Manual
Page 104
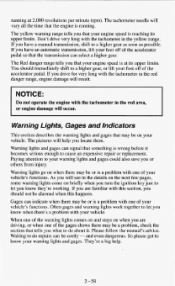
... that tells you turn the ignitionjust to let know your engine speed is problem with this section, you should immediately shift to higher gear, or lift your foot of your a vehicle's functions.As you know they're working. the If you that your foot offof the accelerator... lift pedal so that something is at 2,000 revolutions per minute (rpm). a The Red danger range tells you have an automatic transmission, your engine speed is ...
... that tells you turn the ignitionjust to let know your engine speed is problem with this section, you should immediately shift to higher gear, or lift your foot of your a vehicle's functions.As you know they're working. the If you that your foot offof the accelerator... lift pedal so that something is at 2,000 revolutions per minute (rpm). a The Red danger range tells you have an automatic transmission, your engine speed is ...
Owner's Manual
Page 195
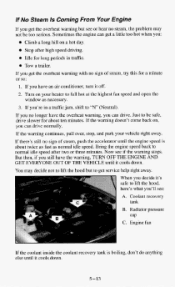
... fan speed and open the full window as normal idle speed. If you have an air conditioner, turn it 's safe to be too serious. to lift the hood, here's what you'll see not be safe, the Just drive slowerfor about twiceas fast as necessary. 3. Bring the engine speed back to... lift the hood but or hear no signof steam, push the accelerator until engine speed is boiling, don't do anything else until it cools down . Now ...
... fan speed and open the full window as normal idle speed. If you have an air conditioner, turn it 's safe to be too serious. to lift the hood, here's what you'll see not be safe, the Just drive slowerfor about twiceas fast as necessary. 3. Bring the engine speed back to... lift the hood but or hear no signof steam, push the accelerator until engine speed is boiling, don't do anything else until it cools down . Now ...
Owner's Manual
Page 208
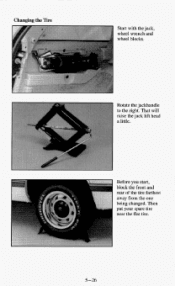
That will raise the jack lift head a little. Rotate the jackhandle to the right. Before you start, block the front and rear of the tire farthest away from the one being changed. Then put your spare tire near theflat tire. 5-26 Changing the Tire Start with the jack, wheel wrench and wheel blocks.
That will raise the jack lift head a little. Rotate the jackhandle to the right. Before you start, block the front and rear of the tire farthest away from the one being changed. Then put your spare tire near theflat tire. 5-26 Changing the Tire Start with the jack, wheel wrench and wheel blocks.

Owner's Manual
Page 211
A. off Be sure tofit the jack lift head into the hole rear nearest the flat tire. I NOTICE: Raising your vehicle. 5 -29 Fit the jack into the proper location before raising your vehicle with the jack improperly positioned will damage the vehicleor may anow the vehicle to fall the jack. Front Frame Hole B. Rear Frame Hole (ZR2) C . Spring Hanger Hole (Standard Pick-ups) Your vehicle has a hole the frame near each front wheel, anda hole i the in n spring hanger near each wheel for the jack. Jack Locations Position the jack under the vehicle.
A. off Be sure tofit the jack lift head into the hole rear nearest the flat tire. I NOTICE: Raising your vehicle. 5 -29 Fit the jack into the proper location before raising your vehicle with the jack improperly positioned will damage the vehicleor may anow the vehicle to fall the jack. Front Frame Hole B. Rear Frame Hole (ZR2) C . Spring Hanger Hole (Standard Pick-ups) Your vehicle has a hole the frame near each front wheel, anda hole i the in n spring hanger near each wheel for the jack. Jack Locations Position the jack under the vehicle.
Owner's Manual
Page 225
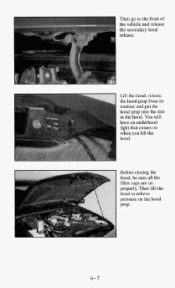
Thenlift the hood to front of the the vehicle and release the secondary hood release. Lift the hood, release the hood prop from its retainer and put the hood prop into the slot in the hood. Before closing the hood, be sureall the filler caps are on when you lift the hood. Then go to relieve pressure on the hood Prop. 6-7 You will have an underhood light that comes on properly.
Thenlift the hood to front of the the vehicle and release the secondary hood release. Lift the hood, release the hood prop from its retainer and put the hood prop into the slot in the hood. Before closing the hood, be sureall the filler caps are on when you lift the hood. Then go to relieve pressure on the hood Prop. 6-7 You will have an underhood light that comes on properly.
Owner's Manual
Page 258
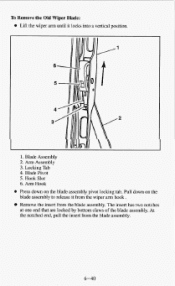
Locking Tab 4. Blade Pivot 5. down on the Pull blade assembly to release from the blade assembly. it locksinto a vertical position. 1. insert has two notches The at one end that are locked by bottom claws of the blade assembly. Arm Hook Press down on the blade assembly pivot locking tab. Hook Slot 6 . Blade Assembly 2. At the notched end, pull the insert from the blade assembly. 6-40 Arm Assembly 3. To Remove the Old Wiper Blade: * Lift the wiperarm until it Kemove the insert from the wiperarm hook.
Locking Tab 4. Blade Pivot 5. down on the Pull blade assembly to release from the blade assembly. it locksinto a vertical position. 1. insert has two notches The at one end that are locked by bottom claws of the blade assembly. Arm Hook Press down on the blade assembly pivot locking tab. Hook Slot 6 . Blade Assembly 2. At the notched end, pull the insert from the blade assembly. 6-40 Arm Assembly 3. To Remove the Old Wiper Blade: * Lift the wiperarm until it Kemove the insert from the wiperarm hook.

