Owner's Manual
Page 16
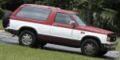
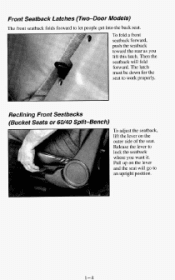
Reclining Front Seatbacks (Bucket Seatsor 60/40 Split-Bench) To adjust the seatback, lift the lever on the lever and the seat will fold forward. I 4 1-4 Then the seatback will go to work properly. Release the lever to letpeople get into the back seat. Front Seatback Latches (Two-Door Models) The front seatback folds forward to lock the seatback where you lift this latch. To fold a front seatback forward, push the seatback toward the rear as you want it. The latch must be down for the seat to an upright position. Pull up on the outer side of the seat.
Reclining Front Seatbacks (Bucket Seatsor 60/40 Split-Bench) To adjust the seatback, lift the lever on the lever and the seat will fold forward. I 4 1-4 Then the seatback will go to work properly. Release the lever to letpeople get into the back seat. Front Seatback Latches (Two-Door Models) The front seatback folds forward to lock the seatback where you lift this latch. To fold a front seatback forward, push the seatback toward the rear as you want it. The latch must be down for the seat to an upright position. Pull up on the outer side of the seat.

Owner's Manual
Page 19
... the seatback to be sure that the right side has locked in the upper center of the rear of the seat cushion. TOraise it, just lift up the seatback and push it until locks in the upright position. 1-7 Rear Folding Seat (Two-Door Models) Your utility vehicle has a rear folding seat... seatback down formore cargo space. Push back on the latch at the righthand side of the seatback. Then fold the seatback forward. To raise it, lift up the seatback and push it until it doesn't. it position. Push back on the lefthand side.
... the seatback to be sure that the right side has locked in the upper center of the rear of the seat cushion. TOraise it, just lift up the seatback and push it until locks in the upright position. 1-7 Rear Folding Seat (Two-Door Models) Your utility vehicle has a rear folding seat... seatback down formore cargo space. Push back on the latch at the righthand side of the seatback. Then fold the seatback forward. To raise it, lift up the seatback and push it until it doesn't. it position. Push back on the lefthand side.

Owner's Manual
Page 59
To open the door from the inside, pull the lever toward you and push the door open . Your Doors And How They Work Side Doors To open the door f~ *om the outside, lift the handle and pull the door open . 2-5
To open the door from the inside, pull the lever toward you and push the door open . Your Doors And How They Work Side Doors To open the door f~ *om the outside, lift the handle and pull the door open . 2-5

Owner's Manual
Page 110
... you install. Just unsnap the top of the visor in different directions at the same time to turn the lightson if you have them. Just lift the mirror cover on each visor to block out glare. Accessory Power Outlet (Option) I If you have the accessory power outlet, you can swing portions...
... you install. Just unsnap the top of the visor in different directions at the same time to turn the lightson if you have them. Just lift the mirror cover on each visor to block out glare. Accessory Power Outlet (Option) I If you have the accessory power outlet, you can swing portions...

Owner's Manual
Page 112
Storage Compartments Your vehicle may also have storage pockets onthe back of your power bucket seats or 60140 split-bench seats. If you have a manual transmission, your glove box, squeeze the buttons on either side of the console while pressing the buttonon the driver's side. If you have a tray. You may have a console compartment between the bucket seats. To open . 2-58 To open it, just lift the top of the keyhole together and pullthe door open your console will have an automatic transmission, yourconsole includes a handy place to hold beverage cups.
Storage Compartments Your vehicle may also have storage pockets onthe back of your power bucket seats or 60140 split-bench seats. If you have a manual transmission, your glove box, squeeze the buttons on either side of the console while pressing the buttonon the driver's side. If you have a tray. You may have a console compartment between the bucket seats. To open . 2-58 To open it, just lift the top of the keyhole together and pullthe door open your console will have an automatic transmission, yourconsole includes a handy place to hold beverage cups.

Owner's Manual
Page 211
Use safety chains and wheel straps. If your vehicle has the four-wheel drive option, a dolly MUST be required for car-carrier equipment. Additional ramping may be used under the rear wheels when towing from the front. 5-9 Use wheel lift or car-carrier equipment. Towing Fromthe Front NOTICE: Do not tow with sling-type equipment or the front bumper system will be damaged.
Use safety chains and wheel straps. If your vehicle has the four-wheel drive option, a dolly MUST be required for car-carrier equipment. Additional ramping may be used under the rear wheels when towing from the front. 5-9 Use wheel lift or car-carrier equipment. Towing Fromthe Front NOTICE: Do not tow with sling-type equipment or the front bumper system will be damaged.
Owner's Manual
Page 214
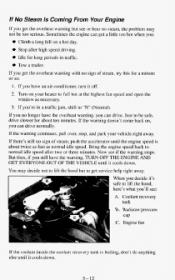
.... Bring the engine speed back to full hot at the highest fan speed and open the window as normal idle speed. Coolantrecovery tank B. Just to lift the hood, here's what you'll see: A. If the warning continues, pull over, stop, and park your heater to normal idle speed after high speed... then, if you still have an air conditioner, turn it 's safe to be too serious. If you no steam, the problem may decide not to lift the hood but see if the warning stops. When you decide it off. 2. If you're in traffic. If the warning doesn'tcome back on...
.... Bring the engine speed back to full hot at the highest fan speed and open the window as normal idle speed. Coolantrecovery tank B. Just to lift the hood, here's what you'll see: A. If the warning continues, pull over, stop, and park your heater to normal idle speed after high speed... then, if you still have an air conditioner, turn it 's safe to be too serious. If you no steam, the problem may decide not to lift the hood but see if the warning stops. When you decide it off. 2. If you're in traffic. If the warning doesn'tcome back on...

Owner's Manual
Page 227
Then, lift the tire off its mounting bracket. That will raise the jacklifthead a little. 5-25 Rotate the jackhandle to the carrier. Changing theTire Start with the jack, wheel wrench and wheel blocks. Use the socket end of your wheel wrench to remove the wheel nuts that secure thetire to the right.
Then, lift the tire off its mounting bracket. That will raise the jacklifthead a little. 5-25 Rotate the jackhandle to the carrier. Changing theTire Start with the jack, wheel wrench and wheel blocks. Use the socket end of your wheel wrench to remove the wheel nuts that secure thetire to the right.

Owner's Manual
Page 230
Raise the vehicle far enough off Be sureto fit the jack lift head into the proper location before raising your vehicle with the jack improperly positioned will damage the vehicle may allow the vehicle to fall the jack. Remove all the wheel nuts. 5-28 h. ~ Raise the vehicle by rotating the wheel wrench to fit. NOTICE: Raising your vehicle. or off the ground so there is enough room for the spare tire to the right.
Raise the vehicle far enough off Be sureto fit the jack lift head into the proper location before raising your vehicle with the jack improperly positioned will damage the vehicle may allow the vehicle to fall the jack. Remove all the wheel nuts. 5-28 h. ~ Raise the vehicle by rotating the wheel wrench to fit. NOTICE: Raising your vehicle. or off the ground so there is enough room for the spare tire to the right.

Owner's Manual
Page 243
Then lift the hood to relieve pressure on when you lift the hood. Lift the hood, release the hood prop fromits retainer and put the hood prop into the slot in the hood.You may have a light that comes on the hood Prop. 6-7 Before closing the hood, be sure all the filler capsare on properly.
Then lift the hood to relieve pressure on when you lift the hood. Lift the hood, release the hood prop fromits retainer and put the hood prop into the slot in the hood.You may have a light that comes on the hood Prop. 6-7 Before closing the hood, be sure all the filler capsare on properly.

Owner's Manual
Page 250
...to determine when to replace the air filter. See "Scheduled Maintenance Services'' in the air cleaner housing, the two wingscrews are properly tightened. Lift the air cleaner assembly up from the vehicle. Care should be taken during reassembly to ensure that the air cleaner cover tabs are fully inserted...the Index. 6- 14 Air Cleaner To remove the round air cleaner filter for the 4.3L (VIN W) high performance engine, loosen both clamps and lift off cover to change the filter. Remove thecover and change the filter. Open both wingnuts (one on the duct and one on straight and the...
...to determine when to replace the air filter. See "Scheduled Maintenance Services'' in the air cleaner housing, the two wingscrews are properly tightened. Lift the air cleaner assembly up from the vehicle. Care should be taken during reassembly to ensure that the air cleaner cover tabs are fully inserted...the Index. 6- 14 Air Cleaner To remove the round air cleaner filter for the 4.3L (VIN W) high performance engine, loosen both clamps and lift off cover to change the filter. Remove thecover and change the filter. Open both wingnuts (one on the duct and one on straight and the...
Owner's Manual
Page 272
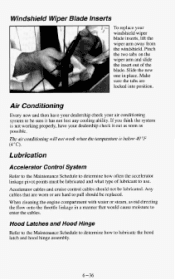
... any cooling ability. The air conditioning will not work when the temperature is not working properly, have your dealership check your windshield wiper blade inserts, lift the wiper arm away from the windshield. Hood Latches and Hood Hinge Refer to the Maintenance Schedule to determine how to use. Any cables that...
... any cooling ability. The air conditioning will not work when the temperature is not working properly, have your dealership check your windshield wiper blade inserts, lift the wiper arm away from the windshield. Hood Latches and Hood Hinge Refer to the Maintenance Schedule to determine how to use. Any cables that...


