Owner's Manual
Page 8
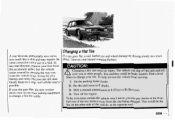
...if a part how to do if you find that 's in back of the operate your Chevrolet. Here the manual tells you how to use. Systems Part 7: Maintenance Schedule Parts 1-8: Each part of all your Chevrolet running properly and that pictures and words work and safety belts properly. under different conditions. ...alphabetical list of this manual, you'll This part tells you how to use your Here you'll find helpful information and from beginning to end when they first manual and includes safety and vehicle tips about the features and controls Part 1: Seats & Safety Belts Part 5: Problems on ...
...if a part how to do if you find that 's in back of the operate your Chevrolet. Here the manual tells you how to use. Systems Part 7: Maintenance Schedule Parts 1-8: Each part of all your Chevrolet running properly and that pictures and words work and safety belts properly. under different conditions. ...alphabetical list of this manual, you'll This part tells you how to use your Here you'll find helpful information and from beginning to end when they first manual and includes safety and vehicle tips about the features and controls Part 1: Seats & Safety Belts Part 5: Problems on ...

Owner's Manual
Page 26
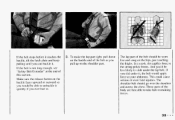
... the latch plate into the buckle until it get twisted. 4. Don't let it clicks. To make the lap part tight, pull down on the buckle end of this section. Pick up on the buckle faces upward or outward so you would be able to the upper or lower guide loop. If... the belt isn't long enough, see "Safety Belt Extender''at the end of the belt as you pull up the latch plate and pull the belt across you ever had to. 5. If the shoulder belt is too...
... the latch plate into the buckle until it get twisted. 4. Don't let it clicks. To make the lap part tight, pull down on the buckle end of this section. Pick up on the buckle faces upward or outward so you would be able to the upper or lower guide loop. If... the belt isn't long enough, see "Safety Belt Extender''at the end of the belt as you pull up the latch plate and pull the belt across you ever had to. 5. If the shoulder belt is too...
Owner's Manual
Page 37
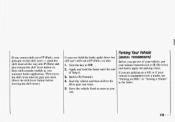
... outward so you pull up on the shoulder part. In a crash, this section. The shoulder belt should be worn low and snug on the buckle end of this applies force to slide under the lap belt. These parts of the belt should go over the shoulder and across the chest. If.... If you slid under it . And you'd be able to unbuckle it quickly if you can buckle it , the belt would apply force at the end of the belt as you would be less likely to the strong pelvic bones. To make the lap part tight, pull down on the hips...
... outward so you pull up on the shoulder part. In a crash, this section. The shoulder belt should be worn low and snug on the buckle end of this applies force to slide under the lap belt. These parts of the belt should go over the shoulder and across the chest. If.... If you slid under it . And you'd be able to unbuckle it quickly if you can buckle it , the belt would apply force at the end of the belt as you would be less likely to the strong pelvic bones. To make the lap part tight, pull down on the hips...
Owner's Manual
Page 77
..." or "Towing a Trailer" in the Index. Have the vehicle fixed as soon as you can. (MANUAL TRANSMISSION) Before you ever hold the brake until the end of Step 4. 3. If you are parking ona hill, or if your manual transmissionin R (Reverse) and firmly apply the parking brake. Start the vehicle and then...
..." or "Towing a Trailer" in the Index. Have the vehicle fixed as soon as you can. (MANUAL TRANSMISSION) Before you ever hold the brake until the end of Step 4. 3. If you are parking ona hill, or if your manual transmissionin R (Reverse) and firmly apply the parking brake. Start the vehicle and then...
Owner's Manual
Page 85
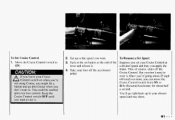
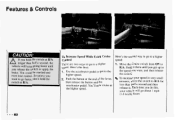
... at lever and release it . %' !m.I To Set Cruise Control 1. Once you set your chosen speed and stay there. Push in the set button at the end of course, shuts off the Cruise Control. This, of the Suppose you 're going about half a second. To Resume a Set Speed 3. Move the Cruise Control...
... at lever and release it . %' !m.I To Set Cruise Control 1. Once you set your chosen speed and stay there. Push in the set button at the end of course, shuts off the Cruise Control. This, of the Suppose you 're going about half a second. To Resume a Set Speed 3. Move the Cruise Control...
Owner's Manual
Page 86
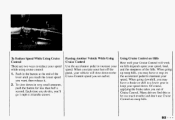
.... .=982 So unless you release the switch or apply the brake. Move the Cruise switch from ON to a higher speed: 1. Push the button at the end of the lever, then release the button and the accelerator pedal. ways to 11 There are twothe first: go to R/A. Hold it .
.... .=982 So unless you release the switch or apply the brake. Move the Cruise switch from ON to a higher speed: 1. Push the button at the end of the lever, then release the button and the accelerator pedal. ways to 11 There are twothe first: go to R/A. Hold it .
Owner's Manual
Page 87
... Using Cruise Control There are two ways to reduce your speed Use the accelerator pedal to increase your speed down in the button at the end of the Cruise Control speed you 'll go 1 mph (1.6 km/h) slower. To slow down . lever until you reach the lower speed you may have to...
... Using Cruise Control There are two ways to reduce your speed Use the accelerator pedal to increase your speed down in the button at the end of the Cruise Control speed you 'll go 1 mph (1.6 km/h) slower. To slow down . lever until you reach the lower speed you may have to...

Owner's Manual
Page 96
Use your door key to lock and unlock it. Front Console To use the storage area, pull up on the front end of the console. There is a cupholder and light and may be a coinholder in the console, The glove box has a light inside. Map Pocket Each door has a map pocket. Features & Controls Storage and Compartments Glove Box To open the glove box, lift up on the lever.
Use your door key to lock and unlock it. Front Console To use the storage area, pull up on the front end of the console. There is a cupholder and light and may be a coinholder in the console, The glove box has a light inside. Map Pocket Each door has a map pocket. Features & Controls Storage and Compartments Glove Box To open the glove box, lift up on the lever.
Owner's Manual
Page 137
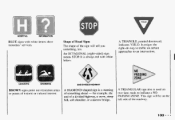
...-shaped sign is always red with white letters show motorists' services. A TRIANGULAR sign also is used on certain approaches to indicate a NO PASSING ZONE. I v CANOEING END DIVIDED HIGHWAY BROWN signs point out recreation areas or points of a divided highway, a curve, steep hill, soft shoulder, or a narrow bridge. Shape of Road Signs...
...-shaped sign is always red with white letters show motorists' services. A TRIANGULAR sign also is used on certain approaches to indicate a NO PASSING ZONE. I v CANOEING END DIVIDED HIGHWAY BROWN signs point out recreation areas or points of a divided highway, a curve, steep hill, soft shoulder, or a narrow bridge. Shape of Road Signs...
Owner's Manual
Page 141
... than it is at 3f you must give way to 1 1 a.m. to the next section. isn't just a little more dangerous! It's about the most and Xear-end collisions are every week, fall on Sunday morning. It's the number one contributor to brake or turn suddenly. 3 a.m. In fact, GM .he right of victims...
... than it is at 3f you must give way to 1 1 a.m. to the next section. isn't just a little more dangerous! It's about the most and Xear-end collisions are every week, fall on Sunday morning. It's the number one contributor to brake or turn suddenly. 3 a.m. In fact, GM .he right of victims...
Owner's Manual
Page 142
... alcohol that is too much "? The amount of a liquor like whiskey, gin or vodka. Just how much alcohol is consumed before or during drinking will end up with a BAC of beer in the drink. For example, if the same person drank three double martinis (3 ounces or 90 ml of liquor each...
... alcohol that is too much "? The amount of a liquor like whiskey, gin or vodka. Just how much alcohol is consumed before or during drinking will end up with a BAC of beer in the drink. For example, if the same person drank three double martinis (3 ounces or 90 ml of liquor each...
Owner's Manual
Page 192
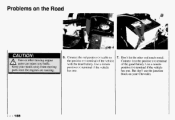
Connect the red positive (+) cable to the positive (+) terminal of the vehicle Connect it to 7. Don't let the other movingengine L parts can injure you badly. Usea remote with the dead battery. Use a remote positive (+) terminal if the vehicle positive (+) terminal if the vehicle has one, has one. the positive (+) terminal of the good battery. Problems an the Road I Fans or other end touch metal. eep your Chevrolet. But don't use the junction block on your hands away from moving -u-tsonce the engines are running. 6.
Connect the red positive (+) cable to the positive (+) terminal of the vehicle Connect it to 7. Don't let the other movingengine L parts can injure you badly. Usea remote with the dead battery. Use a remote positive (+) terminal if the vehicle positive (+) terminal if the vehicle has one, has one. the positive (+) terminal of the good battery. Problems an the Road I Fans or other end touch metal. eep your Chevrolet. But don't use the junction block on your hands away from moving -u-tsonce the engines are running. 6.

Owner's Manual
Page 193
...Take care that move. GoodBattery C. Now start the vehicle with the dead battery. Try to start after a few tries, it Probably needs service. The other end of the vehicle with the dead battery. 9. but the chance of sparks getting back to the dead battery. A. It goes to a heavy unpainted metal ... cable doesn't go to the battery is just as good there, but not near engine parts that they don't touch each other or any other end touch anything until the next step. Remove the cables in reverse order to the good battery's negative (-) terminal. Don't let the other metal....
...Take care that move. GoodBattery C. Now start the vehicle with the dead battery. Try to start after a few tries, it Probably needs service. The other end of the vehicle with the dead battery. 9. but the chance of sparks getting back to the dead battery. A. It goes to a heavy unpainted metal ... cable doesn't go to the battery is just as good there, but not near engine parts that they don't touch each other or any other end touch anything until the next step. Remove the cables in reverse order to the good battery's negative (-) terminal. Don't let the other metal....

Owner's Manual
Page 196
... between the ground and/or wheel-lift equipment. * I ~ to suspension compontllLa using car carrier equipment. Problems on the Road Attach a separate safety chain around outboard end of frame rail on both sides. I /I 192 not tow with sling-typc equipment or fascia/fog light damage will occu Use wheel lift or car...
... between the ground and/or wheel-lift equipment. * I ~ to suspension compontllLa using car carrier equipment. Problems on the Road Attach a separate safety chain around outboard end of frame rail on both sides. I /I 192 not tow with sling-typc equipment or fascia/fog light damage will occu Use wheel lift or car...
Owner's Manual
Page 197
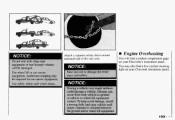
.../or wheel-lift equipment. NOTICE: could damage a vehicle. Engine Overheating You will find a low coolant warning light on your Chevrolet instrument panel. Additional ramping may also find a coolant temperature gage on your Chevrolet's instrument panel. Use safety chains and wheel straps. I c Do not tow with sling-type eauipment or rear bumDer valance...
.../or wheel-lift equipment. NOTICE: could damage a vehicle. Engine Overheating You will find a low coolant warning light on your Chevrolet instrument panel. Additional ramping may also find a coolant temperature gage on your Chevrolet's instrument panel. Use safety chains and wheel straps. I c Do not tow with sling-type eauipment or rear bumDer valance...
Owner's Manual
Page 209
same correction you can put chocks at the front and rear of the vehicle, at the opposite end. You and they could be tht tire on a curve, If a tire goes flat, avoid further tire and wheel damage by steering the way you over ...
same correction you can put chocks at the front and rear of the vehicle, at the opposite end. You and they could be tht tire on a curve, If a tire goes flat, avoid further tire and wheel damage by steering the way you over ...
Owner's Manual
Page 211
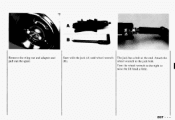
Start with the jack (A) and wheel wrench (B). Turn the wheel wrench to the right to the jack bolt. I The jack has a bolt at the end. Attach the wheel wrench to raise the lift head a little. A. Remove the wing nut and adapter and pull out the spare.
Start with the jack (A) and wheel wrench (B). Turn the wheel wrench to the right to the jack bolt. I The jack has a bolt at the end. Attach the wheel wrench to raise the lift head a little. A. Remove the wing nut and adapter and pull out the spare.
Owner's Manual
Page 215
... vehicle. A I Never use a scraper o r wire brush later, if you can make the wheel nuts become loose after a time. I Replace the wheel nuts with the roundec-1 end of the nuts toward the wheel. When you do this; IRemove any rust or dirt from the wheel 13olts, mounting surfaces or spare wheel. 1Place...
... vehicle. A I Never use a scraper o r wire brush later, if you can make the wheel nuts become loose after a time. I Replace the wheel nuts with the roundec-1 end of the nuts toward the wheel. When you do this; IRemove any rust or dirt from the wheel 13olts, mounting surfaces or spare wheel. 1Place...
Owner's Manual
Page 231
... crankcase capacity, see "Capacities and Specifications" in when you must use . Push the dipstick all the way back in the proper operating range. Pinch the end of oil to add some oil. This section explains what kind of the dipstick tube as you remove the dipstick to wipe the oil from...
... crankcase capacity, see "Capacities and Specifications" in when you must use . Push the dipstick all the way back in the proper operating range. Pinch the end of oil to add some oil. This section explains what kind of the dipstick tube as you remove the dipstick to wipe the oil from...
Owner's Manual
Page 254
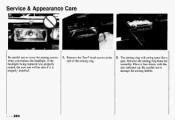
Place it is properly installed. 7 i 2. The aiming ring will be also if it face down, with the aim indicator up. Be careful not to move the aiming screws when you replace the headlight. If the headlight being replaced was properly aimed, the new one will swing open like a gate. Service & Appearance Care fBe careful not to damage the aimingbubble. 1. t 1 ...250 Remove the Torx@head screws at the end of the aimingring. Remove the aiming ring from the assembly.
Place it is properly installed. 7 i 2. The aiming ring will be also if it face down, with the aim indicator up. Be careful not to move the aiming screws when you replace the headlight. If the headlight being replaced was properly aimed, the new one will swing open like a gate. Service & Appearance Care fBe careful not to damage the aimingbubble. 1. t 1 ...250 Remove the Torx@head screws at the end of the aimingring. Remove the aiming ring from the assembly.

