

Owner's Manual
Page 1
2012 Cadillac Escalade/Escalade ESV Owner Manual M In Brief ...1-1 Instrument Panel ...1-2 Initial Drive Information ...1-4 Vehicle Features ...1-18 Performance and Maintenance ...1-24 Keys, Doors, and Windows ...2-1 Keys and Locks ...2-2 Doors ...2-9 Vehicle Security...2-13 Exterior Mirrors ...2-16 Interior......5-23 Vehicle Messages ...5-28 Vehicle Personalization ...5-38 Universal Remote System ...5-46 Lighting ...6-1 Exterior Lighting ...6-1 Interior Lighting ...6-8 Lighting Features ...6-9 Infotainment System ...7-1 Introduction ...7-2 Radio ...7-9 Audio Players ...7-18 Rear Seat ...
2012 Cadillac Escalade/Escalade ESV Owner Manual M In Brief ...1-1 Instrument Panel ...1-2 Initial Drive Information ...1-4 Vehicle Features ...1-18 Performance and Maintenance ...1-24 Keys, Doors, and Windows ...2-1 Keys and Locks ...2-2 Doors ...2-9 Vehicle Security...2-13 Exterior Mirrors ...2-16 Interior......5-23 Vehicle Messages ...5-28 Vehicle Personalization ...5-38 Universal Remote System ...5-46 Lighting ...6-1 Exterior Lighting ...6-1 Interior Lighting ...6-8 Lighting Features ...6-9 Infotainment System ...7-1 Introduction ...7-2 Radio ...7-9 Audio Players ...7-18 Rear Seat ...

Owner's Manual
Page 7
... Seats ...1-10 Head Restraint Adjustment ...1-11 Safety Belts ...1-11 Passenger Sensing System ...1-12 Mirror Adjustment ...1-12 Steering Wheel Adjustment ...1-14 Throttle and Brake Pedal Adjustment ...Interior Lighting ...Exterior Lighting ...Windshield Wiper/Washer ...Climate Controls ...Transmission ... 1-14 1-14 1-15 1-16 1-17 1-17 1-18 1-18 1-18 1-18 1-19 1-19 1-20 1-20 1-20 1-21...
... Seats ...1-10 Head Restraint Adjustment ...1-11 Safety Belts ...1-11 Passenger Sensing System ...1-12 Mirror Adjustment ...1-12 Steering Wheel Adjustment ...1-14 Throttle and Brake Pedal Adjustment ...Interior Lighting ...Exterior Lighting ...Windshield Wiper/Washer ...Climate Controls ...Transmission ... 1-14 1-14 1-15 1-16 1-17 1-17 1-18 1-18 1-18 1-18 1-19 1-19 1-20 1-20 1-20 1-21...

Owner's Manual
Page 19
... tilt to the folded position. See Automatic Dimming Rearview Mirror on page 2‑16. See Power Mirrors on page 2‑17 for more information. 1-13 Interior Mirror Adjustment Hold the rearview mirror in R (Reverse). Press (C) to fold the mirrors out to view the area behind the vehicle. In Brief Power Folding...
... tilt to the folded position. See Automatic Dimming Rearview Mirror on page 2‑16. See Power Mirrors on page 2‑17 for more information. 1-13 Interior Mirror Adjustment Hold the rearview mirror in R (Reverse). Press (C) to fold the mirrors out to view the area behind the vehicle. In Brief Power Folding...

Owner's Manual
Page 20
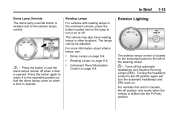
Push the control up or down. To set the memory position, see Vehicle Personalization on page 9‑22. Interior Lighting Dome Lamps The dome lamps are closed. They come on when any door is opened and turn on the center console below the dome ...
Push the control up or down. To set the memory position, see Vehicle Personalization on page 9‑22. Interior Lighting Dome Lamps The dome lamps are closed. They come on when any door is opened and turn on the center console below the dome ...
Owner's Manual
Page 21
... P (Park) position. The lamps cannot be adjusted. The exterior lamps control is located next to the left of the steering wheel. For more information about interior lamps, see: . . 1-15 Exterior Lighting Dome Lamps on page 6‑9. For vehicles first sold in and the dome lamps remain off the automatic headlamps and...
... P (Park) position. The lamps cannot be adjusted. The exterior lamps control is located next to the left of the steering wheel. For more information about interior lamps, see: . . 1-15 Exterior Lighting Dome Lamps on page 6‑9. For vehicles first sold in and the dome lamps remain off the automatic headlamps and...
Owner's Manual
Page 33
...) System Operation ...Remote Vehicle Start ...Door Locks ...Power Door Locks ...Delayed Locking ...Automatic Door Locks ...Lockout Protection ...Safety Locks ...2-2 2-3 2-3 2-5 2-7 2-7 2-8 2-8 2-8 2-8 Doors Liftgate ...2-9 Power Assist Steps ...2-12 Interior Mirrors Automatic Dimming Rearview Mirror ...2-17 Vehicle Security Vehicle Security ...Anti-theft Alarm System ...Immobilizer ...Immobilizer Operation ...2-13 2-13 2-14 2-14 2-16 2-16 2-17 2-17...
...) System Operation ...Remote Vehicle Start ...Door Locks ...Power Door Locks ...Delayed Locking ...Automatic Door Locks ...Lockout Protection ...Safety Locks ...2-2 2-3 2-3 2-5 2-7 2-7 2-8 2-8 2-8 2-8 Doors Liftgate ...2-9 Power Assist Steps ...2-12 Interior Mirrors Automatic Dimming Rearview Mirror ...2-17 Vehicle Security Vehicle Security ...Anti-theft Alarm System ...Immobilizer ...Immobilizer Operation ...2-13 2-13 2-14 2-14 2-16 2-16 2-17 2-17...

Owner's Manual
Page 35
... to 60 m (195 ft) away from the vehicle. See "Battery Replacement" later in the RKE operating range: . If K is pressed again within three seconds. The interior lamps may be available if this section. Press to indicate locking has occurred. If enabled through the Driver Information Center (DIC), the turn signal lamps...
... to 60 m (195 ft) away from the vehicle. See "Battery Replacement" later in the RKE operating range: . If K is pressed again within three seconds. The interior lamps may be available if this section. Press to indicate locking has occurred. If enabled through the Driver Information Center (DIC), the turn signal lamps...

Owner's Manual
Page 49
... position when the vehicle is shifted out of the turn on when the rear window defogger is on page 2‑17 for more information. 2-17 Interior Mirrors Automatic Dimming Rearview Mirror To adjust the inside rearview mirror. The automatic dimming rearview mirror will automatically reduce the glare from the headlamps from...
... position when the vehicle is shifted out of the turn on when the rear window defogger is on page 2‑17 for more information. 2-17 Interior Mirrors Automatic Dimming Rearview Mirror To adjust the inside rearview mirror. The automatic dimming rearview mirror will automatically reduce the glare from the headlamps from...

Owner's Manual
Page 75
... who have rear shoulder belt comfort guides. When installed and properly adjusted, the comfort guide positions the belt away from its storage clip on the interior body. 2.
... who have rear shoulder belt comfort guides. When installed and properly adjusted, the comfort guide positions the belt away from its storage clip on the interior body. 2.

Owner's Manual
Page 76
.... Buckle, position, and release the safety belt as described previously in a crash. The shoulder belt should be under the belt and the guide on the interior body.
.... Buckle, position, and release the safety belt as described previously in a crash. The shoulder belt should be under the belt and the guide on the interior body.

Owner's Manual
Page 86
... fuel system, brake and steering systems, etc. For location of the airbag modules, see What Makes an Airbag Inflate? on the interior lamps and hazard warning flashers, and shut off the interior lamps and hazard warning flashers by opening a window or a door. You can lock the doors, turn on page 3‑31...
... fuel system, brake and steering systems, etc. For location of the airbag modules, see What Makes an Airbag Inflate? on the interior lamps and hazard warning flashers, and shut off the interior lamps and hazard warning flashers by opening a window or a door. You can lock the doors, turn on page 3‑31...

Owner's Manual
Page 173
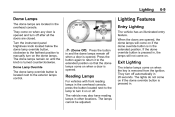
... ...Flash-to-Pass ...Daytime Running Lamps (DRL) ...Automatic Headlamp System ...6-1 6-5 6-5 6-5 6-5 6-6 Hazard Warning Flashers ...6-7 Turn and Lane-Change Signals ...6-7 Fog Lamps ...6-8 Exterior Lighting Exterior Lamp Controls Interior Lighting Instrument Panel Illumination Control ...6-8 Dome Lamps ...6-9 Reading Lamps ...6-9 Lighting Features Entry Lighting ...6-9 Exit Lighting ...6-9 Battery Load Management ...6-10 Battery Power Protection ...6-10 The exterior...
... ...Flash-to-Pass ...Daytime Running Lamps (DRL) ...Automatic Headlamp System ...6-1 6-5 6-5 6-5 6-5 6-6 Hazard Warning Flashers ...6-7 Turn and Lane-Change Signals ...6-7 Fog Lamps ...6-8 Exterior Lighting Exterior Lamp Controls Interior Lighting Instrument Panel Illumination Control ...6-8 Dome Lamps ...6-9 Reading Lamps ...6-9 Lighting Features Entry Lighting ...6-9 Exit Lighting ...6-9 Battery Load Management ...6-10 Battery Power Protection ...6-10 The exterior...

Owner's Manual
Page 180
... to show that the fog lamps are on . Never use the fog lamps after the ignition is turned off , the fog lamps will come on . Interior Lighting Instrument Panel Illumination Control D (Instrument Panel Brightness): This feature controls the brightness of the instrument panel lights and is located on the left side...
... to show that the fog lamps are on . Never use the fog lamps after the ignition is turned off , the fog lamps will come on . Interior Lighting Instrument Panel Illumination Control D (Instrument Panel Brightness): This feature controls the brightness of the instrument panel lights and is located on the left side...
Owner's Manual
Page 181
... to the exterior lamps control. Reading Lamps For vehicles with front reading lamps in , the lamps will come on the dome lamps. Exit Lighting The interior lamps come on until the knob is located next to turn on when any door is opened . The vehicle may also have reading lamps in...
... to the exterior lamps control. Reading Lamps For vehicles with front reading lamps in , the lamps will come on the dome lamps. Exit Lighting The interior lamps come on until the knob is located next to turn on when any door is opened . The vehicle may also have reading lamps in...

Owner's Manual
Page 285
... the controls and operation of the cell phone. Voice Recognition The Bluetooth system uses voice recognition to interpret voice commands to the vehicle. Noise: Keep interior noise levels to access the address book or contact list. The system may not work with the in injury or death. Infotainment System 7-103 Phone...
... the controls and operation of the cell phone. Voice Recognition The Bluetooth system uses voice recognition to interpret voice commands to the vehicle. Noise: Keep interior noise levels to access the address book or contact list. The system may not work with the in injury or death. Infotainment System 7-103 Phone...

Owner's Manual
Page 312
... could be alert and pay attention to do not shift down and they could get so hot that they would not work well. Keep the interior temperature cool. You could crash. If you stay in your surroundings while driving. Tips for driving in these conditions include: . { WARNING Coasting downhill in gear...
... could be alert and pay attention to do not shift down and they could get so hot that they would not work well. Keep the interior temperature cool. You could crash. If you stay in your surroundings while driving. Tips for driving in these conditions include: . { WARNING Coasting downhill in gear...

Owner's Manual
Page 372
... these marks: Jump Starting Jump Starting ...10-88 Towing Towing the Vehicle ...10-93 Recreational Vehicle Towing ...10-93 Appearance Care Exterior Care ...10-96 Interior Care ...10-99 Floor Mats ...10-102
... these marks: Jump Starting Jump Starting ...10-88 Towing Towing the Vehicle ...10-93 Recreational Vehicle Towing ...10-93 Appearance Care Exterior Care ...10-96 Interior Care ...10-99 Floor Mats ...10-102

Owner's Manual
Page 415
Vehicle Care Fuses 17 18 19 20 21 22 23 24 25 26 Usage Interior Lamps Power Door Lock 1 (Unlock Feature) Rear Seat Entertainment Ultrasonic Rear Parking Assist, Power Liftgate Power Door Lock 1 (Lock Feature) Driver Information Center (DIC) Rear ...
Vehicle Care Fuses 17 18 19 20 21 22 23 24 25 26 Usage Interior Lamps Power Door Lock 1 (Unlock Feature) Rear Seat Entertainment Ultrasonic Rear Parking Assist, Power Liftgate Power Door Lock 1 (Lock Feature) Driver Information Center (DIC) Rear ...

Owner's Manual
Page 469
...home furnishings can be removed quickly. To prevent overspray, apply all safety instructions on the instrument cluster. While cleaning the interior, maintain adequate ventilation by opening the doors and windows. Original manufacturer replacement parts will provide the corrosion protection while maintaining ... etched into the paint surface. Larger areas of time. Use cleaners specifically designed for the surfaces being cleaned for cleaning the interior. Using a mild soap solution, immediately remove hand lotions, sunscreen, and insect repellant from your dealer's body and paint shop...
...home furnishings can be removed quickly. To prevent overspray, apply all safety instructions on the instrument cluster. While cleaning the interior, maintain adequate ventilation by opening the doors and windows. Original manufacturer replacement parts will provide the corrosion protection while maintaining ... etched into the paint surface. Larger areas of time. Use cleaners specifically designed for the surfaces being cleaned for cleaning the interior. Using a mild soap solution, immediately remove hand lotions, sunscreen, and insect repellant from your dealer's body and paint shop...

Owner's Manual
Page 470
...detergents or dishwashing soaps with a paper towel. Do not heavily saturate the upholstery when cleaning. Continue blotting until no longer any interior surface. Start on the floor carpet. Gently blot liquids with degreasers. Remove excess moisture by gently wringing until there is being... fabric dampened with plain water. Commercial glass cleaners may damage the rear window defogger. . To prevent damage, do not clean the interior using a soft brush attachment. To clean: 1. Microfiber cloth is not completely removed, use a mild soap solution followed only by vacuuming...
...detergents or dishwashing soaps with a paper towel. Do not heavily saturate the upholstery when cleaning. Continue blotting until no longer any interior surface. Start on the floor carpet. Gently blot liquids with degreasers. Remove excess moisture by gently wringing until there is being... fabric dampened with plain water. Commercial glass cleaners may damage the rear window defogger. . To prevent damage, do not clean the interior using a soft brush attachment. To clean: 1. Microfiber cloth is not completely removed, use a mild soap solution followed only by vacuuming...

