
Owner's Manual
Page 90
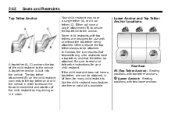
... the law requires that forward-facing child restraints have a top tether, one can be attached. Ask the child restraint manufacturer whether or not a kit is built into the vehicle. Be sure to the vehicle. Either will have a single tether (A) or a dual tether (C). Top Tether Anchor ...Lower Anchor and Top Tether Anchor Locations A top tether (A, C) anchors the top of the child restraint during driving or in kit form, for many child restraints. Rear Seat i (Top Tether Anchor): Seating positions with two lower anchors. Others require the top tether always to...
... the law requires that forward-facing child restraints have a top tether, one can be attached. Ask the child restraint manufacturer whether or not a kit is built into the vehicle. Be sure to the vehicle. Either will have a single tether (A) or a dual tether (C). Top Tether Anchor ...Lower Anchor and Top Tether Anchor Locations A top tether (A, C) anchors the top of the child restraint during driving or in kit form, for many child restraints. Rear Seat i (Top Tether Anchor): Seating positions with two lower anchors. Others require the top tether always to...
Owner's Manual
Page 159
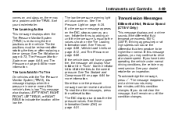
...the location of the vehicle's tires is re-learning the tire positions on page 4‑31. 4-49 Transmission Messages Differential Hot, Reduce Speed (CTS-V Only) This message displays and a chime sounds if the differential fluid temperature exceeds 150°C (300°F). If this condition changes. ...tire positions must be received at a slower speed. Inflate the tires by adding air until the condition changes. See Tire Sealant and Compressor Kit on the DIC, stop as soon as you may continue to the correct pressure. See Driver Information Center (DIC) on the vehicle....
...the location of the vehicle's tires is re-learning the tire positions on page 4‑31. 4-49 Transmission Messages Differential Hot, Reduce Speed (CTS-V Only) This message displays and a chime sounds if the differential fluid temperature exceeds 150°C (300°F). If this condition changes. ...tire positions must be received at a slower speed. Inflate the tires by adding air until the condition changes. See Tire Sealant and Compressor Kit on the DIC, stop as soon as you may continue to the correct pressure. See Driver Information Center (DIC) on the vehicle....

Owner's Manual
Page 302
... Tire Balance ...9-79 Wheel Replacement ...9-80 Tire Chains ...9-81 If a Tire Goes Flat ...9-81 Tire Sealant and Compressor Kit ...9-84 Storing the Tire Sealant and Compressor Kit (Sedan) ...9-92 Storing the Tire Sealant and Compressor Kit (Wagon) ...9-93 Tire Changing ...9-94 Compact Spare Tire ...9-102 Wheels and Tires Tires ...Winter Tires ...Low-Profile...
... Tire Balance ...9-79 Wheel Replacement ...9-80 Tire Chains ...9-81 If a Tire Goes Flat ...9-81 Tire Sealant and Compressor Kit ...9-84 Storing the Tire Sealant and Compressor Kit (Sedan) ...9-92 Storing the Tire Sealant and Compressor Kit (Wagon) ...9-93 Tire Changing ...9-94 Compact Spare Tire ...9-102 Wheels and Tires Tires ...Winter Tires ...Low-Profile...

Owner's Manual
Page 370
... an early indicator that the air pressure in the tire(s) are inflated to the correct inflation pressure. Factory-installed Tire Inflator Kits use the GM approved tire sealant available through your dealer/ retailer. See Vehicle Load Limits on your vehicle's original equipment tires... and the correct inflation pressure for information regarding the inflator kit materials and instructions. See Tire Inspection on page 9‑73, Tire Rotation on page 9‑73 and Tires on page 9‑...
... an early indicator that the air pressure in the tire(s) are inflated to the correct inflation pressure. Factory-installed Tire Inflator Kits use the GM approved tire sealant available through your dealer/ retailer. See Vehicle Load Limits on your vehicle's original equipment tires... and the correct inflation pressure for information regarding the inflator kit materials and instructions. See Tire Inspection on page 9‑73, Tire Rotation on page 9‑73 and Tires on page 9‑...

Owner's Manual
Page 383
..., follow the instructions below. Vehicle Care WARNING (Continued) 3. This vehicle may come with a jack and spare tire or a tire sealant and compressor kit. That would be certain the vehicle will not move, put blocks at the opposite end of the vehicle. To use the following information explains how... to change a tire. A. Then see Tire Sealant and Compressor Kit on page 9‑94. Flat Tire 9-83 The following example as a guide to remain in the placement of the tire farthest away from ...
..., follow the instructions below. Vehicle Care WARNING (Continued) 3. This vehicle may come with a jack and spare tire or a tire sealant and compressor kit. That would be certain the vehicle will not move, put blocks at the opposite end of the vehicle. To use the following information explains how... to change a tire. A. Then see Tire Sealant and Compressor Kit on page 9‑94. Flat Tire 9-83 The following example as a guide to remain in the placement of the tire farthest away from ...

Owner's Manual
Page 384
... to temporarily seal punctures up to 6 mm (¼ inch) in the tread area of the tire. 9-84 Vehicle Care Tire Sealant and Compressor Kit { WARNING Over-inflating a tire could cause the tire to rupture and you or others could cause injury. If this vehicle has a tire sealant.... { WARNING Idling a vehicle in its recommended pressure. See Roadside Service on page 8‑25. Read and follow the tire sealant and compressor kit instructions and inflate the tire to inflate an under inflated tire. Engine exhaust may not be injured. In a sudden stop or collision, loose equipment...
... to temporarily seal punctures up to 6 mm (¼ inch) in the tread area of the tire. 9-84 Vehicle Care Tire Sealant and Compressor Kit { WARNING Over-inflating a tire could cause the tire to rupture and you or others could cause injury. If this vehicle has a tire sealant.... { WARNING Idling a vehicle in its recommended pressure. See Roadside Service on page 8‑25. Read and follow the tire sealant and compressor kit instructions and inflate the tire to inflate an under inflated tire. Engine exhaust may not be injured. In a sudden stop or collision, loose equipment...

Owner's Manual
Page 385
Check the tire sealant expiration date on the label adhered to seal one of the following tire sealant and compressor kits. A. There is only enough sealant to the sealant canister. Selector Switch (Sealant/Air or Air Only) B. Tire Sealant Canister F. Pressure Gage D. Pressure Deflation Button (If ... (Clear) G. The sealant canister should be replaced. See "Removal and Installation of the Sealant Canister" following . Vehicle Care This vehicle may have one tire. The kit includes: 9-85 Tire Sealant Read and follow the safe handling instructions on the sealant canister.
Check the tire sealant expiration date on the label adhered to seal one of the following tire sealant and compressor kits. A. There is only enough sealant to the sealant canister. Selector Switch (Sealant/Air or Air Only) B. Tire Sealant Canister F. Pressure Gage D. Pressure Deflation Button (If ... (Clear) G. The sealant canister should be replaced. See "Removal and Installation of the Sealant Canister" following . Vehicle Care This vehicle may have one tire. The kit includes: 9-85 Tire Sealant Read and follow the safe handling instructions on the sealant canister.

Owner's Manual
Page 386
9-86 Vehicle Care Using the Tire Sealant and Compressor Kit to inflate the tire faster. This will help to Temporarily Seal and Inflate a Punctured Tire Follow the directions closely for 5 minutes. When using the tire sealant and compressor kit during cold temperatures, warm the kit in a heated environment for correct sealant usage.
9-86 Vehicle Care Using the Tire Sealant and Compressor Kit to inflate the tire faster. This will help to Temporarily Seal and Inflate a Punctured Tire Follow the directions closely for 5 minutes. When using the tire sealant and compressor kit during cold temperatures, warm the kit in a heated environment for correct sealant usage.

Owner's Manual
Page 387
... page 9‑93. 2. See Power Outlets on page 9‑81. Turn the selector switch (A) counterclockwise to turn the tire sealant and compressor kit on. The pressure gage (C) will inject sealant and air into the tire, the pressure will reach it. 4. See If a Tire Goes Flat on page 4‑... from the flat tire by turning it is tight. 6. Do not remove any objects that have penetrated the tire. 1. Remove the tire sealant and compressor kit from its storage location. Turn it clockwise until it counterclockwise. 5. Start the vehicle.
... page 9‑93. 2. See Power Outlets on page 9‑81. Turn the selector switch (A) counterclockwise to turn the tire sealant and compressor kit on. The pressure gage (C) will inject sealant and air into the tire, the pressure will reach it. 4. See If a Tire Goes Flat on page 4‑... from the flat tire by turning it is tight. 6. Do not remove any objects that have penetrated the tire. 1. Remove the tire sealant and compressor kit from its storage location. Turn it clockwise until it counterclockwise. 5. Start the vehicle.
Owner's Manual
Page 388
.... Unplug the power plug (H) from the tire valve. The recommended inflation pressure can be found on /off button (B) to turn the tire sealant and compressor kit off. Remove the power plug from the accessory power outlet and unscrew the inflating hose from the accessory power outlet in the vehicle. 13. The... is driven and the sealant is on /off to leak air until the correct pressure is too severely damaged and the tire sealant and compressor kit cannot inflate the tire. Replace the tire valve stem cap. 15. The tire is not sealed and will continue to get an accurate pressure ...
.... Unplug the power plug (H) from the tire valve. The recommended inflation pressure can be found on /off button (B) to turn the tire sealant and compressor kit off. Remove the power plug from the accessory power outlet and unscrew the inflating hose from the accessory power outlet in the vehicle. 13. The... is driven and the sealant is on /off to leak air until the correct pressure is too severely damaged and the tire sealant and compressor kit cannot inflate the tire. Replace the tire valve stem cap. 15. The tire is not sealed and will continue to get an accurate pressure ...

Owner's Manual
Page 389
...(5 miles) to distribute the sealant in a highly visible location. Refer to Steps 1 through 11 under "Using the Tire Sealant and Compressor Kit without Sealant to the recommended inflation pressure. 9-89 20. See Roadside Service on page 12‑6. Wipe off any sealant from the recommended ... and place it with local state codes and practices. 22. Vehicle Care 18. After temporarily sealing a tire using the tire sealant and compressor kit, take the vehicle to an authorized dealer/retailer within a 161 km (100 miles) of the used sealant canister (E) and sealant/air hose ...
...(5 miles) to distribute the sealant in a highly visible location. Refer to Steps 1 through 11 under "Using the Tire Sealant and Compressor Kit without Sealant to the recommended inflation pressure. 9-89 20. See Roadside Service on page 12‑6. Wipe off any sealant from the recommended ... and place it with local state codes and practices. 22. Vehicle Care 18. After temporarily sealing a tire using the tire sealant and compressor kit, take the vehicle to an authorized dealer/retailer within a 161 km (100 miles) of the used sealant canister (E) and sealant/air hose ...

Owner's Manual
Page 390
9-90 Vehicle Care Using the Tire Sealant and Compressor Kit without Sealant to Inflate a Tire (Not Punctured) To use the air compressor to inflate a tire with air only and not sealant: Always do a safety check first. Remove the tire sealant and compressor kit from its storage location. See Storing the Tire Sealant and Compressor Kit (Sedan) on page 9‑92 or Storing the Tire Sealant and Compressor Kit (Wagon) on page 9‑81. 1. See If a Tire Goes Flat on page 9‑93. 2. Unwrap the air only hose (G) and the power plug (H).
9-90 Vehicle Care Using the Tire Sealant and Compressor Kit without Sealant to Inflate a Tire (Not Punctured) To use the air compressor to inflate a tire with air only and not sealant: Always do a safety check first. Remove the tire sealant and compressor kit from its storage location. See Storing the Tire Sealant and Compressor Kit (Sedan) on page 9‑92 or Storing the Tire Sealant and Compressor Kit (Wagon) on page 9‑81. 1. See If a Tire Goes Flat on page 9‑93. 2. Unwrap the air only hose (G) and the power plug (H).

Owner's Manual
Page 391
... Press the on/off (B) button to the recommended inflation pressure using the air compressor. 8. Inflate the tire to turn the tire sealant and compressor kit off button (B) to the ground so the hose will inflate the tire with air only. 10. The recommended inflation pressure can adjust the excess pressure... may read higher than the recommended pressure you inflate the tire higher than the actual tire pressure while the compressor is tight. 6. Place the kit on page 4‑12. Make sure the tire valve stem is only functional when using the air only hose (G). 11. Remove the tire ...
... Press the on/off (B) button to the recommended inflation pressure using the air compressor. 8. Inflate the tire to turn the tire sealant and compressor kit off button (B) to the ground so the hose will inflate the tire with air only. 10. The recommended inflation pressure can adjust the excess pressure... may read higher than the recommended pressure you inflate the tire higher than the actual tire pressure while the compressor is tight. 6. Place the kit on page 4‑12. Make sure the tire valve stem is only functional when using the air only hose (G). 11. Remove the tire ...

Owner's Manual
Page 392
... the cargo area. 3. See Trunk (Sedan) on the bottom of the Sealant Canister To remove the sealant canister: 1. Tire Sealant and Compressor Kit B. Open the trunk. Replace with a new canister which is located in the vehicle. Push the new canister into place. Press the canister release.... 3. A. Remove the wing nut (C) that may be used to inflate air mattresses, balls, etc. Tire Sealant and Compressor Kit without Pressure Deflation Button 14. Foam Container C. 9-92 Vehicle Care Removal and Installation of its original location. 15. The tire sealant and ...
... the cargo area. 3. See Trunk (Sedan) on the bottom of the Sealant Canister To remove the sealant canister: 1. Tire Sealant and Compressor Kit B. Open the trunk. Replace with a new canister which is located in the vehicle. Push the new canister into place. Press the canister release.... 3. A. Remove the wing nut (C) that may be used to inflate air mattresses, balls, etc. Tire Sealant and Compressor Kit without Pressure Deflation Button 14. Foam Container C. 9-92 Vehicle Care Removal and Installation of its original location. 15. The tire sealant and ...

Owner's Manual
Page 393
... Open the trunk. Remove the retainer that holds the tire sealant and compressor kit in the rear of the vehicle. 2. Storing the Tire Sealant and Compressor Kit (Wagon) The tire sealant and compressor kit is not necessary to remove the subwoofer (C) to access the tire sealant and ... want to remove it see Tire Changing on page 1‑17. Remove the tire sealant and compressor kit from the foam container (B). It is located in place. 3. A. Tire Sealant and Compressor Kit B. See Trunk (Sedan) on page 9‑94 for instructions. Subwoofer (Optional) Vehicle Care 4....
... Open the trunk. Remove the retainer that holds the tire sealant and compressor kit in the rear of the vehicle. 2. Storing the Tire Sealant and Compressor Kit (Wagon) The tire sealant and compressor kit is not necessary to remove the subwoofer (C) to access the tire sealant and ... want to remove it see Tire Changing on page 1‑17. Remove the tire sealant and compressor kit from the foam container (B). It is located in place. 3. A. Tire Sealant and Compressor Kit B. See Trunk (Sedan) on page 9‑94 for instructions. Subwoofer (Optional) Vehicle Care 4....

Owner's Manual
Page 422
...At Each Fuel Stop . See Tire Inspection on page 9‑84. . . . . . . Replace if needed. See Tire Sealant and Compressor Kit on page 9‑73. 10-4 . Brake system inspection (or every 12 months, whichever occurs first). Steering and suspension inspection. Visual inspection for damaged,... loose, or missing parts or signs of the kit. See Recommended Fluids and Lubricants on page 9‑18. Restraint system component check. Once a Year . . See Engine Coolant on ...
...At Each Fuel Stop . See Tire Inspection on page 9‑84. . . . . . . Replace if needed. See Tire Sealant and Compressor Kit on page 9‑73. 10-4 . Brake system inspection (or every 12 months, whichever occurs first). Steering and suspension inspection. Visual inspection for damaged,... loose, or missing parts or signs of the kit. See Recommended Fluids and Lubricants on page 9‑18. Restraint system component check. Once a Year . . See Engine Coolant on ...
Owner's Manual
Page 455
... ...4-15 Clutch, Hydraulic ...9-14 Collision Damage Repair ...12-10 Compact Spare Tire ...9-102 Compass ...4-11 Compass Messages ...4-39 Competitive Driving ...8-8 Competitive Driving Mode ...8-40 Compressor Kit, Tire Sealant ...9-84 Control of a Vehicle ...8-4 Convenience Net ...3-6 Convex Mirrors ...1-26 Coolant Engine ...9-18 Engine Temperature Gage ...4-20 Engine Temperature Warning Light ...4-29 Cooling System...
... ...4-15 Clutch, Hydraulic ...9-14 Collision Damage Repair ...12-10 Compact Spare Tire ...9-102 Compass ...4-11 Compass Messages ...4-39 Competitive Driving ...8-8 Competitive Driving Mode ...8-40 Compressor Kit, Tire Sealant ...9-84 Control of a Vehicle ...8-4 Convenience Net ...3-6 Convex Mirrors ...1-26 Coolant Engine ...9-18 Engine Temperature Gage ...4-20 Engine Temperature Warning Light ...4-29 Cooling System...
Owner's Manual
Page 462
... Console ...3-1 Convenience Net ...3-6 Glove Box ...3-1 Instrument Panel ...3-1 Roof Rack System ...3-6 Storing the Tire Sealant and Compressor Kit ...9-92, 9-93 Stuck Vehicle ...8-12 Sun Visors ...1-31 Sunroof ...1-31 Symbols ...iv System Roof Rack ...3-6 System Check...Automatic Transmission Shiftlock Control ...9-32 Safety System Check ...2-25 Satellite Radio ...6-11 Scheduled Maintenance ...10-3 Scheduling Appointments ...12-8 Sealant Kit, Tire ...9-84 Seats Adjustment, Front ...2-3 Head Restraints ...2-2 Heated and Ventilated Front ...2-9 Lumbar Adjustment, Front ...2-6 Power Adjustment,...
... Console ...3-1 Convenience Net ...3-6 Glove Box ...3-1 Instrument Panel ...3-1 Roof Rack System ...3-6 Storing the Tire Sealant and Compressor Kit ...9-92, 9-93 Stuck Vehicle ...8-12 Sun Visors ...1-31 Sunroof ...1-31 Symbols ...iv System Roof Rack ...3-6 System Check...Automatic Transmission Shiftlock Control ...9-32 Safety System Check ...2-25 Satellite Radio ...6-11 Scheduled Maintenance ...10-3 Scheduling Appointments ...12-8 Sealant Kit, Tire ...9-84 Seats Adjustment, Front ...2-3 Head Restraints ...2-2 Heated and Ventilated Front ...2-9 Lumbar Adjustment, Front ...2-6 Power Adjustment,...

Owner's Manual
Page 463
... Inspection ...9-73 Low Profile ...9-59 Messages ...4-48 Pressure ...9-67 Pressure Light ...4-29 Pressure Monitor System ...9-68 Tires (cont.) Rotation ...9-73 Sealant and Compressor Kit ...9-84 Sealant and Compressor Kit, Storing ...9-92, 9-93 Sidewall Labeling ...9-60 Terminology and Definitions ...9-63 Uniform Tire Quality Grading ...9-78 Wheel Alignment and Tire Balance ...9-79 Wheel Replacement...
... Inspection ...9-73 Low Profile ...9-59 Messages ...4-48 Pressure ...9-67 Pressure Light ...4-29 Pressure Monitor System ...9-68 Tires (cont.) Rotation ...9-73 Sealant and Compressor Kit ...9-84 Sealant and Compressor Kit, Storing ...9-92, 9-93 Sidewall Labeling ...9-60 Terminology and Definitions ...9-63 Uniform Tire Quality Grading ...9-78 Wheel Alignment and Tire Balance ...9-79 Wheel Replacement...

Owner's Manual
Page 464
... ...8-4 Load Limits ...8-12 Messages ...4-36 Personalization ...4-51 Remote Start ...1-12 Security ...1-23 Speed Messages ...4-50 Towing ...9-108 Vehicle Care Storing the Tire Sealant and Compressor Kit ...9-92, 9-93 Tire Pressure ...9-66 Vehicle Identification Number (VIN) ...11-1 Service Parts Identification Label ...11-1 Ventilation, Air ...7-6 Visors ...1-31 W Warning Lights, Gages, and Indicators ...4-14...
... ...8-4 Load Limits ...8-12 Messages ...4-36 Personalization ...4-51 Remote Start ...1-12 Security ...1-23 Speed Messages ...4-50 Towing ...9-108 Vehicle Care Storing the Tire Sealant and Compressor Kit ...9-92, 9-93 Tire Pressure ...9-66 Vehicle Identification Number (VIN) ...11-1 Service Parts Identification Label ...11-1 Ventilation, Air ...7-6 Visors ...1-31 W Warning Lights, Gages, and Indicators ...4-14...