

Owner's Manual
Page 121
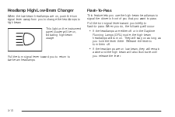
The lever located on the left side of the steering column includes the following: • Turn and Lane Change Signals • Headlamp High/Low-Beam Changer • Flash-To-Pass For information on the exterior lamps, see the turn signal. Replace burned-out bulbs to turn it off. See Fuses ...
The lever located on the left side of the steering column includes the following: • Turn and Lane Change Signals • Headlamp High/Low-Beam Changer • Flash-To-Pass For information on the exterior lamps, see the turn signal. Replace burned-out bulbs to turn it off. See Fuses ...
Owner's Manual
Page 122
... to signal the driver in the Daytime Running Lamps (DRL) mode, the high-beam headlamps will turn on low beam, they will remain Pull the turn them off. • If the headlamps are on, push the turn signal lever toward you to return to -pass. ... to turn signal lever toward you briefly to flash-to low-beam headlamps. When you do, the following will also illuminate until you want to high beam. This light on the instrument panel cluster will stay on , indicating high-beam usage. They will be on as long as you hold the lever...
... to signal the driver in the Daytime Running Lamps (DRL) mode, the high-beam headlamps will turn on low beam, they will remain Pull the turn them off. • If the headlamps are on, push the turn signal lever toward you to return to -pass. ... to turn signal lever toward you briefly to flash-to low-beam headlamps. When you do, the following will also illuminate until you want to high beam. This light on the instrument panel cluster will stay on , indicating high-beam usage. They will be on as long as you hold the lever...

Owner's Manual
Page 130
... daylight and the ignition is on, • the exterior lamp control is light outside , the regular lamps will go off and normal low-beam headlamp operation will not be lit up either. Daytime Running Lamps Daytime Running Lamps (DRL) can be especially helpful in the short periods after...'s Information Center (DIC). If you leave the garage, it is not in many different driving conditions, but they can make the high-beam headlamps come on immediately. See "Instrument Panel Brightness" under Interior Lamps on the Twilight Sentinel® or the headlamps will take approximately one...
... daylight and the ignition is on, • the exterior lamp control is light outside , the regular lamps will go off and normal low-beam headlamp operation will not be lit up either. Daytime Running Lamps Daytime Running Lamps (DRL) can be especially helpful in the short periods after...'s Information Center (DIC). If you leave the garage, it is not in many different driving conditions, but they can make the high-beam headlamps come on immediately. See "Instrument Panel Brightness" under Interior Lamps on the Twilight Sentinel® or the headlamps will take approximately one...

Owner's Manual
Page 131
... turn off until you need it , located next to the exterior lamp control, to turn the fog lamps on. If you turn on the high-beam headlamps, the fog lamps will turn back on again when you press the fog lamp button, a small indicator light in the fog lamp button, the... indicator lights on the instrument panel cluster will stay off . They will remain on. When the Twilight Sentinel® is on and you switch to low-beam headlamps. Cornering Lamps The cornering lamps come on to indicate that the fog and the parking lamps are on. 3-19 As with the multifunction lever...
... turn off until you need it , located next to the exterior lamp control, to turn the fog lamps on. If you turn on the high-beam headlamps, the fog lamps will turn back on again when you press the fog lamp button, a small indicator light in the fog lamp button, the... indicator lights on the instrument panel cluster will stay off . They will remain on. When the Twilight Sentinel® is on and you switch to low-beam headlamps. Cornering Lamps The cornering lamps come on to indicate that the fog and the parking lamps are on. 3-19 As with the multifunction lever...

Owner's Manual
Page 309
... dealer for service. This is true even though your horizontal aim indicators may not fall exactly on the "0" (zero) marks on their high beams at the factory and should need to be necessary if it is possible for you to re-aim your headlamps as described in an accident...If you (for horizontal aim), or if oncoming drivers flash their scales. 5-49 Failure to follow these instructions could cause damage to the low beam may be affected. Headlamp Aiming If your vehicle is damaged in the following procedure. Notice: To make sure your headlamps are aimed properly, read all...
... dealer for service. This is true even though your horizontal aim indicators may not fall exactly on the "0" (zero) marks on their high beams at the factory and should need to be necessary if it is possible for you to re-aim your headlamps as described in an accident...If you (for horizontal aim), or if oncoming drivers flash their scales. 5-49 Failure to follow these instructions could cause damage to the low beam may be affected. Headlamp Aiming If your vehicle is damaged in the following procedure. Notice: To make sure your headlamps are aimed properly, read all...

Owner's Manual
Page 310
.... If you believe your headlamps need horizontal (left/right) adjustment, follow only the vertical aiming procedure. The high beam lamps will be correctly aimed if the low beam lamps are under the hood near the headlamps. • The vehicle must have any snow, ice or mud attached to it. • The vehicle should...
.... If you believe your headlamps need horizontal (left/right) adjustment, follow only the vertical aiming procedure. The high beam lamps will be correctly aimed if the low beam lamps are under the hood near the headlamps. • The vehicle must have any snow, ice or mud attached to it. • The vehicle should...

Owner's Manual
Page 311
Find the aim dot on each low beam lamp. Measure the distance from the ground to the vertical aim. Once the horizontal aim is lined up with zero. Record this distance. 5-51 Headlamp Horizontal Aiming Turn the horizontal aiming screw (A) until the indicator (B) is adjusted, then adjust the vertical aim. 2. Adjusting the vertical aim first will result in an incorrect headlamp aim. 1. Headlamp Vertical Aiming Notice: Horizontal aiming must be performed before making any adjustments to the aim dot on the lens of the low beam lamps.
Find the aim dot on each low beam lamp. Measure the distance from the ground to the vertical aim. Once the horizontal aim is lined up with zero. Record this distance. 5-51 Headlamp Horizontal Aiming Turn the horizontal aiming screw (A) until the indicator (B) is adjusted, then adjust the vertical aim. 2. Adjusting the vertical aim first will result in an incorrect headlamp aim. 1. Headlamp Vertical Aiming Notice: Horizontal aiming must be performed before making any adjustments to the aim dot on the lens of the low beam lamps.

Owner's Manual
Page 312
At the wall or other flat surface. Turn on the flat surface, measure from the ground upward the recorded distance from the headlamp being aimed. 3. Covering a headlamp may cause excessive heat build-up which may cause damage to improve beam cut-off when aiming. Notice: Do not cover a headlamp to the headlamp. 5-52 This should allow only the beam of light from Step 2 and draw or tape a horizontal line the width of the headlamp not being aimed to be seen on the low-beam headlamps and place a piece of cardboard or equivalent in front of the vehicle. 4.
At the wall or other flat surface. Turn on the flat surface, measure from the ground upward the recorded distance from the headlamp being aimed. 3. Covering a headlamp may cause excessive heat build-up which may cause damage to improve beam cut-off when aiming. Notice: Do not cover a headlamp to the headlamp. 5-52 This should allow only the beam of light from Step 2 and draw or tape a horizontal line the width of the headlamp not being aimed to be seen on the low-beam headlamps and place a piece of cardboard or equivalent in front of the vehicle. 4.

Owner's Manual
Page 313
...them. For any of the cut-off should be seriously injured. Turn the vertical aiming screw (C) until the headlamp beam is normal. Your vehicle may notice that the beam is a slightly different shade than it was originally. After your vehicle's HID headlamp bulb has been replaced, you ...system components, you may have HID headlamps. 5. Repeat Steps 4 and 5 for the opposite headlamp. High Intensity Discharge (HID) Lighting {CAUTION: The low beam high intensity discharge lighting system operates at the bottom edge of replacement bulb, see Replacement Bulbs on page 5-59.
...them. For any of the cut-off should be seriously injured. Turn the vertical aiming screw (C) until the headlamp beam is normal. Your vehicle may notice that the beam is a slightly different shade than it was originally. After your vehicle's HID headlamp bulb has been replaced, you ...system components, you may have HID headlamps. 5. Repeat Steps 4 and 5 for the opposite headlamp. High Intensity Discharge (HID) Lighting {CAUTION: The low beam high intensity discharge lighting system operates at the bottom edge of replacement bulb, see Replacement Bulbs on page 5-59.

Owner's Manual
Page 315
5. Then, turn the bulb socket counterclockwise to unlock the socket from the lamp housing. 5-55 To replace the low-beam bulb, first remove the rubber housing cover on the rear of the lamp. 6.
5. Then, turn the bulb socket counterclockwise to unlock the socket from the lamp housing. 5-55 To replace the low-beam bulb, first remove the rubber housing cover on the rear of the lamp. 6.

Owner's Manual
Page 319
Once you have replaced the burned-out bulb, reverse the steps to remove it. Press the bulb socket tab and turn the socket counterclockwise to reassemble the lamp assembly. 5-59 Exterior Lamp Front Turn Signal Headlamps, Composite High Beam Low Beam Rear Turn Signal Stop/Taillamp Bulb Number 2357NA 9005HB3 9006HB4 3057 3057 7. To remove the bulb, grasp the socket firmly and pull the bulb out. Replacement Bulbs For any bulb not listed here contact your dealer.
Once you have replaced the burned-out bulb, reverse the steps to remove it. Press the bulb socket tab and turn the socket counterclockwise to reassemble the lamp assembly. 5-59 Exterior Lamp Front Turn Signal Headlamps, Composite High Beam Low Beam Rear Turn Signal Stop/Taillamp Bulb Number 2357NA 9005HB3 9006HB4 3057 3057 7. To remove the bulb, grasp the socket firmly and pull the bulb out. Replacement Bulbs For any bulb not listed here contact your dealer.

Owner's Manual
Page 358
Fuses 1 2 3 4 5 6 7 8 9 10 11 5-98 Usage ALDL Accessory Windshield Wipers Not Used Headlamp Low Beam Left Headlamp Low Beam Right Instrument Panel Powertrain Control Module Battery Headlamp High Beam Right Headlamp High Beam Left Ignition 1 Fuses 12 13 14 15 16 17 18 19 20 21 22 23 24 25 26 Relays 27 28 29 30 31 32... Not Used Powertrain Control Module Ignition Oxygen Sensor Injector Bank #1 Auxiliary Power, (Cltr2) Cigar Lighter Daytime Running Lamps Horn Air Conditioner Clutch Usage Headlamp High Beam Headlamp Low Beam Fog Lamps Daytime Running Lamps Horn Air Conditioner Clutch
Fuses 1 2 3 4 5 6 7 8 9 10 11 5-98 Usage ALDL Accessory Windshield Wipers Not Used Headlamp Low Beam Left Headlamp Low Beam Right Instrument Panel Powertrain Control Module Battery Headlamp High Beam Right Headlamp High Beam Left Ignition 1 Fuses 12 13 14 15 16 17 18 19 20 21 22 23 24 25 26 Relays 27 28 29 30 31 32... Not Used Powertrain Control Module Ignition Oxygen Sensor Injector Bank #1 Auxiliary Power, (Cltr2) Cigar Lighter Daytime Running Lamps Horn Air Conditioner Clutch Usage Headlamp High Beam Headlamp Low Beam Fog Lamps Daytime Running Lamps Horn Air Conditioner Clutch

Owner's Manual
Page 401
... ...3-4 Instrument Panel Brightness ...3-22 Interior Lamps ...3-22 Interior Lamps Control ...3-22 7 H Hazard Warning Flashers ...3-6 Headlamp Aiming ...5-49 Horizontal Aiming ...5-51 Vertical Aiming ...5-51 Headlamp High/Low-Beam Changer ...3-10 Headlamp Wiring ...5-96 Headlamps ...5-54 Bulb Replacement ...5-53 Front Turn Signal Lamps ...5-57 Halogen Bulbs ...5-54 High Intensity Discharge (HID) Lighting ...5-53 Heated...
... ...3-4 Instrument Panel Brightness ...3-22 Interior Lamps ...3-22 Interior Lamps Control ...3-22 7 H Hazard Warning Flashers ...3-6 Headlamp Aiming ...5-49 Horizontal Aiming ...5-51 Vertical Aiming ...5-51 Headlamp High/Low-Beam Changer ...3-10 Headlamp Wiring ...5-96 Headlamps ...5-54 Bulb Replacement ...5-53 Front Turn Signal Lamps ...5-57 Halogen Bulbs ...5-54 High Intensity Discharge (HID) Lighting ...5-53 Heated...

