Owner's Manual
Page 111
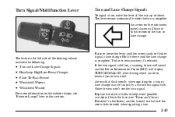
... direction of the steering column includes the following: Raise or lower the lever until the lane change may be caused by a burned out signal bulb. Replace burned-out bulbs to work when signaling a turn. The lever returns automatically when the turn , move the lever all the way up or down. Check the... is complete. Turn Signal/Multifunction Lever Turn and Lane-Change Signals To signal a turn is complete. Arrows that flash rapidly when signaling for burned-out bulbs if the arrow fails to help avoid possible accidents.
... direction of the steering column includes the following: Raise or lower the lever until the lane change may be caused by a burned out signal bulb. Replace burned-out bulbs to work when signaling a turn. The lever returns automatically when the turn , move the lever all the way up or down. Check the... is complete. Turn Signal/Multifunction Lever Turn and Lane-Change Signals To signal a turn is complete. Arrows that flash rapidly when signaling for burned-out bulbs if the arrow fails to help avoid possible accidents.
Owner's Manual
Page 277
The arrows on the trailer are burned out. NOTICE: Making very sharp turns while trailering could be sure the trailer bulbs are still working. Your vehicle could cause the trailer to come in advance. 4-39 Check with the vehicle. Avoid jerky or sudden maneuvers. ...When towing a trailer, the arrows on your instrument panel will flash for turns even if the bulbs on your instrument panel will also flash, telling other objects. Avoid making very sharp turns while trailering. When you're turning with a trailer, ...
The arrows on the trailer are burned out. NOTICE: Making very sharp turns while trailering could be sure the trailer bulbs are still working. Your vehicle could cause the trailer to come in advance. 4-39 Check with the vehicle. Avoid jerky or sudden maneuvers. ...When towing a trailer, the arrows on your instrument panel will flash for turns even if the bulbs on your instrument panel will also flash, telling other objects. Avoid making very sharp turns while trailering. When you're turning with a trailer, ...

Owner's Manual
Page 311
... Vehicle Care/Appearance Materials Vehicle Identification Number (VIN) Service Parts Identification Label Electrical System Removing the Rear Seat Cushion Replacement Bulbs Capacities and Specifications Normal Maintenance Replacement Parts 6-1 Section 6 Service and Appearance Care Here you will find information about your ...Engine Oil Engine Air Cleaner/Filter Automatic Transaxle Fluid Engine Coolant Surge Tank Pressure Cap Power Steering Fluid Windshield Washer Fluid Brakes Battery Bulb Replacement Windshield Wiper Blade Replacement 66-48 6-59 6-59 6-64 6-65 6-66 6-66 6-67 6-68 6-68 6-69 6-...
... Vehicle Care/Appearance Materials Vehicle Identification Number (VIN) Service Parts Identification Label Electrical System Removing the Rear Seat Cushion Replacement Bulbs Capacities and Specifications Normal Maintenance Replacement Parts 6-1 Section 6 Service and Appearance Care Here you will find information about your ...Engine Oil Engine Air Cleaner/Filter Automatic Transaxle Fluid Engine Coolant Surge Tank Pressure Cap Power Steering Fluid Windshield Washer Fluid Brakes Battery Bulb Replacement Windshield Wiper Blade Replacement 66-48 6-59 6-59 6-64 6-65 6-66 6-66 6-67 6-68 6-68 6-69 6-...

Owner's Manual
Page 346
...read and follow the instructions on the outer circle to remove the pin. 6-36 Bulb Replacement For the proper type of replacement bulb, see "Replacement Bulbs" in place. Headlamps 1. Do this section, contact your dealer. For any bulb changing procedure not listed in this by pressing in the center of the push-...pins that hold the filler panel cover in the Index. Halogen Bulbs CAUTION: Halogen bulbs have pressurized gas inside and can burst if you drop or scratch the bulb. You or others could be injured. To access the headlamps, remove all of each pin and...
...read and follow the instructions on the outer circle to remove the pin. 6-36 Bulb Replacement For the proper type of replacement bulb, see "Replacement Bulbs" in place. Headlamps 1. Do this section, contact your dealer. For any bulb changing procedure not listed in this by pressing in the center of the push-...pins that hold the filler panel cover in the Index. Halogen Bulbs CAUTION: Halogen bulbs have pressurized gas inside and can burst if you drop or scratch the bulb. You or others could be injured. To access the headlamps, remove all of each pin and...

Owner's Manual
Page 348
Turn the headlamp housing socket counterclockwise to unlock the socket from the vehicle. 8. Remove the bulb socket dust cover. 6. 7. Firmly grasp the outboard side of the headlamp assembly with both hands and pull hard enough so that the whole assembly separates from the lamp housing. 6-38
Turn the headlamp housing socket counterclockwise to unlock the socket from the vehicle. 8. Remove the bulb socket dust cover. 6. 7. Firmly grasp the outboard side of the headlamp assembly with both hands and pull hard enough so that the whole assembly separates from the lamp housing. 6-38

Owner's Manual
Page 349
... while pushing up on the outer circle until it is seated against the surface of each down so far that the bulb is level with the outer circle. Install the new bulb into the headlamp assembly. 12. After placing each by holding each push-pin into the opening, press down on the... that the push-pin releases again. 10. Place the filler panel in firmly. 11. Reinstall the headlamp housing socket into the socket. Pull the old bulb out of the push-pin should now be above the outer circle. 3.
... while pushing up on the outer circle until it is seated against the surface of each down so far that the bulb is level with the outer circle. Install the new bulb into the headlamp assembly. 12. After placing each by holding each push-pin into the opening, press down on the... that the push-pin releases again. 10. Place the filler panel in firmly. 11. Reinstall the headlamp housing socket into the socket. Pull the old bulb out of the push-pin should now be above the outer circle. 3.

Owner's Manual
Page 355
Disconnect the cornering lamp bulb by pushing the new bulb directly into the headlamp assembly. 5. Do not twist or turn the bulb. 3. Follow Steps 1 through 6 in "Headlamps" described previously. 2. Replace cornering lamp bulb by pulling the bulb out of the socket. Reinstall the cornering lamp housing socket into the socket. 4. Reverse Steps 1 through 6 in "Headlamps" described previously. 6-45 6. Front Cornering Lamps 1. Repeat Steps 4 and 5 for the opposite headlamp.
Disconnect the cornering lamp bulb by pushing the new bulb directly into the headlamp assembly. 5. Do not twist or turn the bulb. 3. Follow Steps 1 through 6 in "Headlamps" described previously. 2. Replace cornering lamp bulb by pulling the bulb out of the socket. Reinstall the cornering lamp housing socket into the socket. 4. Reverse Steps 1 through 6 in "Headlamps" described previously. 6-45 6. Front Cornering Lamps 1. Repeat Steps 4 and 5 for the opposite headlamp.

Owner's Manual
Page 356
The turn signal lamp housing socket and replace the bulb. 4. Reverse Steps 1 and 2 to unlock the socket from the lamp housing. 6-46 Remove the turn signal lamps are located beside the headlamp bulbs. Front Turn Signal Lamps 1. Press the tab down and turn the housing socket clockwise to reinstall. 2. See Steps 1 through 6 under "Headlamps" described previously. 3. To access, lift off the bulb socket dust cover.
The turn signal lamp housing socket and replace the bulb. 4. Reverse Steps 1 and 2 to unlock the socket from the lamp housing. 6-46 Remove the turn signal lamps are located beside the headlamp bulbs. Front Turn Signal Lamps 1. Press the tab down and turn the housing socket clockwise to reinstall. 2. See Steps 1 through 6 under "Headlamps" described previously. 3. To access, lift off the bulb socket dust cover.
Owner's Manual
Page 387
... Seats Power Windows Usage Cigar Lighter Rear Defog Usage Park Brake Rear Defog HVAC Blower Audio Amplifier ELC Compressor/Exhaust Cigar Lighter Not Used Replacement Bulbs For any bulb not listed here contact your dealer.
... Seats Power Windows Usage Cigar Lighter Rear Defog Usage Park Brake Rear Defog HVAC Blower Audio Amplifier ELC Compressor/Exhaust Cigar Lighter Not Used Replacement Bulbs For any bulb not listed here contact your dealer.


