

Owner's Manual
Page 12
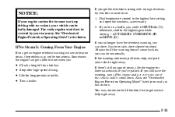
See Section 6 for octane ratings. Oil Viscosity Engine Oil See Section 6 Service Station Guide Cooling System For a More Detailed Look at What's Under the Hood See Section 6 See Section 5 Battery Tire Pressure See Section 6 See Section 6 Spare Tire Pressure See Section 5 Hood Release See Section 6 Alternate Fuel Door Release See Section 6 Windshield Washer Fluid See Section 6 Engine Oil Dipstick See Section 6 Remote Fuel Door Release See Section 6 Fuel Use unleaded only.
See Section 6 for octane ratings. Oil Viscosity Engine Oil See Section 6 Service Station Guide Cooling System For a More Detailed Look at What's Under the Hood See Section 6 See Section 5 Battery Tire Pressure See Section 6 See Section 6 Spare Tire Pressure See Section 5 Hood Release See Section 6 Alternate Fuel Door Release See Section 6 Windshield Washer Fluid See Section 6 Engine Oil Dipstick See Section 6 Remote Fuel Door Release See Section 6 Fuel Use unleaded only.
Owner's Manual
Page 93
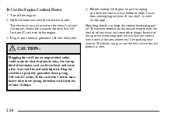
... AC outlet. Also, the wrong kind of trying to list everything here, we ask that particular area. To Use the Engine Coolant Heater 1. Open the hood and unwrap the electrical cord.
... AC outlet. Also, the wrong kind of trying to list everything here, we ask that particular area. To Use the Engine Coolant Heater 1. Open the hood and unwrap the electrical cord.
Owner's Manual
Page 138
Heated Seat Controls S. Console Shift Lever U. Air Vent Control Thumbwheel J. Hood Release N. Convenience Storage/Optional Ashtray V. Driver Information Center Buttons C. Instrument Panel Cluster F. Audio System L. Trunk Release P. Cruise Control Q. Air Outlets B. Ignition Switch I. Fuel Door Release O. ...
Heated Seat Controls S. Console Shift Lever U. Air Vent Control Thumbwheel J. Hood Release N. Convenience Storage/Optional Ashtray V. Driver Information Center Buttons C. Instrument Panel Cluster F. Audio System L. Trunk Release P. Cruise Control Q. Air Outlets B. Ignition Switch I. Fuel Door Release O. ...

Owner's Manual
Page 188
... to be replaced as part of ice, snow or any other obstruction (such as leaves). The filter is part of objects. Ventilation Tips D Keep the hood and front air inlet free of routine scheduled maintenance. of a three-piece filter system. See your vehicle. This helps circulate air throughout your dealer for...
... to be replaced as part of ice, snow or any other obstruction (such as leaves). The filter is part of objects. Ventilation Tips D Keep the hood and front air inlet free of routine scheduled maintenance. of a three-piece filter system. See your vehicle. This helps circulate air throughout your dealer for...
Owner's Manual
Page 257
...engine compartment of your battery for this purpose. 5-4 Turn off the ignition on the passenger's side of the engine compartment, is located under the hood of the vehicles rolling, set the parking brake firmly on both vehicles involved in NEUTRAL before setting the parking brake. 3. You wouldn't be ...the vehicles aren't touching each other. If they are, it could damage the electrical systems. To avoid the possibility of your radio! Open the hoods and locate the battery on the other vehicle. 2. You do not need to start procedure. In addition, it could be able to access ...
...engine compartment of your battery for this purpose. 5-4 Turn off the ignition on the passenger's side of the engine compartment, is located under the hood of the vehicles rolling, set the parking brake firmly on both vehicles involved in NEUTRAL before setting the parking brake. 3. You wouldn't be ...the vehicles aren't touching each other. If they are, it could damage the electrical systems. To avoid the possibility of your radio! Open the hoods and locate the battery on the other vehicle. 2. You do not need to start procedure. In addition, it could be able to access ...
Owner's Manual
Page 263
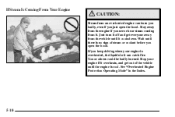
... you keep driving when your engine if it can burn you badly, even if you open the hood. Just turn it off and get out of steam or coolant before you just open the hood. You or others could be badly burned. If Steam Is Coming From Your Engine CAUTION: Steam from...
... you keep driving when your engine if it can burn you badly, even if you open the hood. Just turn it off and get out of steam or coolant before you just open the hood. You or others could be badly burned. If Steam Is Coming From Your Engine CAUTION: Steam from...
Owner's Manual
Page 264
... because you keep driving with no sign of steam, try this section. See "Overheated Engine Protection Operating Mode" in a traffic jam, shift to lift the hood but see "Overheated Engine Protection Operating Mode" listed previously in this for long periods in traffic.
... because you keep driving with no sign of steam, try this section. See "Overheated Engine Protection Operating Mode" in a traffic jam, shift to lift the hood but see "Overheated Engine Protection Operating Mode" listed previously in this for long periods in traffic.
Owner's Manual
Page 265
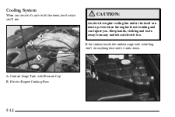
A. Coolant Surge Tank with Pressure Cap B. Electric Engine Cooling Fans 5-12 Keep hands, clothing and tools away from any underhood electric fan. Cooling System When you decide it cools down. If the coolant inside the coolant surge tank is not running and can injure you 'll see: CAUTION: An electric engine cooling fan under the hood can start up even when the engine is boiling, don't do anything else until it 's safe to lift the hood, here's what you .
A. Coolant Surge Tank with Pressure Cap B. Electric Engine Cooling Fans 5-12 Keep hands, clothing and tools away from any underhood electric fan. Cooling System When you decide it cools down. If the coolant inside the coolant surge tank is not running and can injure you 'll see: CAUTION: An electric engine cooling fan under the hood can start up even when the engine is boiling, don't do anything else until it 's safe to lift the hood, here's what you .
Owner's Manual
Page 283
... its appearance care. 6-2 6-3 6-6 6-9 6-9 6-12 6-17 6-20 6-24 6-28 6-30 6-34 6-36 6-46 Service Fuel Filling Your Tank Filling a Portable Fuel Container Checking Things Under the Hood Engine Oil Engine Air Cleaner/Filter Automatic Transaxle Fluid Engine Coolant Windshield Washer Fluid Brakes Battery Bulb Replacement Windshield Wiper Blade Replacement 6-47 6-57 6-57...
... its appearance care. 6-2 6-3 6-6 6-9 6-9 6-12 6-17 6-20 6-24 6-28 6-30 6-34 6-36 6-46 Service Fuel Filling Your Tank Filling a Portable Fuel Container Checking Things Under the Hood Engine Oil Engine Air Cleaner/Filter Automatic Transaxle Fluid Engine Coolant Windshield Washer Fluid Brakes Battery Bulb Replacement Windshield Wiper Blade Replacement 6-47 6-57 6-57...
Owner's Manual
Page 291
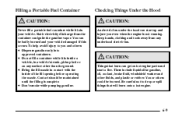
... while it is not running. Static electricity discharge from any surface other fluids, and plastic or rubber. You can start a fire. Checking Things Under the Hood CAUTION: An electric fan under the...
... while it is not running. Static electricity discharge from any surface other fluids, and plastic or rubber. You can start a fire. Checking Things Under the Hood CAUTION: An electric fan under the...

Owner's Manual
Page 292
Then go to the left side of the vehicle and find the secondary hood release which is located on the lower left as you raise the hood. 6-10 Move the release lever to the front of the instrument panel. Hood Release Pull the lever inside the vehicle to open the hood. It is located below the front grille.
Then go to the left side of the vehicle and find the secondary hood release which is located on the lower left as you raise the hood. 6-10 Move the release lever to the front of the instrument panel. Hood Release Pull the lever inside the vehicle to open the hood. It is located below the front grille.

Owner's Manual
Page 293
Engine Air Cleaner/Filter C. Then pull the hood down and close it firmly. 6-11 Power Steering Fluid G. Engine Oil Dipstick Location Before closing the hood, be sure all filler caps are on properly. Windshield Washer Fluid F. Surge Tank/Coolant Fill Location D. Engine Compartment Overview When you open the hood, you'll see: E. Brake Master Cylinder A. Engine Oil Fill Location H. Transaxle Dipstick/Fill Location B.
Engine Air Cleaner/Filter C. Then pull the hood down and close it firmly. 6-11 Power Steering Fluid G. Engine Oil Dipstick Location Before closing the hood, be sure all filler caps are on properly. Windshield Washer Fluid F. Surge Tank/Coolant Fill Location D. Engine Compartment Overview When you open the hood, you'll see: E. Brake Master Cylinder A. Engine Oil Fill Location H. Transaxle Dipstick/Fill Location B.

Owner's Manual
Page 294
... order to check your engine oil level regularly; The engine oil dipstick is an added reminder. The yellow handle says ENGINE OIL on when the hood is opened. Pull out the dipstick and clean it with a paper towel or cloth, then push it again, keeping the tip down, and check the...
... order to check your engine oil level regularly; The engine oil dipstick is an added reminder. The yellow handle says ENGINE OIL on when the hood is opened. Pull out the dipstick and clean it with a paper towel or cloth, then push it again, keeping the tip down, and check the...
Owner's Manual
Page 319
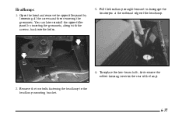
Headlamps 1. To replace the low-beam bulb, first remove the rubber housing cover on the rear of the headlamp. 4. Pull the headlamp straight forward to the headlamp mounting bracket. 6-37 Open the hood and remove the upper filler panel by inserting the grommets, along with the screws, back into the holes. 3. Remove the two bolts fastening the headlamp to disengage the locator pin at the outboard edge of the lamp. 2. You can later reinstall the upper filler panel by loosening all the screws and then removing the grommets.
Headlamps 1. To replace the low-beam bulb, first remove the rubber housing cover on the rear of the headlamp. 4. Pull the headlamp straight forward to the headlamp mounting bracket. 6-37 Open the hood and remove the upper filler panel by inserting the grommets, along with the screws, back into the holes. 3. Remove the two bolts fastening the headlamp to disengage the locator pin at the outboard edge of the lamp. 2. You can later reinstall the upper filler panel by loosening all the screws and then removing the grommets.
Owner's Manual
Page 323
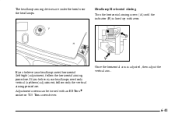
Once the horizontal aim is lined up /down) adjustment, follow the horizontal aiming procedure. If you believe your headlamps need only vertical (up with an E8 TorxR socket or T15 Torx screwdriver. Adjustment screws can be turned with zero. The headlamp aiming devices are under the hood near the headlamps. Headlamp Horizontal Aiming Turn the horizontal aiming screw (A) until the indicator (B) is adjusted, then adjust the vertical aim. 6-41 If you believe your headlamps need horizontal (left/right) adjustment, follow only the vertical aiming procedure.
Once the horizontal aim is lined up /down) adjustment, follow the horizontal aiming procedure. If you believe your headlamps need only vertical (up with an E8 TorxR socket or T15 Torx screwdriver. Adjustment screws can be turned with zero. The headlamp aiming devices are under the hood near the headlamps. Headlamp Horizontal Aiming Turn the horizontal aiming screw (A) until the indicator (B) is adjusted, then adjust the vertical aim. 6-41 If you believe your headlamps need horizontal (left/right) adjustment, follow only the vertical aiming procedure.

Owner's Manual
Page 358
... to fill to the approximate level, as recommended in this manual. Recheck fluid level after filling. gallons (70.1L) Refrigerant ...See charge label under the hood All capacities are approximate.
... to fill to the approximate level, as recommended in this manual. Recheck fluid level after filling. gallons (70.1L) Refrigerant ...See charge label under the hood All capacities are approximate.