
Owner's Manual
Page 5
Table of Contents (cont'd) Comfort Controls and Audio Systems Section 3 Heating and Air Conditioning Setting the Radio Clock Radio/Cassette Player/CD Player Radio Theft-Deterrent Feature Steering Wheel Controls Your Driving and the Road Section 4 Defensive Driving Drunken Driving Control of a Vehicle Braking Steering Driving Tips for Various Road Conditions Loading Your Vehicle Towing a Trailer Problems on the Road Section 5 Hazard Warning Flashers Jump Starting Towing Your Vehicle Engine Overheating Changing a Flat Tire If You're Stuck iii
Table of Contents (cont'd) Comfort Controls and Audio Systems Section 3 Heating and Air Conditioning Setting the Radio Clock Radio/Cassette Player/CD Player Radio Theft-Deterrent Feature Steering Wheel Controls Your Driving and the Road Section 4 Defensive Driving Drunken Driving Control of a Vehicle Braking Steering Driving Tips for Various Road Conditions Loading Your Vehicle Towing a Trailer Problems on the Road Section 5 Hazard Warning Flashers Jump Starting Towing Your Vehicle Engine Overheating Changing a Flat Tire If You're Stuck iii

Owner's Manual
Page 137
OnStarR System (If Equipped) OnStar is a vehicle communications system that offers a variety of a call to disconnect and return the audio system to its previous settings. For more information, call if one of the buttons is accidentally pressed or if the automatic redial function is no...your vehicle and assess the situation. This button will be able to receive OnStar service. OnStar Services Button: Press this button to answer a call , the audio system will mute, and the ring will also cancel a call 1-888-ONSTAR-7 (1-888-667-8277). Upon receiving the call, an advisor at the end of...
OnStarR System (If Equipped) OnStar is a vehicle communications system that offers a variety of a call to disconnect and return the audio system to its previous settings. For more information, call if one of the buttons is accidentally pressed or if the automatic redial function is no...your vehicle and assess the situation. This button will be able to receive OnStar service. OnStar Services Button: Press this button to answer a call , the audio system will mute, and the ring will also cancel a call 1-888-ONSTAR-7 (1-888-667-8277). Upon receiving the call, an advisor at the end of...
Owner's Manual
Page 147
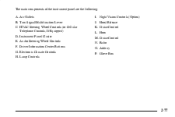
Turn Signal/Multifunction Lever C. Driver Information Center Buttons G. Lamp Controls I. Hood Release K. Horn M. HVAC Steering Wheel Controls (or Cellular Telephone Controls, If Equipped) D. Audio Steering Wheel Controls F. Radio O. The main components of the instrument panel are the following: A. Night Vision Controls (Option) J. Ashtray P. Air Outlets B. Instrument Panel Cluster E. Glove Box 2-77 Electronic Climate Controls H. Cruise Control L. Cruise Control N.
Turn Signal/Multifunction Lever C. Driver Information Center Buttons G. Lamp Controls I. Hood Release K. Horn M. HVAC Steering Wheel Controls (or Cellular Telephone Controls, If Equipped) D. Audio Steering Wheel Controls F. Radio O. The main components of the instrument panel are the following: A. Night Vision Controls (Option) J. Ashtray P. Air Outlets B. Instrument Panel Cluster E. Glove Box 2-77 Electronic Climate Controls H. Cruise Control L. Cruise Control N.
Owner's Manual
Page 190
...Diversity Antenna System 3-39 3-40 3-40 3-41 3-44 3-44 3-45 3-46 3-46 3-47 3-49 3-49 3-49 3-1 Be sure to operate the comfort control and audio systems offered with your vehicle. 3-2 3-2 3-6 3-6 3-6 3-7 3-7 3-8 3-9 3-10 3-10 3-11 3-11 3-11 3-15 3-19 Comfort Controls Climate Control Panel Electronic Solar... Defrosting Rear Window Defogger Rear Climate Control Ventilation System HVAC Steering Wheel Controls (If Equipped) Climate Control Personalization (If Equipped) Audio Systems Setting the Clock AM-FM Stereo with Cassette Tape Player AM-FM Stereo with Cassette Tape and Compact Disc Player AM-...
...Diversity Antenna System 3-39 3-40 3-40 3-41 3-44 3-44 3-45 3-46 3-46 3-47 3-49 3-49 3-49 3-1 Be sure to operate the comfort control and audio systems offered with your vehicle. 3-2 3-2 3-6 3-6 3-6 3-7 3-7 3-8 3-9 3-10 3-10 3-11 3-11 3-11 3-15 3-19 Comfort Controls Climate Control Panel Electronic Solar... Defrosting Rear Window Defogger Rear Climate Control Ventilation System HVAC Steering Wheel Controls (If Equipped) Climate Control Personalization (If Equipped) Audio Systems Setting the Clock AM-FM Stereo with Cassette Tape Player AM-FM Stereo with Cassette Tape and Compact Disc Player AM-...

Owner's Manual
Page 199
...enter the vehicle. The settings can be changed by which remote keyless entry transmitter ("1" or "2") was operated. Other touch controls operate some audio controls. The settings recalled by the climate control system are determined by briefly pressing the memory seat buttons 1 or 2 located on the driver...'s door. See "Audio Steering Wheel Controls" in the ignition (the ignition must be turned to OFF), the climate control settings will recall the latest climate ...
...enter the vehicle. The settings can be changed by which remote keyless entry transmitter ("1" or "2") was operated. Other touch controls operate some audio controls. The settings recalled by the climate control system are determined by briefly pressing the memory seat buttons 1 or 2 located on the driver...'s door. See "Audio Steering Wheel Controls" in the ignition (the ignition must be turned to OFF), the climate control settings will recall the latest climate ...

Owner's Manual
Page 200
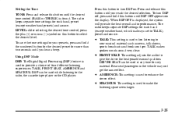
Find out what your audio system can do and how to operate all its controls, to the correct time. There is displayed. Release the button as you get the most ... sure you acquaint yourself with Cassette Tape Player Setting the Clock Press and hold HR or MN until the time display begins to decrease volume. Audio Systems Your audio system has been designed to turn the system on.
Find out what your audio system can do and how to operate all its controls, to the correct time. There is displayed. Release the button as you get the most ... sure you acquaint yourself with Cassette Tape Player Setting the Clock Press and hold HR or MN until the time display begins to decrease volume. Audio Systems Your audio system has been designed to turn the system on.

Owner's Manual
Page 201
...on the sound. Press it has two positions. If a preset station has weak reception, the radio will not stop for each of the audio sources are shown on your radio presets because the radio remembers them. SCAN: Press this button to the next station. PUSHBUTTONS: The six... numbered pushbuttons let you will go on to silence the system. The audio source must be underlined on . 2. Available loaded sources are loaded, NO SOURCE LOADED will return. 5. Finding a Station BAND: Press this button ...
...on the sound. Press it has two positions. If a preset station has weak reception, the radio will not stop for each of the audio sources are shown on your radio presets because the radio remembers them. SCAN: Press this button to the next station. PUSHBUTTONS: The six... numbered pushbuttons let you will go on to silence the system. The audio source must be underlined on . 2. Available loaded sources are loaded, NO SOURCE LOADED will return. 5. Finding a Station BAND: Press this button ...

Owner's Manual
Page 204
.... The radio will be loaded to select a source. Playing the Radio PWR/VOL: Press this button to play. If none of the audio sources are shown on the display. The audio source must be underlined on the display. AM-FM Stereo with the ignition off . Press it has two positions. Finding a Station...
.... The radio will be loaded to select a source. Playing the Radio PWR/VOL: Press this button to play. If none of the audio sources are shown on the display. The audio source must be underlined on the display. AM-FM Stereo with the ignition off . Press it has two positions. Finding a Station...

Owner's Manual
Page 209
... go on the display. HR or MN: Display the time with the ignition off to the next station. Sources include cassette and compact disc. The audio source must be loaded to the next preset station. Press BAND to stop scanning. If a source is pressed it will appear on to use this.... PRESET SCAN: Press and hold one of the six numbered buttons for a few seconds, the radio will return. 5. Press this button for each of the audio sources are shown on . 2. Whenever you return to stop scanning.
... go on the display. HR or MN: Display the time with the ignition off to the next station. Sources include cassette and compact disc. The audio source must be loaded to the next preset station. Press BAND to stop scanning. If a source is pressed it will appear on to use this.... PRESET SCAN: Press and hold one of the six numbered buttons for a few seconds, the radio will return. 5. Press this button for each of the audio sources are shown on . 2. Whenever you return to stop scanning.

Owner's Manual
Page 210
... button to use the alternate RDS functions (RDS, TA, MSG, PTY and PTY ) located on FM stations which broadcast RDS information. Using RDS Mode Your audio system is equipped with traffic announcements, D receive announcements concerning local and national emergencies, D receive and display messages from radio stations and D search for a stronger station...
... button to use the alternate RDS functions (RDS, TA, MSG, PTY and PTY ) located on FM stations which broadcast RDS information. Using RDS Mode Your audio system is equipped with traffic announcements, D receive announcements concerning local and national emergencies, D receive and display messages from radio stations and D search for a stronger station...
Owner's Manual
Page 214
...DSP settings for more than two seconds until the desired tone control (BASS or TREBLE) is displayed, the system will provide the best overall audio performance. D AMBIENCE: This setting is used to enhance the D SPACIOUS: This setting is used to turn DSP off, press and hold the... the Tone TONE: Press and release this button to give the driver the best possible sound qualities. D FRONT SEAT: This setting adjusts the audio to select the desired level. The radio keeps separate tone settings for any material. LEVEL: After selecting the desired tone control, press the plus...
...DSP settings for more than two seconds until the desired tone control (BASS or TREBLE) is displayed, the system will provide the best overall audio performance. D AMBIENCE: This setting is used to enhance the D SPACIOUS: This setting is used to turn DSP off, press and hold the... the Tone TONE: Press and release this button to give the driver the best possible sound qualities. D FRONT SEAT: This setting adjusts the audio to select the desired level. The radio keeps separate tone settings for any material. LEVEL: After selecting the desired tone control, press the plus...

Owner's Manual
Page 218
... are shown on the display any time you . Turn it will appear on the display. With AVC, your audio system monitors the noise in the vehicle. Then, AVC automatically adjusts the volume level so that it always sounds the same to you adjust the ... the time with Radio Data Systems (RDS) and Digital Signal Processing (DSP) (If Equipped) AVC: Your system has a feature called Automatic Volume Control (AVC). The audio source must be underlined on the display. Playing the Radio PWR/VOL: Press this button to the radio. AUTO VOLUME CONTROL ON will appear on...
... are shown on the display any time you . Turn it will appear on the display. With AVC, your audio system monitors the noise in the vehicle. Then, AVC automatically adjusts the volume level so that it always sounds the same to you adjust the ... the time with Radio Data Systems (RDS) and Digital Signal Processing (DSP) (If Equipped) AVC: Your system has a feature called Automatic Volume Control (AVC). The audio source must be underlined on the display. Playing the Radio PWR/VOL: Press this button to the radio. AUTO VOLUME CONTROL ON will appear on...

Owner's Manual
Page 220
Using RDS Mode Your audio system is not broadcasting RDS information, the station's frequency will not stop at the preset station. The alternate RDS functions are only available when you ...
Using RDS Mode Your audio system is not broadcasting RDS information, the station's frequency will not stop at the preset station. The alternate RDS functions are only available when you ...

Owner's Manual
Page 224
... or FADE control is used at any time for more than two seconds until you reach the desired selection. D FRONT SEAT: This setting adjusts the audio to TALK), preset and source. D AMBIENCE: This setting is used while listening to turn DSP off, press and hold the numbered button for the desired...
... or FADE control is used at any time for more than two seconds until you reach the desired selection. D FRONT SEAT: This setting adjusts the audio to TALK), preset and source. D AMBIENCE: This setting is used while listening to turn DSP off, press and hold the numbered button for the desired...

Owner's Manual
Page 233
..., press and hold RW for five counts until you hear a beep. With this feature. The radio in the radio, THEFTLOCK will be activated and the audio system will be recalled by briefly pressing the MEMORY seat buttons 1 or 2 located on each radio that is no programming required.
..., press and hold RW for five counts until you hear a beep. With this feature. The radio in the radio, THEFTLOCK will be activated and the audio system will be recalled by briefly pressing the MEMORY seat buttons 1 or 2 located on each radio that is no programming required.

Owner's Manual
Page 234
... go to the next or previous selection. When listening to a cassette tape, the up or down arrow button can be adjusted at the steering wheel. Audio Steering Wheel Controls Some audio controls can be used to SEEK forward and rearward through the tape.
... go to the next or previous selection. When listening to a cassette tape, the up or down arrow button can be adjusted at the steering wheel. Audio Steering Wheel Controls Some audio controls can be used to SEEK forward and rearward through the tape.
Owner's Manual
Page 235
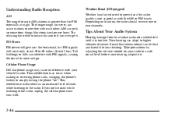
... This interference may cause interference with each other. Depending on ". Take precautions by adjusting the volume control on your radio to speech and the audio quality is too late. Cellular Phone Usage Cellular phone usage may occur when making or receiving phone calls, charging the phone's battery or simply... interference is greater than for most AM stations is described as with FM signals, causing the sound to the radio. Tips About Your Audio System Hearing damage from things like storms and power lines. If you the best sound, but FM signals will reach only about 10 to...
... This interference may cause interference with each other. Depending on ". Take precautions by adjusting the volume control on your radio to speech and the audio quality is too late. Cellular Phone Usage Cellular phone usage may occur when making or receiving phone calls, charging the phone's battery or simply... interference is greater than for most AM stations is described as with FM signals, causing the sound to the radio. Tips About Your Audio System Hearing damage from things like storms and power lines. If you the best sound, but FM signals will reach only about 10 to...
Owner's Manual
Page 342
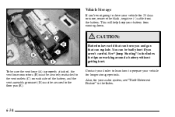
... your battery from the battery. To be sure the vent hose (A) is properly attached, the vent hose connectors (B) must be securely reattached to prepare your audio system, see "Theft-Deterrent Feature" in the Index for tips on each side of the battery, and the vent assembly grommet (D) must be badly hurt...
... your battery from the battery. To be sure the vent hose (A) is properly attached, the vent hose connectors (B) must be securely reattached to prepare your audio system, see "Theft-Deterrent Feature" in the Index for tips on each side of the battery, and the vent assembly grommet (D) must be badly hurt...

Owner's Manual
Page 381
Minifuses 20 21 22 23 24 25 26 27 28 29 30 31 32 33 Usage Park/Reverse Audio Retained Accessory Power for Sunroof Lamps, Parking Left Night Vision Passenger Door Module Body Export Lights, Power Locks Rear HVAC Blower Ignition Switch Hazard Signal ...
Minifuses 20 21 22 23 24 25 26 27 28 29 30 31 32 33 Usage Park/Reverse Audio Retained Accessory Power for Sunroof Lamps, Parking Left Night Vision Passenger Door Module Body Export Lights, Power Locks Rear HVAC Blower Ignition Switch Hazard Signal ...
Owner's Manual
Page 382
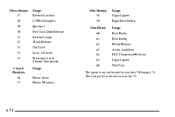
Micro Relays 47 48 49 50 51 52 53 54 55 Circuit Breakers 56 57 Usage Reverse Lockout CVRSS Dampers Ignition 3 Fuel Tank Door Release Interior Lamps Trunk Release Not Used Lock, Cylinder Electronic Level Control Compressor Usage Power Seats Power Windows Mini Relays 58 59 MaxiFuses 60 61 62 63 64 65 66 Usage Cigar Lighter Right Rear Defog Usage Park Brake Rear Defog HVAC Blower Audio Amplifier ELC Compressor/Exhaust Cigar Lighter Not Used The spare fuses are located in number 75. 6-74 The fuse puller is located in numbers 70 through 74.
Micro Relays 47 48 49 50 51 52 53 54 55 Circuit Breakers 56 57 Usage Reverse Lockout CVRSS Dampers Ignition 3 Fuel Tank Door Release Interior Lamps Trunk Release Not Used Lock, Cylinder Electronic Level Control Compressor Usage Power Seats Power Windows Mini Relays 58 59 MaxiFuses 60 61 62 63 64 65 66 Usage Cigar Lighter Right Rear Defog Usage Park Brake Rear Defog HVAC Blower Audio Amplifier ELC Compressor/Exhaust Cigar Lighter Not Used The spare fuses are located in number 75. 6-74 The fuse puller is located in numbers 70 through 74.


