

Owner's Manual
Page 12
Service Station Guide Cooling System For a More Detailed Look at What's Under the Hood See Section 6 See Section 5 Tire Pressure See Section 6 Battery See Section 6 Spare Tire Pressure See Section 5 Hood Release See Section 6 Alternate Fuel Door Release See Section 6 Windshield Washer Fluid See Section 6 Engine Oil Dipstick See Section 6 Remote Fuel Door Release See Section 6 Premium Fuel Recommended Use unleaded gas only, 91 Octane or higher. See Section 6 Oil Viscosity Engine Oil See Section 6
Service Station Guide Cooling System For a More Detailed Look at What's Under the Hood See Section 6 See Section 5 Tire Pressure See Section 6 Battery See Section 6 Spare Tire Pressure See Section 5 Hood Release See Section 6 Alternate Fuel Door Release See Section 6 Windshield Washer Fluid See Section 6 Engine Oil Dipstick See Section 6 Remote Fuel Door Release See Section 6 Premium Fuel Recommended Use unleaded gas only, 91 Octane or higher. See Section 6 Oil Viscosity Engine Oil See Section 6
Owner's Manual
Page 81
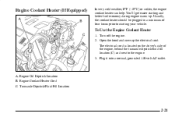
.... Transaxle Dipstick/Fluid Fill Location 2-21 Engine Oil Dipstick Location B. You'll get easier starting your vehicle. To Use the Engine Coolant Heater 1. Open the hood and unwrap the electrical cord. Plug it into a normal, grounded 110-volt AC outlet.
.... Transaxle Dipstick/Fluid Fill Location 2-21 Engine Oil Dipstick Location B. You'll get easier starting your vehicle. To Use the Engine Coolant Heater 1. Open the hood and unwrap the electrical cord. Plug it into a normal, grounded 110-volt AC outlet.

Owner's Manual
Page 125
... Panel Cluster 5. Hazard Warning Button 10. The main components of the instrument panel are: 1. Ignition Switch 8. Horn 17. Electronic Climate Controls 23. Lamp Controls 12. Hood Release 13. Console Shift Lever 21. Air Outlets 2. Driver Information Center Control Buttons 3. Turn Signal/Multifunction Lever 4. Cruise Control Lever 7. Radio 11. Audio Steering Wheel...
... Panel Cluster 5. Hazard Warning Button 10. The main components of the instrument panel are: 1. Ignition Switch 8. Horn 17. Electronic Climate Controls 23. Lamp Controls 12. Hood Release 13. Console Shift Lever 21. Air Outlets 2. Driver Information Center Control Buttons 3. Turn Signal/Multifunction Lever 4. Cruise Control Lever 7. Radio 11. Audio Steering Wheel...

Owner's Manual
Page 163
... occur more quickly in dusty areas, indicate that the filter needs to replace the filter once the old one is removed. 3-9 Ventilation Tips D Keep the hood and front air inlet free of ice, snow or any other obstruction (such as part of routine scheduled maintenance. See the Maintenance Schedule booklet for...
... occur more quickly in dusty areas, indicate that the filter needs to replace the filter once the old one is removed. 3-9 Ventilation Tips D Keep the hood and front air inlet free of ice, snow or any other obstruction (such as part of routine scheduled maintenance. See the Maintenance Schedule booklet for...

Owner's Manual
Page 252
... You wouldn't be able to start your vehicle and the bad grounding could be covered by your radio on, it is located under the hood of the vehicles rolling, set the parking brake firmly on the battery in the jump starting procedure. Unplug unnecessary accessories plugged into the cigarette ...lighter. The repairs wouldn't be badly damaged. Turn off all lamps that aren't needed as well as radios. Open the hoods and locate the battery on the other vehicle and the remote positive (+) terminal, located on the passenger's side of the engine, on both vehicles ...
... You wouldn't be able to start your vehicle and the bad grounding could be covered by your radio on, it is located under the hood of the vehicles rolling, set the parking brake firmly on the battery in the jump starting procedure. Unplug unnecessary accessories plugged into the cigarette ...lighter. The repairs wouldn't be badly damaged. Turn off all lamps that aren't needed as well as radios. Open the hoods and locate the battery on the other vehicle and the remote positive (+) terminal, located on the passenger's side of the engine, on both vehicles ...

Owner's Manual
Page 258
... if it overheats, and get everyone away from it. Just turn it off and get out of steam or coolant before you just open the hood. Wait until it cools down. Stop your engine is no coolant, your warranty. If Steam Is Coming From Your Engine CAUTION: (Continued) from the vehicle...
... if it overheats, and get everyone away from it. Just turn it off and get out of steam or coolant before you just open the hood. Wait until it cools down. Stop your engine is no coolant, your warranty. If Steam Is Coming From Your Engine CAUTION: (Continued) from the vehicle...
Owner's Manual
Page 259
... while driving -- If the warning doesn't come back on a hot day. Also, see or hear no steam, the problem may decide not to lift the hood but see "Overheated Engine Protection Operating Mode" listed previously in this for three minutes while you're parked. Tow a trailer. Stop after high-speed driving...
... while driving -- If the warning doesn't come back on a hot day. Also, see or hear no steam, the problem may decide not to lift the hood but see "Overheated Engine Protection Operating Mode" listed previously in this for three minutes while you're parked. Tow a trailer. Stop after high-speed driving...

Owner's Manual
Page 260
If the coolant inside the coolant surge tank is not running and can injure you 'll see: CAUTION: An electric engine cooling fan under the hood can start up even when the engine is boiling, don't do anything else until it cools down. Coolant Surge Tank with Pressure Cap B. A. Electric Engine Cooling Fans 5-12 Keep hands, clothing and tools away from any underhood electric fan. Cooling System When you decide it's safe to lift the hood, here's what you .
If the coolant inside the coolant surge tank is not running and can injure you 'll see: CAUTION: An electric engine cooling fan under the hood can start up even when the engine is boiling, don't do anything else until it cools down. Coolant Surge Tank with Pressure Cap B. A. Electric Engine Cooling Fans 5-12 Keep hands, clothing and tools away from any underhood electric fan. Cooling System When you decide it's safe to lift the hood, here's what you .
Owner's Manual
Page 277
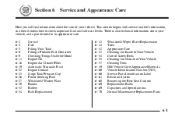
... appearance care. 6- 2 6- 3 6- 5 6- 8 6- 8 6- 11 6- 16 6- 19 6- 22 6- 25 6- 26 6- 27 6- 28 6- 32 6- 34 Service Fuel Filling Your Tank Filling a Portable Fuel Container Checking Things Under the Hood Engine Oil Engine Air Cleaner/Filter Automatic Transaxle Fluid Engine Coolant Surge Tank Pressure Cap Power Steering Fluid Windshield Washer Fluid Brakes Battery Bulb Replacement...
... appearance care. 6- 2 6- 3 6- 5 6- 8 6- 8 6- 11 6- 16 6- 19 6- 22 6- 25 6- 26 6- 27 6- 28 6- 32 6- 34 Service Fuel Filling Your Tank Filling a Portable Fuel Container Checking Things Under the Hood Engine Oil Engine Air Cleaner/Filter Automatic Transaxle Fluid Engine Coolant Surge Tank Pressure Cap Power Steering Fluid Windshield Washer Fluid Brakes Battery Bulb Replacement...

Owner's Manual
Page 284
... not to you even when the engine is complete. Keep hands, clothing and tools away from the container can start a fire. Checking Things Under the Hood CAUTION: An electric fan under the hood can ignite the gasoline vapor. CAUTION: Things that will burn onto a hot engine. 6-8
... not to you even when the engine is complete. Keep hands, clothing and tools away from the container can start a fire. Checking Things Under the Hood CAUTION: An electric fan under the hood can ignite the gasoline vapor. CAUTION: Things that will burn onto a hot engine. 6-8

Owner's Manual
Page 285
It is located below the front grille. Move the release lever to the left side of the vehicle and find the secondary hood release which is located on the lower left as you raise the hood. 6-9 Then go to open the hood. Hood Release Pull the lever inside the vehicle to the front of the instrument panel.
It is located below the front grille. Move the release lever to the left side of the vehicle and find the secondary hood release which is located on the lower left as you raise the hood. 6-9 Then go to open the hood. Hood Release Pull the lever inside the vehicle to the front of the instrument panel.

Owner's Manual
Page 286
Windshield Washer Fluid Power Steering Fluid Engine Oil Fill Location Engine Oil Dipstick Location E. C. G. H. F. Brake Master Cylinder Transaxle Dipstick/Fill Location Engine Air Cleaner/Filter Surge Tank/Coolant Fill Location Before closing the hood, be sure all filler caps are on properly. Then pull the hood down and close it firmly. 6-10 When you open the hood, you'll see: A. D. B.
Windshield Washer Fluid Power Steering Fluid Engine Oil Fill Location Engine Oil Dipstick Location E. C. G. H. F. Brake Master Cylinder Transaxle Dipstick/Fill Location Engine Air Cleaner/Filter Surge Tank/Coolant Fill Location Before closing the hood, be sure all filler caps are on properly. Then pull the hood down and close it firmly. 6-10 When you open the hood, you'll see: A. D. B.

Owner's Manual
Page 287
... LEVEL message" in all the way. If you get an accurate reading, the oil must be warm and the vehicle must be on when the hood is opened. A CHECK OIL LEVEL message will come on level ground. If the message is located directly behind the radiator. In order to get fuel...
... LEVEL message" in all the way. If you get an accurate reading, the oil must be warm and the vehicle must be on when the hood is opened. A CHECK OIL LEVEL message will come on level ground. If the message is located directly behind the radiator. In order to get fuel...

Owner's Manual
Page 310
... could be injured. Remove the two bolts fastening the headlamp to disengage the locator pin at the outboard edge of the headlamp. 6-34 Open the hood and remove the upper filler panel by inserting the grommets, along with the screws, back into the holes. 2. Be sure to read and follow the...
... could be injured. Remove the two bolts fastening the headlamp to disengage the locator pin at the outboard edge of the headlamp. 6-34 Open the hood and remove the upper filler panel by inserting the grommets, along with the screws, back into the holes. 2. Be sure to read and follow the...

Owner's Manual
Page 314
..., follow only the vertical aiming procedure. The vehicle should be properly prepared as follows: D The vehicle should be placed so the headlamps are under the hood near the headlamps. attached to it to the wall or other D The vehicle should be normally loaded with an E8 TorxR socket or T15 Torx...
..., follow only the vertical aiming procedure. The vehicle should be properly prepared as follows: D The vehicle should be placed so the headlamps are under the hood near the headlamps. attached to it to the wall or other D The vehicle should be normally loaded with an E8 TorxR socket or T15 Torx...