
Owner's Manual
Page 11
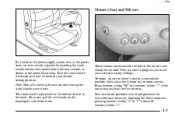
... seat cushion, as shown in the above steps and pressing memory button "2" or "3" instead of memory button "1." 1-3 The crank handle is provided in the tool kit located in the trunk. Turn the crank handle clockwise until you've reached your desired memory settings. yellowblue Memory Seat and Mirrors If a failure in...
... seat cushion, as shown in the above steps and pressing memory button "2" or "3" instead of memory button "1." 1-3 The crank handle is provided in the tool kit located in the trunk. Turn the crank handle clockwise until you've reached your desired memory settings. yellowblue Memory Seat and Mirrors If a failure in...

Owner's Manual
Page 52
...restraint on the seat. 2. yellowblue Top Strap Securing a Child Restraint in a Rear Seat Position You'll be anchored. Secure the child in the kit. 1. See the earlier part about the top strap if the child restraint has one. If the shoulder belt goes in front of the child's ... or neck, put it should be using the instructions provided in the child restraint when and as the instructions say. The dealer can obtain a kit with the child restraint. Be sure to have a top strap, and that came with anchor hardware and installation instructions specifically designed for this vehicle...
...restraint on the seat. 2. yellowblue Top Strap Securing a Child Restraint in a Rear Seat Position You'll be anchored. Secure the child in the kit. 1. See the earlier part about the top strap if the child restraint has one. If the shoulder belt goes in front of the child's ... or neck, put it should be using the instructions provided in the child restraint when and as the instructions say. The dealer can obtain a kit with the child restraint. Be sure to have a top strap, and that came with anchor hardware and installation instructions specifically designed for this vehicle...

Owner's Manual
Page 116
... panel will stop if something gets in the way. yellowblue Anti-Pinch Feature If a hand, an arm or another object is provided in the tool kit in the trunk (with the jack). 2-54 If this happens, the sunroof won't stop at the obstruction and open to press and hold the power...
... panel will stop if something gets in the way. yellowblue Anti-Pinch Feature If a hand, an arm or another object is provided in the tool kit in the trunk (with the jack). 2-54 If this happens, the sunroof won't stop at the obstruction and open to press and hold the power...

Owner's Manual
Page 139
... Systems (RDS) (If Equipped) 3-22 3-23 3-23 3-27 3-27 3-28 3-28 3-29 3-30 3-31 3-31 Radio Data Systems (RDS) Program Type (PTY) Selections CD Adapter Kits Trunk-Mounted CD Changer (Option) Theft-Deterrent Feature Audio Steering Wheel Controls Understanding Radio Reception Tips About Your Audio System Care of Your Cassette Tape...
... Systems (RDS) (If Equipped) 3-22 3-23 3-23 3-27 3-27 3-28 3-28 3-29 3-30 3-31 3-31 Radio Data Systems (RDS) Program Type (PTY) Selections CD Adapter Kits Trunk-Mounted CD Changer (Option) Theft-Deterrent Feature Audio Steering Wheel Controls Understanding Radio Reception Tips About Your Audio System Care of Your Cassette Tape...

Owner's Manual
Page 161
... may be played only with specially designed trays. 3-23 The smaller discs (8 cm) can play a compact disc. To activate the bypass feature, use a CD adapter kit with your tape player. The tape symbol on one of the 12 trays holds one disc. Load the trays from bottom to top, placing a disc... SOURCE button for loading up , the disc will not play and an error will remain active until the eject button is pressed. yellowblue CD Adapter Kits It is possible to use the following steps: 1. Repeat this procedure for two seconds.
... may be played only with specially designed trays. 3-23 The smaller discs (8 cm) can play a compact disc. To activate the bypass feature, use a CD adapter kit with your tape player. The tape symbol on one of the 12 trays holds one disc. Load the trays from bottom to top, placing a disc... SOURCE button for loading up , the disc will not play and an error will remain active until the eject button is pressed. yellowblue CD Adapter Kits It is possible to use the following steps: 1. Repeat this procedure for two seconds.

Owner's Manual
Page 228
Turn the nut holding the jack counterclockwise and remove it. 5-20 Pull the red handle to remove the cover and access the equipment. yellowblue The jack and tool kit are located on the passenger's side of the trunk.
Turn the nut holding the jack counterclockwise and remove it. 5-20 Pull the red handle to remove the cover and access the equipment. yellowblue The jack and tool kit are located on the passenger's side of the trunk.
Owner's Manual
Page 318
... ...3-29 Care of Your Compact Disc Player ...3-31 Care of Your Compact Discs ...3-30 Carpet Cleaning ...6-46 Cassette Tape Player Errors ...3-11, 3-19 CD Adapter Kits ...3-23 CD Changer ...3-23 Cellular Telephone ...2-52 Center Console Storage Area ...2-50 Center High-Mounted Stoplamp (CHMSL), Bulb Replacement ...6-34 Central Door Unlocking System ...2-4 Certification...
... ...3-29 Care of Your Compact Disc Player ...3-31 Care of Your Compact Discs ...3-30 Carpet Cleaning ...6-46 Cassette Tape Player Errors ...3-11, 3-19 CD Adapter Kits ...3-23 CD Changer ...3-23 Cellular Telephone ...2-52 Center Console Storage Area ...2-50 Center High-Mounted Stoplamp (CHMSL), Bulb Replacement ...6-34 Central Door Unlocking System ...2-4 Certification...
