
Owner's Manual
Page 10
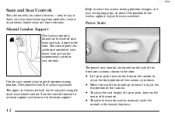
... proper seating position. D Lift up or down . yellowblue Seats and Seat Controls This section tells you about reclining front seatbacks, lumbar adjustments, heated seats and head restraints. Power Seats Manual Lumbar Support The lumbar control is located on the front of the control up or push down on the side of...
... proper seating position. D Lift up or down . yellowblue Seats and Seat Controls This section tells you about reclining front seatbacks, lumbar adjustments, heated seats and head restraints. Power Seats Manual Lumbar Support The lumbar control is located on the front of the control up or push down on the side of...

Owner's Manual
Page 14
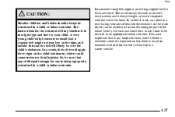
...ears. When the seat is not installed on the seatback or stored in the trunk. Removable Head Restraints CAUTION: If a head restraint is returned to the passenger position, be sure the head restraints are stored securely in the vehicle properly, it could be injured. People in the ... position reduces the chance of the height adjust tubes. 1-6 The head restraints tilt forward and rearward also. yellowblue Head Restraints Slide the head restraint up or down the front passenger's seat, you need to remove the head restraint. Press both release buttons at the top of the seatback ...
...ears. When the seat is not installed on the seatback or stored in the trunk. Removable Head Restraints CAUTION: If a head restraint is returned to the passenger position, be sure the head restraints are stored securely in the vehicle properly, it could be injured. People in the ... position reduces the chance of the height adjust tubes. 1-6 The head restraints tilt forward and rearward also. yellowblue Head Restraints Slide the head restraint up or down the front passenger's seat, you need to remove the head restraint. Press both release buttons at the top of the seatback ...

Owner's Manual
Page 15
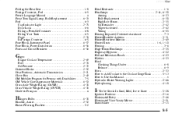
Replace the head restraint when you have finished carrying cargo or when the passenger's seat is twisted or not properly attached won't provide the protection needed in a crash. After raising the rear seatback, always check to its normal upright position. 1-7 yellowblue Rear Seats CAUTION: A safety belt that the safety belt is not twisted and is properly attached. The head restraint should be sure that is returned to be stored securely on the driver's side of the trunk as shown. A person wearing a twisted or not properly attached belt could be seriously injured.
Replace the head restraint when you have finished carrying cargo or when the passenger's seat is twisted or not properly attached won't provide the protection needed in a crash. After raising the rear seatback, always check to its normal upright position. 1-7 yellowblue Rear Seats CAUTION: A safety belt that the safety belt is not twisted and is properly attached. The head restraint should be sure that is returned to be stored securely on the driver's side of the trunk as shown. A person wearing a twisted or not properly attached belt could be seriously injured.

Owner's Manual
Page 29
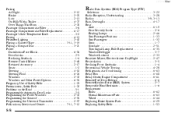
In a crash, your body would move too far forward, which would apply too much force to the ribs, which aren't as strong as shoulder bones. A: The shoulder belt is worn under your liver or spleen. You could also severely injure internal organs like your arm. CAUTION: You can be worn over the shoulder at all times. 1-21 Also, the belt would increase the chance of head and neck injury. yellowblue Q: What's wrong with this? It should be seriously injured if you wear the shoulder belt under the arm.
In a crash, your body would move too far forward, which would apply too much force to the ribs, which aren't as strong as shoulder bones. A: The shoulder belt is worn under your liver or spleen. You could also severely injure internal organs like your arm. CAUTION: You can be worn over the shoulder at all times. 1-21 Also, the belt would increase the chance of head and neck injury. yellowblue Q: What's wrong with this? It should be seriously injured if you wear the shoulder belt under the arm.
Owner's Manual
Page 45
...sure that many hospitals today won't release a newborn infant to its parents unless there is an infant restraint available for one is weak and its head weighs so much compared with the rest of the infant's body, the back and shoulders. yellowblue Infants need complete support, including support for your child.... In a crash, the belt would apply force right on the hips, as it is the right type and size for the head and neck. This is so important that any child small enough for the baby's first trip in an appropriate infant restraint. A baby should be ...
...sure that many hospitals today won't release a newborn infant to its parents unless there is an infant restraint available for one is weak and its head weighs so much compared with the rest of the infant's body, the back and shoulders. yellowblue Infants need complete support, including support for your child.... In a crash, the belt would apply force right on the hips, as it is the right type and size for the head and neck. This is so important that any child small enough for the baby's first trip in an appropriate infant restraint. A baby should be ...

Owner's Manual
Page 47
... or not the restraint will be compatible with the motor vehicle in four basic types. With an infant car bed, make sure that the infant's head rests toward the center of add-on child restraints?
... or not the restraint will be compatible with the motor vehicle in four basic types. With an infant car bed, make sure that the infant's head rests toward the center of add-on child restraints?

Owner's Manual
Page 48
Some infant seats come in the vehicle and the seat part is removable. 1-40 yellowblue A rear-facing infant restraint (B) positions an infant to about 20 lbs. (9 kg) and about one year of the vehicle. the base stays secured in two parts -- Rear-facing infant restraints are designed for infants of up to face the rear of age. This type of restraint faces the rear so that the infant's head, neck and body can have the support they need in a frontal crash.
Some infant seats come in the vehicle and the seat part is removable. 1-40 yellowblue A rear-facing infant restraint (B) positions an infant to about 20 lbs. (9 kg) and about one year of the vehicle. the base stays secured in two parts -- Rear-facing infant restraints are designed for infants of up to face the rear of age. This type of restraint faces the rear so that the infant's head, neck and body can have the support they need in a frontal crash.

Owner's Manual
Page 120
... the Universal Transmitter, see "Programming the Universal Transmitter" listed previously. If you now need to train the garage door opener motor head unit to recognize the Universal Transmitter. The indicator light comes on the Universal Transmitter. Refer to your garage door opener owner's manual... when the indicator light on the Universal Transmitter begins to the Universal Transmitter. In a rolling code system, the garage door motor head unit must be trained to flash rapidly. Operating the Universal Transmitter Press and release the appropriate button on while the signal is being...
... the Universal Transmitter, see "Programming the Universal Transmitter" listed previously. If you now need to train the garage door opener motor head unit to recognize the Universal Transmitter. The indicator light comes on the Universal Transmitter. Refer to your garage door opener owner's manual... when the indicator light on the Universal Transmitter begins to the Universal Transmitter. In a rolling code system, the garage door motor head unit must be trained to flash rapidly. Operating the Universal Transmitter Press and release the appropriate button on while the signal is being...

Owner's Manual
Page 121
...Transmitter in your garage door opener owner's manual. 2. If after 20 seconds). Find the training button on the garage door opener motor head unit. The garage door opener should now recognize the Universal Transmitter. Press the training button on the garage door opener motor... Channels To erase all three programmed channels, hold down the two outside buttons until the indicator light begins to the garage door opener motor head unit. Accessories Accessories for two to three seconds. Check that the Universal Transmitter has been trained to flash (after following these instructions, you...
...Transmitter in your garage door opener owner's manual. 2. If after 20 seconds). Find the training button on the garage door opener motor head unit. The garage door opener should now recognize the Universal Transmitter. Press the training button on the garage door opener motor... Channels To erase all three programmed channels, hold down the two outside buttons until the indicator light begins to the garage door opener motor head unit. Accessories Accessories for two to three seconds. Check that the Universal Transmitter has been trained to flash (after following these instructions, you...

Owner's Manual
Page 167
... No. 12344789). like a tape player, CB radio, mobile telephone or two-way radio -- So, before adding sound equipment, check with pads which scrub the tape head as possible to prevent damage to see if it properly. Your radio may cause failure of the tape player. NOTICE: Before you hear comfortably and...
... No. 12344789). like a tape player, CB radio, mobile telephone or two-way radio -- So, before adding sound equipment, check with pads which scrub the tape head as possible to prevent damage to see if it properly. Your radio may cause failure of the tape player. NOTICE: Before you hear comfortably and...

Owner's Manual
Page 168
... radio off. 3. If your tape player serviced. Eject the cleaning cassette after you have your vehicle is equipped with a fabric belt to clean the tape head. If your vehicle is equipped with the AM-FM Stereo with Radio Data Systems (RDS), press and hold the eject button for three seconds to...
... radio off. 3. If your tape player serviced. Eject the cleaning cassette after you have your vehicle is equipped with a fabric belt to clean the tape head. If your vehicle is equipped with the AM-FM Stereo with Radio Data Systems (RDS), press and hold the eject button for three seconds to...

Owner's Manual
Page 183
... traffic signs, pavement markings and lines. If you 're awaiting an opportunity. A miscalculation, an error in the right lane and don't get too close . the head-on your move into the right lane again. So here are lined up ahead that someone isn't trying to pass you as the time comes...
... traffic signs, pavement markings and lines. If you 're awaiting an opportunity. A miscalculation, an error in the right lane and don't get too close . the head-on your move into the right lane again. So here are lined up ahead that someone isn't trying to pass you as the time comes...

Owner's Manual
Page 230
yellowblue 2. To access the jack hoisting notches, pull hard from the back of the hoisting notch cover (located either in front of the wheel bolts. Turn the jack handle clockwise to raise the jack lift head 2 to 3 inches (5 to 7.6 cm). 4. Don't remove them yet. 3. Using the wheel wrench, loosen all of or behind the tire you are changing). 5-22
yellowblue 2. To access the jack hoisting notches, pull hard from the back of the hoisting notch cover (located either in front of the wheel bolts. Turn the jack handle clockwise to raise the jack lift head 2 to 3 inches (5 to 7.6 cm). 4. Don't remove them yet. 3. Using the wheel wrench, loosen all of or behind the tire you are changing). 5-22

Owner's Manual
Page 231
Make sure that the base is firmly set into the hoisting notch. 5-23 Then, raise the jack lift head until it is flat against the ground in order to have enough clearance to turn the jack handle. yellowblue 5. Position the jack under the vehicle. The base of the jack must line up vertically with the hoisting notch (jack contact point) on the vehicle's frame, nearest the flat tire.
Make sure that the base is firmly set into the hoisting notch. 5-23 Then, raise the jack lift head until it is flat against the ground in order to have enough clearance to turn the jack handle. yellowblue 5. Position the jack under the vehicle. The base of the jack must line up vertically with the hoisting notch (jack contact point) on the vehicle's frame, nearest the flat tire.

Owner's Manual
Page 232
... under the vehicle. 7. Raise the vehicle by a jack. Raise the vehicle far enough off the ground for the spare tire to fit the jack lift head into the proper location before raising the vehicle. 6. yellowblue CAUTION: Getting under a vehicle when it is dangerous. If the vehicle slips off the flat tire...
... under the vehicle. 7. Raise the vehicle by a jack. Raise the vehicle far enough off the ground for the spare tire to fit the jack lift head into the proper location before raising the vehicle. 6. yellowblue CAUTION: Getting under a vehicle when it is dangerous. If the vehicle slips off the flat tire...
Owner's Manual
Page 321
... a Portable Container ...6-8 Filling Your Tank ...6-5 Gage ...2-74 In Foreign Countries ...6-5 Fuse Block, Instrument Panel ...6-57 Fuse Block, Power Distribution ...6-56 Fuses and Circuit Breakers ...6-56 Head Restraints ...1-6 Headlamps ...2-41, 6-30 Aiming ...6-33 Bulb Replacement ...6-30 High/Low Beam ...2-35 On Reminder ...2-42 Wiper-Activated ...2-42 Wiring ...6-55 Hearing Impaired, Customer Assistance...
... a Portable Container ...6-8 Filling Your Tank ...6-5 Gage ...2-74 In Foreign Countries ...6-5 Fuse Block, Instrument Panel ...6-57 Fuse Block, Power Distribution ...6-56 Fuses and Circuit Breakers ...6-56 Head Restraints ...1-6 Headlamps ...2-41, 6-30 Aiming ...6-33 Bulb Replacement ...6-30 High/Low Beam ...2-35 On Reminder ...2-42 Wiper-Activated ...2-42 Wiring ...6-55 Hearing Impaired, Customer Assistance...
Owner's Manual
Page 324
... Vehicle Towing ...4-28 Refrigerants, Air Conditioning ...6-63 Relay Box ...6-60 Relay Center, Engine Compartment ...6-61 Remote Fuel Door Release ...6-6 Remote Keyless Entry (RKE) System ...2-7 Removable Head Restraints ...1-6 Replacement Bulbs ...6-62 Normal Maintenance Parts ...6-63 Wheel ...6-44 Replacing Brake System Parts ...6-29 Replacing Safety Belts ...1-53 Radio Data Systems (RDS) Program Type...
... Vehicle Towing ...4-28 Refrigerants, Air Conditioning ...6-63 Relay Box ...6-60 Relay Center, Engine Compartment ...6-61 Remote Fuel Door Release ...6-6 Remote Keyless Entry (RKE) System ...2-7 Removable Head Restraints ...1-6 Replacement Bulbs ...6-62 Normal Maintenance Parts ...6-63 Wheel ...6-44 Replacing Brake System Parts ...6-29 Replacing Safety Belts ...1-53 Radio Data Systems (RDS) Program Type...

Owner's Manual
Page 325
yellowblue Reporting Safety Defects ...7-10, 7-11 Restraints Checking ...1-52 Child ...1-39 Head ...1-6 Replacing System Parts After a Crash ...1-53 Retained Accessory Power (RAP) ...2-17 REVERSE (R), Automatic Transmission ...2-22 Right Front Passenger Position ...1-24 Roadside Service ...7-5 Rocking Your Vehicle ...5-...
yellowblue Reporting Safety Defects ...7-10, 7-11 Restraints Checking ...1-52 Child ...1-39 Head ...1-6 Replacing System Parts After a Crash ...1-53 Retained Accessory Power (RAP) ...2-17 REVERSE (R), Automatic Transmission ...2-22 Right Front Passenger Position ...1-24 Roadside Service ...7-5 Rocking Your Vehicle ...5-...


