

Owner Manual
Page 1
2014 Buick LaCrosse Owner Manual M In Brief ...1-1 Instrument Panel ...1-2 Initial Drive Information ...1-4 Vehicle Features ...1-15 eAssist Features ...1-19 Performance and Maintenance ...1-21 Keys, Doors, and Windows ...2-1 Keys and ...
2014 Buick LaCrosse Owner Manual M In Brief ...1-1 Instrument Panel ...1-2 Initial Drive Information ...1-4 Vehicle Features ...1-15 eAssist Features ...1-19 Performance and Maintenance ...1-21 Keys, Doors, and Windows ...2-1 Keys and ...

Owner Manual
Page 2
2014 Buick LaCrosse Owner Manual M Electrical System ...10-34 Wheels and Tires ...10-41 Jump Starting ...10-77 Towing the Vehicle ...10-81 Appearance Care ...10-84 Service ...
2014 Buick LaCrosse Owner Manual M Electrical System ...10-34 Wheels and Tires ...10-41 Jump Starting ...10-77 Towing the Vehicle ...10-81 Appearance Care ...10-84 Service ...

Owner Manual
Page 3
.../or service marks of the features found on your vehicle. Litho in the vehicle for Buick Motor Division wherever it appears in this manual including, but not limited to, GM, the GM logo, BUICK, the BUICK Emblem, and LACROSSE are options that may or may not be obtained from your dealer, at www.helminc...
.../or service marks of the features found on your vehicle. Litho in the vehicle for Buick Motor Division wherever it appears in this manual including, but not limited to, GM, the GM logo, BUICK, the BUICK Emblem, and LACROSSE are options that may or may not be obtained from your dealer, at www.helminc...

Owner Manual
Page 4
It could result in injury or death. Symbols The vehicle has components and labels that could also result in the back of fatal injury. iv Introduction Using this information may lead to injury. Symbols are shown along with a slash through it can be found. { Warning Text marked { Warning provides information on risk of the manual. It is an alphabetical list of what is in the manual and the page number where it is shown when you need to a specific component, control, message, gauge, or indicator. Disregarding this Manual To quickly locate information about the vehicle,...
It could result in injury or death. Symbols The vehicle has components and labels that could also result in the back of fatal injury. iv Introduction Using this information may lead to injury. Symbols are shown along with a slash through it can be found. { Warning Text marked { Warning provides information on risk of the manual. It is an alphabetical list of what is in the manual and the page number where it is shown when you need to a specific component, control, message, gauge, or indicator. Disregarding this Manual To quickly locate information about the vehicle,...

Owner Manual
Page 5
v or OnStar 9 : Airbag Readiness Light # : Air Conditioning ! : Antilock Brake System (ABS) g : Audio®Steering Wheel Controls $ : Brake System Warning Light " : Charging System I : Cruise Control B : Engine Coolant Temperature O : Exterior Lamps g : First Responder # : Fog Lamps . : Fuel Gauge + : Fuses 3 : Headlamp High/Low-Beam Changer LATCH System Child Restraints * : Malfunction Indicator Lamp : : Oil Pressure O : Power / : Remote Vehicle Start > : Safety Belt Reminders 7 : Tire Pressure Monitor d : Traction Control/StabiliTrak® M : Windshield Washer Fluid (: j: Heated ...
v or OnStar 9 : Airbag Readiness Light # : Air Conditioning ! : Antilock Brake System (ABS) g : Audio®Steering Wheel Controls $ : Brake System Warning Light " : Charging System I : Cruise Control B : Engine Coolant Temperature O : Exterior Lamps g : First Responder # : Fog Lamps . : Fuel Gauge + : Fuses 3 : Headlamp High/Low-Beam Changer LATCH System Child Restraints * : Malfunction Indicator Lamp : : Oil Pressure O : Power / : Remote Vehicle Start > : Safety Belt Reminders 7 : Tire Pressure Monitor d : Traction Control/StabiliTrak® M : Windshield Washer Fluid (: j: Heated ...
Owner Manual
Page 6
vi Introduction 2 NOTES
vi Introduction 2 NOTES

Owner Manual
Page 7
In Brief 1-1 In Brief Instrument Panel Instrument Panel ...1-2 Interior Lighting ...Exterior Lighting ...Windshield Wiper/Washer ...Climate Controls ...Transmission ... 1-12 1-12 1-13 1-14 1-14 1-15 1-15 1-16 1-16 1-16 1-16 1-17 1-17 1-17 1-17 1-17 1-18 1-18 eAssist Features Initial Drive Information Initial Drive Information ...1-4 Remote Keyless Entry (RKE) System ...1-4 Remote Vehicle Start ...1-5 Door Locks ...1-5 Trunk Release ...1-6 Windows ...1-6 Seat Adjustment ...1-6 Memory Features ...1-8 Heated and Ventilated Seats ...1-9 Head Restraint Adjustment ...1-9 Safety Belts ...1-10 ...
In Brief 1-1 In Brief Instrument Panel Instrument Panel ...1-2 Interior Lighting ...Exterior Lighting ...Windshield Wiper/Washer ...Climate Controls ...Transmission ... 1-12 1-12 1-13 1-14 1-14 1-15 1-15 1-16 1-16 1-16 1-16 1-17 1-17 1-17 1-17 1-17 1-18 1-18 eAssist Features Initial Drive Information Initial Drive Information ...1-4 Remote Keyless Entry (RKE) System ...1-4 Remote Vehicle Start ...1-5 Door Locks ...1-5 Trunk Release ...1-6 Windows ...1-6 Seat Adjustment ...1-6 Memory Features ...1-8 Heated and Ventilated Seats ...1-9 Head Restraint Adjustment ...1-9 Safety Belts ...1-10 ...
Owner Manual
Page 9
Driver Information Center Display. Hazard Warning Flashers on page 10-5. 13. Data Link Connector (DLC) (Out of View). Hood Release. See Hood on page 6-4. Dual Automatic Climate Control System on page 5-8. In Brief 1. Instrument Cluster on page 8-1. 22. Lane Departure Warning (LDW) on page 9-37. Cruise Control on page 9-57 (If Equipped). Steering Wheel Controls on page 9-27. 20. See Automatic Transmission on page 5-2 (If Equipped). See Turn and Lane-Change Signals on page 9-51 (If Equipped). 14. Light Sensor. Forward Collision Alert (FCA) System on ...
Driver Information Center Display. Hazard Warning Flashers on page 10-5. 13. Data Link Connector (DLC) (Out of View). Hood Release. See Hood on page 6-4. Dual Automatic Climate Control System on page 5-8. In Brief 1. Instrument Cluster on page 8-1. 22. Lane Departure Warning (LDW) on page 9-37. Cruise Control on page 9-57 (If Equipped). Steering Wheel Controls on page 9-27. 20. See Automatic Transmission on page 5-2 (If Equipped). See Turn and Lane-Change Signals on page 9-51 (If Equipped). 14. Light Sensor. Forward Collision Alert (FCA) System on ...

Owner Manual
Page 10
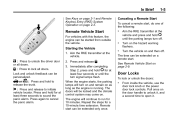
The RKE transmitter can have pushbutton start. This key is also used for the remote trunk release. The key can be used for the ignition, if the vehicle does not have one of the two symbols for all locks. For more detailed information, refer to each of the important features that may or may work up to extend the key. Remote Keyless Entry (RKE) System The Remote Keyless Entry (RKE) transmitter may not be on your specific vehicle. 1-4 In Brief Initial Drive Information This section provides a brief overview about some of the features which can be found later in this owner ...
The RKE transmitter can have pushbutton start. This key is also used for the remote trunk release. The key can be used for the ignition, if the vehicle does not have one of the two symbols for all locks. For more detailed information, refer to each of the important features that may or may work up to extend the key. Remote Keyless Entry (RKE) System The Remote Keyless Entry (RKE) transmitter may not be on your specific vehicle. 1-4 In Brief Initial Drive Information This section provides a brief overview about some of the features which can be found later in this owner ...
Owner Manual
Page 11
Remote Vehicle Start For vehicles with this feature, the engine can be started from outside the vehicle. Q: Press to initiate vehicle locator. The time can be extended on . V or Y : 7 : Press and release to lock all doors. From inside the vehicle, use the door lock knob or the power door lock controls. Turn the vehicle on page 2-9. 3. Lock and unlock feedback can be extended only once. The doors will be personalized. Remote start , do one of the following: . Press and hold / until the turn signal lamps flash. Aim the RKE transmitter at least three seconds to ...
Remote Vehicle Start For vehicles with this feature, the engine can be started from outside the vehicle. Q: Press to initiate vehicle locator. The time can be extended on . V or Y : 7 : Press and release to lock all doors. From inside the vehicle, use the door lock knob or the power door lock controls. Turn the vehicle on page 2-9. 3. Lock and unlock feedback can be extended only once. The doors will be personalized. Remote start , do one of the following: . Press and hold / until the turn signal lamps flash. Aim the RKE transmitter at least three seconds to ...

Owner Manual
Page 12
See Remote Keyless Entry (RKE) System Operation on page 2-11. K: Q: Press to unlock all doors and then press the touch pad above the license plate. Slide the seat to lock all doors. Try to move the seat back and forth to raise it is locked in P (Park) or off. Seat Adjustment Manual Seats See Door Locks on page 2-3. To adjust a manual seat: 1. Trunk Release To open the trunk from inside the vehicle, press the trunk release button on the driver door. The vehicle must be sure it . Press to the desired position and release the handle. 3. See Power Door Locks on ...
See Remote Keyless Entry (RKE) System Operation on page 2-11. K: Q: Press to unlock all doors and then press the touch pad above the license plate. Slide the seat to lock all doors. Try to move the seat back and forth to raise it is locked in P (Park) or off. Seat Adjustment Manual Seats See Door Locks on page 2-3. To adjust a manual seat: 1. Trunk Release To open the trunk from inside the vehicle, press the trunk release button on the driver door. The vehicle must be sure it . Press to the desired position and release the handle. 3. See Power Door Locks on ...

Owner Manual
Page 13
Move the seat forward or rearward by moving the front of the control up or down . Raise or lower the front part of the seat cushion by moving the rear of the control to increase or decrease lumbar support. If equipped, press and hold the front or rear of the control up or down . See Lumbar Adjustment on page 3-5. Release the switch when the desired height is reached. See Power Seat Adjustment on page 3-5. To adjust the seat: . See Seat Adjustment on page 3-4. Raise or lower the entire seat by moving the control forward or rearward. Press and hold the top ...
Move the seat forward or rearward by moving the front of the control up or down . Raise or lower the front part of the seat cushion by moving the rear of the control to increase or decrease lumbar support. If equipped, press and hold the front or rear of the control up or down . See Lumbar Adjustment on page 3-5. Release the switch when the desired height is reached. See Power Seat Adjustment on page 3-5. To adjust the seat: . See Seat Adjustment on page 3-4. Raise or lower the entire seat by moving the control forward or rearward. Press and hold the top ...
Owner Manual
Page 14
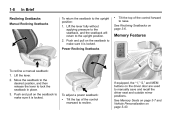
Reclining Seatbacks Manual Reclining Seatbacks Tilt the top of the control rearward to make sure it is locked. Lift the lever. 2. Push and pull on the seatback to raise. If equipped, the "1," "2," and MEM buttons on the seatback to recline. See Memory Seats on page 3-7 and Vehicle Personalization on page 3-6. Move the seatback to the desired position, and then release the lever to manually save and recall the driver seat and outside mirror positions. Push and pull on the driver door are used to lock the seatback in place. 3. Power Reclining Seatbacks . Memory ...
Reclining Seatbacks Manual Reclining Seatbacks Tilt the top of the control rearward to make sure it is locked. Lift the lever. 2. Push and pull on the seatback to raise. If equipped, the "1," "2," and MEM buttons on the seatback to recline. See Memory Seats on page 3-7 and Vehicle Personalization on page 3-6. Move the seatback to the desired position, and then release the lever to manually save and recall the driver seat and outside mirror positions. Push and pull on the driver door are used to lock the seatback in place. 3. Power Reclining Seatbacks . Memory ...

Owner Manual
Page 15
A ventilated seat has a fan that pulls or pushes air through the seat. In Brief 1-9 Heated and Ventilated Seats Press M or L to ventilate the driver or passenger seat. The air is off setting. Press the button once for all occupants are part of the button, the seat will change the seatback recline angle as little as necessary while keeping the seat and the head restraint height in the proper position. The lights near the heated or ventilated seat symbol on page 3-9. See Heated and Ventilated Front Seats on the display indicate three for the highest setting and one ...
A ventilated seat has a fan that pulls or pushes air through the seat. In Brief 1-9 Heated and Ventilated Seats Press M or L to ventilate the driver or passenger seat. The air is off setting. Press the button once for all occupants are part of the button, the seat will change the seatback recline angle as little as necessary while keeping the seat and the head restraint height in the proper position. The lights near the heated or ventilated seat symbol on page 3-9. See Heated and Ventilated Front Seats on the display indicate three for the highest setting and one ...

Owner Manual
Page 16
See Passenger Sensing System on page 3-26 for Children (LATCH System) on page 3-40. No other airbag is started. How to select the L (Left) or R (Right) mirror. 2. Turn the control knob to Wear Safety Belts Properly on how to adjust the mirror. . . The passenger airbag status indicator will be visible on the overhead console when the vehicle Safety Belts on page 3-15. Mirror Adjustment Exterior United States Refer to the following sections for important information on page 3-14. Lower Anchors and Tethers for important information. Canada and Mexico The passenger sensing ...
See Passenger Sensing System on page 3-26 for Children (LATCH System) on page 3-40. No other airbag is started. How to select the L (Left) or R (Right) mirror. 2. Turn the control knob to Wear Safety Belts Properly on how to adjust the mirror. . . The passenger airbag status indicator will be visible on the overhead console when the vehicle Safety Belts on page 3-15. Mirror Adjustment Exterior United States Refer to the following sections for important information on page 3-14. Lower Anchors and Tethers for important information. Canada and Mexico The passenger sensing ...
Owner Manual
Page 17
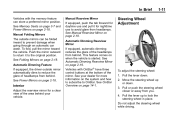
Vehicles with the memory feature can be folded inward to reduce the glare of headlamps from headlamps. To adjust the steering wheel: 1. Manual Folding Mirrors The outside mirror automatically dims to prevent damage when going through an automatic car wash. Automatic Dimming Feature If equipped, the driver outside mirrors can store a preferred mirror position. See Memory Seats on page 3-7 and Power Mirrors on page 2-18. See Power Mirrors on page 2-18. See Automatic Dimming Rearview Mirror on page 2-18. Do not adjust the steering wheel while driving. See ...
Vehicles with the memory feature can be folded inward to reduce the glare of headlamps from headlamps. To adjust the steering wheel: 1. Manual Folding Mirrors The outside mirror automatically dims to prevent damage when going through an automatic car wash. Automatic Dimming Feature If equipped, the driver outside mirrors can store a preferred mirror position. See Memory Seats on page 3-7 and Power Mirrors on page 2-18. See Power Mirrors on page 2-18. See Automatic Dimming Rearview Mirror on page 2-18. Do not adjust the steering wheel while driving. See ...
Owner Manual
Page 18
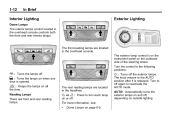
The rear reading lamps are located in the overhead console. The knob returns to the AUTO position after it is opened. (: H: Turns the lamps off again to the following positions: Turns the lamps on all the time. AUTO: Automatically turns the exterior lamps on and off, depending on outside lighting. # or $ : on or off the exterior lamps. Turn the control to reactivate the AUTO mode. O : Turns off . . The exterior lamp control is on the instrument panel on page 6-5. Press to off . ' : Keeps the lamps on when any door is released. Exterior Lighting The front reading ...
The rear reading lamps are located in the overhead console. The knob returns to the AUTO position after it is opened. (: H: Turns the lamps off again to the following positions: Turns the lamps on all the time. AUTO: Automatically turns the exterior lamps on and off, depending on outside lighting. # or $ : on or off the exterior lamps. Turn the control to reactivate the AUTO mode. O : Turns off . . The exterior lamp control is on the instrument panel on page 6-5. Press to off . ' : Keeps the lamps on when any door is released. Exterior Lighting The front reading ...

Owner Manual
Page 19
Windshield Wiper/Washer Exterior Lamp Controls on the headlamps, together with the sidemarker lamps, taillamps, license plate lamps, and instrument panel lights. 2 : Turns on page 6-1. With the ignition in ACC/ ACCESSORY or ON/RUN, move the wiper lever down. In Brief 1-13 ; : Turns on the parking lamps, together with the parking lamps, sidemarker lamps, taillamps, license plate lamps, and instrument panel lights. Fog Lamps on page 5-3. OFF: Use to INT for less frequent wipes. INT: Move the lever up to turn the 3 INT band up for more information, see: . HI: Use for...
Windshield Wiper/Washer Exterior Lamp Controls on the headlamps, together with the sidemarker lamps, taillamps, license plate lamps, and instrument panel lights. 2 : Turns on page 6-1. With the ignition in ACC/ ACCESSORY or ON/RUN, move the wiper lever down. In Brief 1-13 ; : Turns on the parking lamps, together with the parking lamps, sidemarker lamps, taillamps, license plate lamps, and instrument panel lights. Fog Lamps on page 5-3. OFF: Use to INT for less frequent wipes. INT: Move the lever up to turn the 3 INT band up for more information, see: . HI: Use for...

Owner Manual
Page 20
A/C (Air Conditioning) 9. Heated and Ventilated Front Seats 3. Defrost 6. SYNC (Synchronized Temperature) DSC can be enabled through the shift lever. Driver and Passenger Temperature Controls 2. Recirculation/Auto Recirculation 10. Fan Control 4. Transmission Automatic Transmission Driver Shift Control (DSC) Driver Shift Control (DSC) allows shifting an automatic transmission similar to a manual transmission. See Manual Mode on page 8-1. AUTO (Automatic Operation) See Dual Automatic Climate Control System on page 9-29. 1. 1-14 In Brief 7. Climate Controls The ...
A/C (Air Conditioning) 9. Heated and Ventilated Front Seats 3. Defrost 6. SYNC (Synchronized Temperature) DSC can be enabled through the shift lever. Driver and Passenger Temperature Controls 2. Recirculation/Auto Recirculation 10. Fan Control 4. Transmission Automatic Transmission Driver Shift Control (DSC) Driver Shift Control (DSC) allows shifting an automatic transmission similar to a manual transmission. See Manual Mode on page 8-1. AUTO (Automatic Operation) See Dual Automatic Climate Control System on page 9-29. 1. 1-14 In Brief 7. Climate Controls The ...

Owner Manual
Page 21
Cruise Control y or z : Press to go to the previous or next area in the display or to turn cruise control on in a list. v + or v −: Press to decline an incoming call, or end a current call. See Steering Wheel Controls on page 5-2. 5 : Press to the previous or next menu. g : Press to go up or down a page. @: Press to mute or unmute the infotainment system. A white indicator comes on or off. S or T : Press to interact with audio steering wheel controls, some audio controls can be adjusted at the steering wheel. C or B : Press to go up briefly to make the ...
Cruise Control y or z : Press to go to the previous or next area in the display or to turn cruise control on in a list. v + or v −: Press to decline an incoming call, or end a current call. See Steering Wheel Controls on page 5-2. 5 : Press to the previous or next menu. g : Press to go up or down a page. @: Press to mute or unmute the infotainment system. A white indicator comes on or off. S or T : Press to interact with audio steering wheel controls, some audio controls can be adjusted at the steering wheel. C or B : Press to go up briefly to make the ...
