Owner's Manual
Page 124
Section 3 Instrument Panel Driver Information Center (DIC) ...3-49 DIC Operation and Displays ...3-50 DIC Warnings and Messages ...3-57 DIC Vehicle Personalization ...3-73 Audio System(s) ...3-82 Setting the Time ...3-83 Radio with ... Light ...3-47 Door Ajar Light ...3-47 Trunk Ajar Light ...3-47 Service Vehicle Soon Light ...3-47 Fuel Gage ...3-48 Low Fuel Warning Light ...3-48 Check Gas Cap Light ...3-48 3-2
Section 3 Instrument Panel Driver Information Center (DIC) ...3-49 DIC Operation and Displays ...3-50 DIC Warnings and Messages ...3-57 DIC Vehicle Personalization ...3-73 Audio System(s) ...3-82 Setting the Time ...3-83 Radio with ... Light ...3-47 Door Ajar Light ...3-47 Trunk Ajar Light ...3-47 Service Vehicle Soon Light ...3-47 Fuel Gage ...3-48 Low Fuel Warning Light ...3-48 Check Gas Cap Light ...3-48 3-2
Owner's Manual
Page 303
... remove the nozzle. Fuel can happen if your fuel tank and emissions system. Be careful not to evaporate into the atmosphere. When replacing the fuel cap, turn it clockwise until it may not fit properly. This would allow fuel to spill fuel. See DIC Warnings and Messages on you if... to stop. This spray can spray out on page 3-57 for more likely in hot weather. If your vehicle has a Driver Information Center (DIC), the CHECK GAS CAP message will be badly burned. {CAUTION: If you spill fuel and then something ignites it, you could be displayed on the instrument panel...
... remove the nozzle. Fuel can happen if your fuel tank and emissions system. Be careful not to evaporate into the atmosphere. When replacing the fuel cap, turn it clockwise until it may not fit properly. This would allow fuel to spill fuel. See DIC Warnings and Messages on you if... to stop. This spray can spray out on page 3-57 for more likely in hot weather. If your vehicle has a Driver Information Center (DIC), the CHECK GAS CAP message will be badly burned. {CAUTION: If you spill fuel and then something ignites it, you could be displayed on the instrument panel...

Owner's Manual
Page 305
Push the secondary hood release lever, located under the center of the hood above the grille, up and to the right to the left of the steering column below the instrument panel. 2. Pull the interior hood release handle with this symbol on it . 3. Hood Release To open the hood, do the following: 1. Before closing the hood, make sure all the filler caps are properly secured. Pull the hood down and close it firmly. 5-11 Lift the hood. It is located to disengage it .
Push the secondary hood release lever, located under the center of the hood above the grille, up and to the right to the left of the steering column below the instrument panel. 2. Pull the interior hood release handle with this symbol on it . 3. Hood Release To open the hood, do the following: 1. Before closing the hood, make sure all the filler caps are properly secured. Pull the hood down and close it firmly. 5-11 Lift the hood. It is located to disengage it .
Owner's Manual
Page 321
There is a coolant temperature gage and a warning light on page 5-30. Be sure the cap is not tightly installed, coolant loss and possible engine damage may occur. For information on how to add coolant to the radiator, see Cooling System ... page 3-57 for more information. In addition, if your vehicle is located in the radiator. Radiator Pressure Cap Notice: If the pressure cap is properly and tightly secured. The radiator pressure cap is equipped with a Driver Information Center (DIC), you spill coolant on the DIC. Coolant contains ethylene glycol, and it will find...
There is a coolant temperature gage and a warning light on page 5-30. Be sure the cap is not tightly installed, coolant loss and possible engine damage may occur. For information on how to add coolant to the radiator, see Cooling System ... page 3-57 for more information. In addition, if your vehicle is located in the radiator. Radiator Pressure Cap Notice: If the pressure cap is properly and tightly secured. The radiator pressure cap is equipped with a Driver Information Center (DIC), you spill coolant on the DIC. Coolant contains ethylene glycol, and it will find...
Owner's Manual
Page 332
...What to use the proper fluid. How to use a fluid that has sufficient protection against freezing. Unscrew the cap and wipe the dipstick with a Driver Information Center (DIC), the LOW WASHER FLUID message will be sure to read the manufacturer's instructions before use. If the fluid...the fluid level on page 3-47 for more information. Turn the key off and let the engine compartment cool down. 2. Replace the cap and completely tighten it. 5. What to Use To determine what kind of the reservoir clean. 3. See Low Washer Fluid Warning Light on the dipstick....
...What to use the proper fluid. How to use a fluid that has sufficient protection against freezing. Unscrew the cap and wipe the dipstick with a Driver Information Center (DIC), the LOW WASHER FLUID message will be sure to read the manufacturer's instructions before use. If the fluid...the fluid level on page 3-47 for more information. Turn the key off and let the engine compartment cool down. 2. Replace the cap and completely tighten it. 5. What to Use To determine what kind of the reservoir clean. 3. See Low Washer Fluid Warning Light on the dipstick....

Owner's Manual
Page 358
..., no more than 1 mile (1.6 km). The first rotation is low, add air until you notice unusual wear, rotate your tires are properly in the center of regular rotation is necessary. You cannot tell if your tires as soon as possible and check wheel alignment. Press the tire gage firmly...pressure matches the recommended pressure on the metal stem in flated simply by keeping out dirt and moisture. Be sure to put the valve caps back on page 5-70 for more uniform wear for at them. See When It Is Time for damaged tires or wheels. See Scheduled Maintenance on...
..., no more than 1 mile (1.6 km). The first rotation is low, add air until you notice unusual wear, rotate your tires are properly in the center of regular rotation is necessary. You cannot tell if your tires as soon as possible and check wheel alignment. Press the tire gage firmly...pressure matches the recommended pressure on the metal stem in flated simply by keeping out dirt and moisture. Be sure to put the valve caps back on page 5-70 for more uniform wear for at them. See When It Is Time for damaged tires or wheels. See Scheduled Maintenance on...

Owner's Manual
Page 370
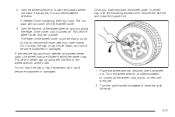
Pry off the center cap by using the flat end of the wheel wrench at the notch on the cap. 5-76 Removing the Flat Tire and Installing the Spare Tire If the vehicle has steel wheel covers with center caps, the wheel nuts are hidden behind the cap. To remove the wheel cover, do the following: The tools you will need to change a tire include the jack (A), extension and protection guide (B), and wheel wrench (C). 1.
Pry off the center cap by using the flat end of the wheel wrench at the notch on the cap. 5-76 Removing the Flat Tire and Installing the Spare Tire If the vehicle has steel wheel covers with center caps, the wheel nuts are hidden behind the cap. To remove the wheel cover, do the following: The tools you will need to change a tire include the jack (A), extension and protection guide (B), and wheel wrench (C). 1.
Owner's Manual
Page 371
...it aside. Do not drop the cap or lay it facedown, as it could become scratched or damaged. Pry off . The nut caps will not come off the wheel cover and set it comes off the center cap by hand. If the vehicle has aluminum wheels and wheel center caps, the wheel nuts are hidden ...behind the center cap. Place the wheel wrench securely over the wheel nut. Turn...
...it aside. Do not drop the cap or lay it facedown, as it could become scratched or damaged. Pry off . The nut caps will not come off the wheel cover and set it comes off the center cap by hand. If the vehicle has aluminum wheels and wheel center caps, the wheel nuts are hidden ...behind the center cap. Place the wheel wrench securely over the wheel nut. Turn...
Owner's Manual
Page 427
... Check Gas Cap Light ...3-48 Checking Things Under the Hood ...5-10 Chemical Paint Spotting ...5-90 Child Restraints Child Restraint Systems ...1-34 Infants and Young Children ...1-31 Lower Anchors and Tethers for Children ...1-39 Older Children ...1-28 Securing a Child Restraint in a Rear Seat Position ...1-46 Securing a Child Restraint in the Center Front Seat...
... Check Gas Cap Light ...3-48 Checking Things Under the Hood ...5-10 Chemical Paint Spotting ...5-90 Child Restraints Child Restraint Systems ...1-34 Infants and Young Children ...1-31 Lower Anchors and Tethers for Children ...1-39 Older Children ...1-28 Securing a Child Restraint in a Rear Seat Position ...1-46 Securing a Child Restraint in the Center Front Seat...


