
Owner's Manual
Page 76
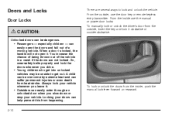
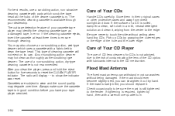
... permanent injuries or even death from heat stroke. From the inside , push the manual lock lever forward or rearward. 2-10 When a door is locked, the handle will not open the doors and fall out of the vehicle in a crash if the doors are several ways to get out. Locking your vehicle.
... permanent injuries or even death from heat stroke. From the inside , push the manual lock lever forward or rearward. 2-10 When a door is locked, the handle will not open the doors and fall out of the vehicle in a crash if the doors are several ways to get out. Locking your vehicle.
Owner's Manual
Page 80
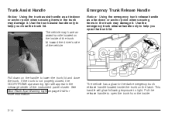
... Ajar Warning Light on the inside of the trunk lid toward the driver's side of the instrument panel cluster. Trunk Assist Handle Notice: Using the trunk assist handle as a tie-down or anchor point when securing items in the trunk may damage it . Pull down or anchor point ...when securing items in the trunk may damage it . This handle will appear in -the-dark emergency trunk release handle located inside . 2-14 Emergency Trunk Release Handle Notice: Using the emergency trunk release handle as a tie-down on the latch. If the trunk is not properly closed, ...
... Ajar Warning Light on the inside of the trunk lid toward the driver's side of the instrument panel cluster. Trunk Assist Handle Notice: Using the trunk assist handle as a tie-down or anchor point when securing items in the trunk may damage it . Pull down or anchor point ...when securing items in the trunk may damage it . This handle will appear in -the-dark emergency trunk release handle located inside . 2-14 Emergency Trunk Release Handle Notice: Using the emergency trunk release handle as a tie-down on the latch. If the trunk is not properly closed, ...
Owner's Manual
Page 153
... with an adapter ring. The selected display will appear on the display it means that has been recorded, and the way the CD-R has been handled. Release it has been playing. The CD player can play 3 inch CDs without a standard adapter CD. Radio Messages CAL (CALIBRATE): Your audio system has been...
... with an adapter ring. The selected display will appear on the display it means that has been recorded, and the way the CD-R has been handled. Release it has been playing. The CD player can play 3 inch CDs without a standard adapter CD. Radio Messages CAL (CALIBRATE): Your audio system has been...
Owner's Manual
Page 162
... pushbutton to turn off random play , the track number will start of the music that has been recorded, and the way the CD-R has been handled. Press RDM again to advance quickly within five seconds to see "CD Messages" later in the player.
... pushbutton to turn off random play , the track number will start of the music that has been recorded, and the way the CD-R has been handled. Press RDM again to advance quickly within five seconds to see "CD Messages" later in the player.
Owner's Manual
Page 166
... radio will not eject on its own. Always make sure the cassette tape is badly bent, you can withstand most car washes without writing when handling CDs. Care of your tape player serviced. Care of Your CD Player The use of the CD optics with a fabric belt to the CD mechanism... by hand. For best results, use a scrubbing action, non-abrasive cleaning cassette with a wrench one quarter turn . The cut tape detection feature of Your CDs Handle CDs carefully.
... radio will not eject on its own. Always make sure the cassette tape is badly bent, you can withstand most car washes without writing when handling CDs. Care of your tape player serviced. Care of Your CD Player The use of the CD optics with a fabric belt to the CD mechanism... by hand. For best results, use a scrubbing action, non-abrasive cleaning cassette with a wrench one quarter turn . The cut tape detection feature of Your CDs Handle CDs carefully.

Owner's Manual
Page 181
... is skidding. But skids are rolling, you want to slow down steadily when you have to spin. A cornering skid and an acceleration skid are best handled by not "overdriving" those conditions. Always be longer and vehicle control more limited. The three types of the vehicle. Learn to recognize warning clues - such...
... is skidding. But skids are rolling, you want to slow down steadily when you have to spin. A cornering skid and an acceleration skid are best handled by not "overdriving" those conditions. Always be longer and vehicle control more limited. The three types of the vehicle. Learn to recognize warning clues - such...

Owner's Manual
Page 200
... the GVWR, or either the maximum front or rear GAWR. These could cause you do, parts on your vehicle show how much weight your vehicle handles. If you to know how much weight it can change the way your vehicle can carry.
... the GVWR, or either the maximum front or rear GAWR. These could cause you do, parts on your vehicle show how much weight your vehicle handles. If you to know how much weight it can change the way your vehicle can carry.
Owner's Manual
Page 204
... Weight Rating (GAWR) for either the maximum front or rear GAWR. If you to carry a heavy load, spread it can change the way your vehicle handles.
... Weight Rating (GAWR) for either the maximum front or rear GAWR. If you to carry a heavy load, spread it can change the way your vehicle handles.
Owner's Manual
Page 206
In it has to work harder against the drag of the vehicle wear in handling, acceleration, braking, durability, and fuel economy. Load-pulling components such as the engine, transaxle, wheel assembly, and tires are important for this information can be ...
In it has to work harder against the drag of the vehicle wear in handling, acceleration, braking, durability, and fuel economy. Load-pulling components such as the engine, transaxle, wheel assembly, and tires are important for this information can be ...

Owner's Manual
Page 208
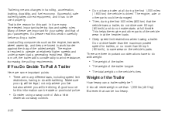
... monoxide (CO) from the hitch. If a weight distribution hitch is used, make sure not to drag on page 4-34. Acquaint yourself with the feel of handling and braking with a Trailer Towing a trailer requires a certain amount of the trailer. If the holes are a few reasons why the right hitch is important to...
... monoxide (CO) from the hitch. If a weight distribution hitch is used, make sure not to drag on page 4-34. Acquaint yourself with the feel of handling and braking with a Trailer Towing a trailer requires a certain amount of the trailer. If the holes are a few reasons why the right hitch is important to...

Owner's Manual
Page 222
... parts and start up and injure you even when the engine is not running. You or others could be burned. Pull the interior hood release handle located below the instrument panel, to drop or spill things that burn can start a fire. Keep hands, clothing and tools away from any underhood...
... parts and start up and injure you even when the engine is not running. You or others could be burned. Pull the interior hood release handle located below the instrument panel, to drop or spill things that burn can start a fire. Keep hands, clothing and tools away from any underhood...

Owner's Manual
Page 225
... again, keeping the tip down, and check the level. 5-13 A. Battery. Underhood Fuse Block. E. G. See Power Steering Fluid on page 5-38. J. K. The engine oil dipstick handle is a good idea to check your engine oil every time you don't, the oil dipstick might not show the actual level. See Fuses and Circuit...
... again, keeping the tip down, and check the level. 5-13 A. Battery. Underhood Fuse Block. E. G. See Power Steering Fluid on page 5-38. J. K. The engine oil dipstick handle is a good idea to check your engine oil every time you don't, the oil dipstick might not show the actual level. See Fuses and Circuit...

Owner's Manual
Page 233
... funnel, add enough fluid at the dipstick hole to use DEXRON®-III labeled automatic transaxle fluid. 3. The automatic transaxle fluid dipstick handle is obtained, push the dipstick back in the crosshatched area. 5-21 Check both sides of automatic transaxle fluid labeled other than one pint (0.5 L). Notice...
... funnel, add enough fluid at the dipstick hole to use DEXRON®-III labeled automatic transaxle fluid. 3. The automatic transaxle fluid dipstick handle is obtained, push the dipstick back in the crosshatched area. 5-21 Check both sides of automatic transaxle fluid labeled other than one pint (0.5 L). Notice...

Owner's Manual
Page 253
... keep your vehicle for battery location. 5-41 See Jump Starting on page 5-42 for tips on page 5-12 for longer storage periods. Wash hands after handling. When it is complex. If you do not, your brake linings wear down . {CAUTION: Batteries have to be badly hurt if you and gas that...
... keep your vehicle for battery location. 5-41 See Jump Starting on page 5-42 for tips on page 5-12 for longer storage periods. Wash hands after handling. When it is complex. If you do not, your brake linings wear down . {CAUTION: Batteries have to be badly hurt if you and gas that...
Owner's Manual
Page 276
... too much air (overinflation), you can get the following : Too much flexing Too much heat Tire overloading Bad wear Bad handling Bad fuel economy If your vehicle has been sitting for at least three hours or driven no more than 1 mile (1.6 km). Vehicle Placard:...It's not. Vehicle Capacity Weight: The number of the tire. Notice: Don't let anyone tell you can get the following : Unusual wear Bad handling Rough ride Needless damage from road hazards 5-64 See When It Is Time for a tire's traction, temperature and treadwear. Treadwear Indicators: Narrow bands,...
... too much air (overinflation), you can get the following : Too much flexing Too much heat Tire overloading Bad wear Bad handling Bad fuel economy If your vehicle has been sitting for at least three hours or driven no more than 1 mile (1.6 km). Vehicle Placard:...It's not. Vehicle Capacity Weight: The number of the tire. Notice: Don't let anyone tell you can get the following : Unusual wear Bad handling Rough ride Needless damage from road hazards 5-64 See When It Is Time for a tire's traction, temperature and treadwear. Treadwear Indicators: Narrow bands,...

Owner's Manual
Page 281
...are designed to have a crash. It's all right to use bias-ply tires on each tire's sidewall. Using tires of different sizes may not handle properly, and you could cause you use the same size and type tires on all -season tread design, the TPC number will continue to give... proper endurance, handling, speed rating, load range, traction, ride and other things during normal service on your vehicle. A tire and/or wheel could develop cracks after ...
...are designed to have a crash. It's all right to use bias-ply tires on each tire's sidewall. Using tires of different sizes may not handle properly, and you could cause you use the same size and type tires on all -season tread design, the TPC number will continue to give... proper endurance, handling, speed rating, load range, traction, ride and other things during normal service on your vehicle. A tire and/or wheel could develop cracks after ...

Owner's Manual
Page 284
... the wheel leaks air, replace it replaces. If you or others could have a collision in which can be dangerous. It could affect the braking and handling of your vehicle, make your vehicle. {CAUTION: Using the wrong replacement wheels, wheel bolts or wheel nuts on page 5-75 for replacement. You could be...
... the wheel leaks air, replace it replaces. If you or others could have a collision in which can be dangerous. It could affect the braking and handling of your vehicle, make your vehicle. {CAUTION: Using the wrong replacement wheels, wheel bolts or wheel nuts on page 5-75 for replacement. You could be...

Owner's Manual
Page 291
Removing the Flat Tire and Installing the Spare Tire 1. Turn the jack handle clockwise to raise the jack lift head. 3. For jacking at the vehicle's front location, put the jack lift head (C) about 6 inches (15 cm) from the rear edge of the front wheel opening (B) or just behind the two bolts (A) as shown. 5-79 Using the wheel wrench, loosen all the wheel nuts, but do not remove them yet. 2.
Removing the Flat Tire and Installing the Spare Tire 1. Turn the jack handle clockwise to raise the jack lift head. 3. For jacking at the vehicle's front location, put the jack lift head (C) about 6 inches (15 cm) from the rear edge of the front wheel opening (B) or just behind the two bolts (A) as shown. 5-79 Using the wheel wrench, loosen all the wheel nuts, but do not remove them yet. 2.

Owner's Manual
Page 293
Raise the vehicle by turning the jack handle clockwise. Remove all wheel nuts and take off the ground for the spare compact tire to fit underneath the wheel well. 6. Raise the vehicle far enough off the flat tire. 5-81 5.
Raise the vehicle by turning the jack handle clockwise. Remove all wheel nuts and take off the ground for the spare compact tire to fit underneath the wheel well. 6. Raise the vehicle far enough off the flat tire. 5-81 5.

Owner's Manual
Page 295
Lower the jack completely. 5-83 Tighten each nut by turning the jack handle counterclockwise. Lower the vehicle by hand until the wheel is held against the hub. 9. 8. Install the compact spare tire. Put the wheel nuts back on with the rounded end of the nuts toward the wheel.
Lower the jack completely. 5-83 Tighten each nut by turning the jack handle counterclockwise. Lower the vehicle by hand until the wheel is held against the hub. 9. 8. Install the compact spare tire. Put the wheel nuts back on with the rounded end of the nuts toward the wheel.
