
Owner's Manual
Page 142
... Leaving electrical equipment on for extended periods of ignition position, and for extended periodswill drain your vehicle has front bucket seatswith a center console, you wiii iind iwu uuiieis irlsidt. This wouldn't be pulled down to the accessory power outlets and could result in ...e A fuse is adjusted properly. See Fuses and Circuit Breakers on page 5-90. i i i t . If you ever have a small cap that is designed for additional information on the accessory power outlets. Accessory Power Outlets The accessory power outlets can be compatible to access the accessorypower...
... Leaving electrical equipment on for extended periods of ignition position, and for extended periodswill drain your vehicle has front bucket seatswith a center console, you wiii iind iwu uuiieis irlsidt. This wouldn't be pulled down to the accessory power outlets and could result in ...e A fuse is adjusted properly. See Fuses and Circuit Breakers on page 5-90. i i i t . If you ever have a small cap that is designed for additional information on the accessory power outlets. Accessory Power Outlets The accessory power outlets can be compatible to access the accessorypower...

Owner's Manual
Page 163
... Is On Steady You may be able to evaporate into your vehicle? Turn the key off or improperly installed. A loose or missing fuel cap will usually be wet. If the light stops flashing and remains on steady, see "If the Light Is On Steady" following . If the.... Avoiding hard accelerations. Avoiding steep uphill grades. A few driving trips should turn the light off . If so, your dealer or qualified service center for service. Find a safe place to your vehicle: Reducing vehicle speed. If the Light Is Flashing The following may prevent more serious damage to...
... Is On Steady You may be able to evaporate into your vehicle? Turn the key off or improperly installed. A loose or missing fuel cap will usually be wet. If the light stops flashing and remains on steady, see "If the Light Is On Steady" following . If the.... Avoiding hard accelerations. Avoiding steep uphill grades. A few driving trips should turn the light off . If so, your dealer or qualified service center for service. Find a safe place to your vehicle: Reducing vehicle speed. If the Light Is Flashing The following may prevent more serious damage to...
Owner's Manual
Page 171
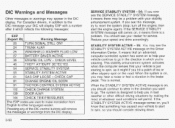
... I I I I I ~~ STABILITY SYSTEM ACTIVE - 55: You may hear a noise or feel a vibration in bad weather or other languages easier. 3-50 CHECK CAP 81 -CHANGEENGINE OIL SOON TACTION CONTROL SYSTEM ACTIVE 91 102 CHECK CHARGE SYSTEM 139 DOOR AJAR ~~~ SERVICE STABILITY SYSTEM - 54: If you ever see your... vehicle continue to spin, so you in the brake pedal. If the SERVICE STABILITY SYSTEM message still comes on the Driver Information Center. This is a problem. When the STABILITY SYSTEM ACTIVE message is on , you should continue to help you should see the SERVICE STABILITY...
... I I I I I ~~ STABILITY SYSTEM ACTIVE - 55: You may hear a noise or feel a vibration in bad weather or other languages easier. 3-50 CHECK CAP 81 -CHANGEENGINE OIL SOON TACTION CONTROL SYSTEM ACTIVE 91 102 CHECK CHARGE SYSTEM 139 DOOR AJAR ~~~ SERVICE STABILITY SYSTEM - 54: If you ever see your... vehicle continue to spin, so you in the brake pedal. If the SERVICE STABILITY SYSTEM message still comes on the Driver Information Center. This is a problem. When the STABILITY SYSTEM ACTIVE message is on , you should continue to help you should see the SERVICE STABILITY...
Owner's Manual
Page 260
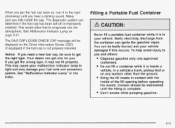
... operating the nozzle. Bring the fill nozzle in contact with the inside a it is in the Index. When you put the fuel cap back on the Driver Information Center (DIC) (if equipped) if the fuel cap is not properly installed. Fi%g a Portable Fun' Cor+ainer Notice: If you need a new fuel... cap, be badly burned and your fuel tank and emissions system. You can get the right type. Contact should be displayed on , turn it...
... operating the nozzle. Bring the fill nozzle in contact with the inside a it is in the Index. When you put the fuel cap back on the Driver Information Center (DIC) (if equipped) if the fuel cap is not properly installed. Fi%g a Portable Fun' Cor+ainer Notice: If you need a new fuel... cap, be badly burned and your fuel tank and emissions system. You can get the right type. Contact should be displayed on , turn it...
Owner's Manual
Page 262
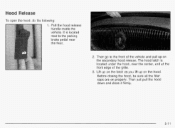
It is located under the hood, near the floor. 2. up on the hood. Lift up on the latch as you lift up on properly. Hood Release To open the hood, do the following: 1. Then go to the parking brake pedal near the center, and at the front edge of the vehiele and p t l l l - The hood latch is located next to the front of the grille. 3. Then just pull the hood down and close it firmly. 5-1 1 Before closing the hood, be sure all the filler caps are on the secondary hood release. Pull the hood release handle inside the vehicle.
It is located under the hood, near the floor. 2. up on the hood. Lift up on the latch as you lift up on properly. Hood Release To open the hood, do the following: 1. Then go to the parking brake pedal near the center, and at the front edge of the vehiele and p t l l l - The hood latch is located next to the front of the grille. 3. Then just pull the hood down and close it firmly. 5-1 1 Before closing the hood, be sure all the filler caps are on the secondary hood release. Pull the hood release handle inside the vehicle.

Owner's Manual
Page 286
Clean the area around the engine oil fill tube and cap before removing. Twist the oil fill tube, with cap attached, in the center of the engine bracket and remove the cover shield. 3.4. If you have the supercharged engine, remove the nut in the valve cover oil fill hole ...until you're ready to access the bleed valve. 3.2. Put the oil fill tube, with cap attached, counterclockwise and...
Clean the area around the engine oil fill tube and cap before removing. Twist the oil fill tube, with cap attached, in the center of the engine bracket and remove the cover shield. 3.4. If you have the supercharged engine, remove the nut in the valve cover oil fill hole ...until you're ready to access the bleed valve. 3.2. Put the oil fill tube, with cap attached, counterclockwise and...
Owner's Manual
Page 287
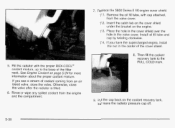
...neck. I V6 engine cover shield. 1 7.1. If you have the supercharged engine, install the nut in the valve cover. 7. Fill the radiator with cap attached, from the engine and the compartment. 9. See Engine Coolant on the engine. 7.3. Place the hole in the cover shield over the hole in ...the center of coolant coming from an air bleed valve, close the valve after the radiator is filled. 6. Replace the 3800 Series I 5. Insert the ...
...neck. I V6 engine cover shield. 1 7.1. If you have the supercharged engine, install the nut in the valve cover. 7. Fill the radiator with cap attached, from the engine and the compartment. 9. See Engine Coolant on the engine. 7.3. Place the hole in the cover shield over the hole in ...the center of coolant coming from an air bleed valve, close the valve after the radiator is filled. 6. Replace the 3800 Series I 5. Insert the ...
Owner's Manual
Page 324
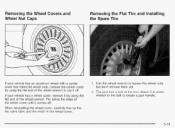
Removing the Wheel Covers and Wheel Nut Caps Removing the Flat Tire and Installing the Spare Tire If your vehicle has a wheel cover, remove it off . 1. Pry along the edge of the wheel .... Attach the vvk& wrench to the bolt to loosen the wheel nuts, but don't remove them yet. 2. If your vehicle has an aluminum wheel with a center cover that hides the wheel nuts, remove the center cover by using the flat end of the wheel wrench.
Removing the Wheel Covers and Wheel Nut Caps Removing the Flat Tire and Installing the Spare Tire If your vehicle has a wheel cover, remove it off . 1. Pry along the edge of the wheel .... Attach the vvk& wrench to the bolt to loosen the wheel nuts, but don't remove them yet. 2. If your vehicle has an aluminum wheel with a center cover that hides the wheel nuts, remove the center cover by using the flat end of the wheel wrench.


