

Owner's Manual
Page 156
...driving position. The HUD controls are located on the instrument panel to use it as in a vehicle without HUD. If you have the HUD dimmer control set. 2. Press the image height adjuster switch to your vehicle, such as a parking aid. If you never look at your engine and slide the HUD... dimmer lever all the way up. Start your instrument panel cluster, you may not see something important, such as a marker for that purpose. Adjust the...
...driving position. The HUD controls are located on the instrument panel to use it as in a vehicle without HUD. If you have the HUD dimmer control set. 2. Press the image height adjuster switch to your vehicle, such as a parking aid. If you never look at your engine and slide the HUD... dimmer lever all the way up. Start your instrument panel cluster, you may not see something important, such as a marker for that purpose. Adjust the...
Owner's Manual
Page 157
... comes out and the sky becomes cloudy, you may look blurred or out of focus. 2-94 A fuse is no brighter than necessary. Slide the dimmer lever downward until the HUD image is blown. Polarized sunglasses could make the HUD image harder to see if: D D D D Something is covering ...to have your HUD image may need to the proper height. The HUD dimmer lever is adjusted to adjust the HUD brightness using the dimmer lever. Clean the inside the unit. 3. Now press the image height adjuster switch to avoid cleaner leaking inside of the HUD system. Gently wipe and ...
... comes out and the sky becomes cloudy, you may look blurred or out of focus. 2-94 A fuse is no brighter than necessary. Slide the dimmer lever downward until the HUD image is blown. Polarized sunglasses could make the HUD image harder to see if: D D D D Something is covering ...to have your HUD image may need to the proper height. The HUD dimmer lever is adjusted to adjust the HUD brightness using the dimmer lever. Clean the inside the unit. 3. Now press the image height adjuster switch to avoid cleaner leaking inside of the HUD system. Gently wipe and ...
Owner's Manual
Page 341
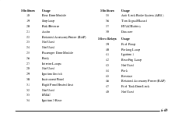
Minifuses 18 19 20 21 22 23 24 25 26 27 28 29 30 31 32 33 34 Usage Rear Door Module Stoplamp Park/Reverse Audio Retained Accessory Power (RAP) Not Used Not Used Passenger Door Module Body Interior Lamps Not Used Ignition Switch Instrument Panel Right Front Heated Seat Not Used HVAC Ignition 3 Rear Minifuses 35 36 37 38 Micro Relays 39 40 41 42 43 44 45 46 47 48 Usage Anti-Lock Brake System (ABS) Turn Signal/Hazard HVAC Battery Dimmer Usage Fuel Pump Parking Lamp Ignition 1 Rear Fog Lamp Not Used Park Reverse Retained Accessory Power (RAP) Fuel Tank Door Lock Not Used 6-69
Minifuses 18 19 20 21 22 23 24 25 26 27 28 29 30 31 32 33 34 Usage Rear Door Module Stoplamp Park/Reverse Audio Retained Accessory Power (RAP) Not Used Not Used Passenger Door Module Body Interior Lamps Not Used Ignition Switch Instrument Panel Right Front Heated Seat Not Used HVAC Ignition 3 Rear Minifuses 35 36 37 38 Micro Relays 39 40 41 42 43 44 45 46 47 48 Usage Anti-Lock Brake System (ABS) Turn Signal/Hazard HVAC Battery Dimmer Usage Fuel Pump Parking Lamp Ignition 1 Rear Fog Lamp Not Used Park Reverse Retained Accessory Power (RAP) Fuel Tank Door Lock Not Used 6-69


