
Owner's Manual
Page 80
... attention if you to activate an alarm by pressing a button on the remote keyless entry transmitter, the headlamps will flash, the horn will honk repeatedly, and the interior lamps will only unlock if your headlamps and back-up lamps for reception of about two minutes has elapsed. Instant Alarm This feature allows...
... attention if you to activate an alarm by pressing a button on the remote keyless entry transmitter, the headlamps will flash, the horn will honk repeatedly, and the interior lamps will only unlock if your headlamps and back-up lamps for reception of about two minutes has elapsed. Instant Alarm This feature allows...
Owner's Manual
Page 81
... programming mode by one of the remote keyless entry transmitter LOCK button will start the customization mode. Mode 1: No Verification Mode 2: Horn Chirp only Mode 3: Headlamp Flash only Mode 4: Horn Chirp and...
... programming mode by one of the remote keyless entry transmitter LOCK button will start the customization mode. Mode 1: No Verification Mode 2: Horn Chirp only Mode 3: Headlamp Flash only Mode 4: Horn Chirp and...
Owner's Manual
Page 106
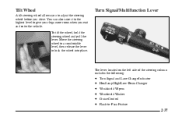
... 2-37 Turn Signal/Multifunction Lever The lever located on the left side of the steering column includes the following: D D D D D D Turn Signal and Lane Change Indicator Headlamp High/Low-Beam Changer Windshield Wipers Windshield Washer Cruise Control Flash-to give your legs more room when you drive.
... 2-37 Turn Signal/Multifunction Lever The lever located on the left side of the steering column includes the following: D D D D D D Turn Signal and Lane Change Indicator Headlamp High/Low-Beam Changer Windshield Wipers Windshield Washer Cruise Control Flash-to give your legs more room when you drive.
Owner's Manual
Page 107
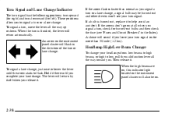
When the turn or a lane change , just raise or lower the lever until you complete your headlamps from low beams to high beams, or high to flash. If the arrows don't go on for burned-out bulbs and then check the fuse (... or a lane change, a signal bulb may be on the instrument panel cluster will sound if you to signal a turn is burned out, replace it . 2-38 Headlamp High/Low-Beam Changer To change your lane change . A chime will flash in the Index). These positions allow you leave your turn or lane change...
When the turn or a lane change , just raise or lower the lever until you complete your headlamps from low beams to high beams, or high to flash. If the arrows don't go on for burned-out bulbs and then check the fuse (... or a lane change, a signal bulb may be on the instrument panel cluster will sound if you to signal a turn is burned out, replace it . 2-38 Headlamp High/Low-Beam Changer To change your lane change . A chime will flash in the Index). These positions allow you leave your turn or lane change...
Owner's Manual
Page 108
...if your blades do become damaged, get new blades or blade inserts. To use your high-beam headlamps to signal the driver in light rain or snow. The wipers will come on . For high...LO, the shorter the delay between wipes. The closer to normal operation. If your headlamps are off or on low beam, your high-beam headlamps will stop them . They'll stay on as long as you hold the band ...on MIST longer. Be sure to LO. If your headlamps are off . For steady wiping at low speed, turn the band to OFF. Windshield Wipers You control...
...if your blades do become damaged, get new blades or blade inserts. To use your high-beam headlamps to signal the driver in light rain or snow. The wipers will come on . For high...LO, the shorter the delay between wipes. The closer to normal operation. If your headlamps are off or on low beam, your high-beam headlamps will stop them . They'll stay on as long as you hold the band ...on MIST longer. Be sure to LO. If your headlamps are off . For steady wiping at low speed, turn the band to OFF. Windshield Wipers You control...
Owner's Manual
Page 112
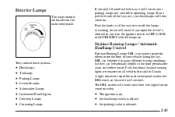
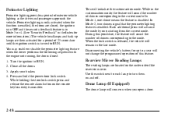
... short periods after dawn and before sunset. If you turn the ignition switch to turn on your parking lamps and your headlamps will sound if you open the driver's door when you pull the knob all vehicles first sold in many different driving .... Exterior Lamps The lamp controls are required on . A warning chime will then come on when: They control these systems: D D D D D D D D Headlamps Taillamps Parking Lamps License Lamps Sidemarker Lamps Instrument Panel Lights Courtesy Lamps Cornering Lamps D The ignition is on . Fully functional daytime running lights are located...
... short periods after dawn and before sunset. If you turn the ignition switch to turn on your parking lamps and your headlamps will sound if you open the driver's door when you pull the knob all vehicles first sold in many different driving .... Exterior Lamps The lamp controls are required on . A warning chime will then come on when: They control these systems: D D D D D D D D Headlamps Taillamps Parking Lamps License Lamps Sidemarker Lamps Instrument Panel Lights Courtesy Lamps Cornering Lamps D The ignition is on . Fully functional daytime running lights are located...
Owner's Manual
Page 113
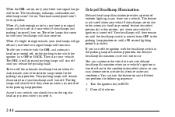
... parking lamps will stay off under the conditions described above, or you turn off the ignition with your headlamps will turn off and your front turn on. The DRL, headlamps and parking lamps will turn signal lamps will be lit if they were on when you release the parking brake.... the ignition key to RUN. 2. Close all the doors. 2-44 Your instrument panel won 't be lit up either. When it's bright enough outside, your headlamps will go off . You can turn off . To turn the feature on and off , set the parking brake while the ignition is activated when your...
... parking lamps will stay off under the conditions described above, or you turn off the ignition with your headlamps will turn off and your front turn on. The DRL, headlamps and parking lamps will turn signal lamps will be lit if they were on when you release the parking brake.... the ignition key to RUN. 2. Close all the doors. 2-44 Your instrument panel won 't be lit up either. When it's bright enough outside, your headlamps will go off . You can turn off . To turn the feature on and off , set the parking brake while the ignition is activated when your...
Owner's Manual
Page 114
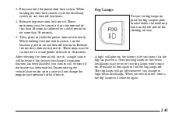
... the button again to turn the fog lamps on, press the fog lamps button located below the headlamp knob on and then off two times. 4. 3. While holding the door unlock switch, turn the headlamp switch on the left side of this feature. Fog Lamps To turn the fog lamps off whenever you... been disabled; Release the power door lock switch. Then, press and hold the power door lock switch. While holding the door lock switch, cycle the headlamp switch on and then off two times. The fog lamps will not change to a year will go off . These operations must be carried out in...
... the button again to turn the fog lamps on, press the fog lamps button located below the headlamp knob on and then off two times. 4. 3. While holding the door unlock switch, turn the headlamp switch on the left side of this feature. Fog Lamps To turn the fog lamps off whenever you... been disabled; Release the power door lock switch. Then, press and hold the power door lock switch. While holding the door lock switch, cycle the headlamp switch on and then off two times. The fog lamps will not change to a year will go off . These operations must be carried out in...
Owner's Manual
Page 117
... current mode. Perimeter Lighting Perimeter lighting provides a period of the rearview mirror. Close all the doors. 3. Disconnecting the vehicle's battery for more information.) The vehicle headlamps and back-up to RUN. 2. During this feature. You may enable or disable the perimeter lighting feature when the driver performs the following sequence with...
... current mode. Perimeter Lighting Perimeter lighting provides a period of the rearview mirror. Close all the doors. 3. Disconnecting the vehicle's battery for more information.) The vehicle headlamps and back-up to RUN. 2. During this feature. You may enable or disable the perimeter lighting feature when the driver performs the following sequence with...

Owner's Manual
Page 119
... mirror. The mirror's two outer buttons operate the lights on the bottom of the mirror. The mirror will darken gradually to reduce glare from headlamps behind you while driving at the bottom of the mirror to night position. To return the mirror to the day position, return the lever to...the center of the mirror face. Push the button in the Index for more information about the services OnStar provides. 2-50 To reduce glare from headlamps behind you . There are also three OnStar buttons located at night, turn this feature on and off by pressing the button next to its ...
... mirror. The mirror's two outer buttons operate the lights on the bottom of the mirror. The mirror will darken gradually to reduce glare from headlamps behind you while driving at the bottom of the mirror to night position. To return the mirror to the day position, return the lever to...the center of the mirror face. Push the button in the Index for more information about the services OnStar provides. 2-50 To reduce glare from headlamps behind you . There are also three OnStar buttons located at night, turn this feature on and off by pressing the button next to its ...

Owner's Manual
Page 120
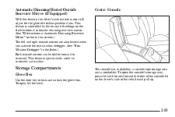
... clean them with the OnStar System. The automatic dimming feature is becoming dark outside. See your dealer for more information. Another photocell, facing rearward, senses headlamps behind you. Electrochromic Day/Night Rearview Mirror with OnStarR and Map Lamps (If Equipped) Your vehicle may have an automatic electrochromic day/night rearview mirror...
... clean them with the OnStar System. The automatic dimming feature is becoming dark outside. See your dealer for more information. Another photocell, facing rearward, senses headlamps behind you. Electrochromic Day/Night Rearview Mirror with OnStarR and Map Lamps (If Equipped) Your vehicle may have an automatic electrochromic day/night rearview mirror...
Owner's Manual
Page 122
... Index.) Both outside mirrors can be folded forward or rearward. This feature is controlled by the on and off settings on the driver's side of headlamps behind you activate the rear window defogger. (See "Rear Window Defogger" in automatic car washes. To open the console's storage area, press the latch located...
... Index.) Both outside mirrors can be folded forward or rearward. This feature is controlled by the on and off settings on the driver's side of headlamps behind you activate the rear window defogger. (See "Rear Window Defogger" in automatic car washes. To open the console's storage area, press the latch located...

Owner's Manual
Page 196
D Don't drink and drive. headlamps can 't see as well, you may need to slow down , especially on night driving. D Slow down and keep more dangerous than day driving. Your D In ...remote areas, watch for animals. Night driving is that some tips on higher speed roads. D Adjust your inside rearview mirror to reduce the glare from headlamps behind you 're tired, pull off the road in a safe place and rest. by alcohol or drugs, with night vision problems, or by fatigue. 4-18...
D Don't drink and drive. headlamps can 't see as well, you may need to slow down , especially on night driving. D Slow down and keep more dangerous than day driving. Your D In ...remote areas, watch for animals. Night driving is that some tips on higher speed roads. D Adjust your inside rearview mirror to reduce the glare from headlamps behind you 're tired, pull off the road in a safe place and rest. by alcohol or drugs, with night vision problems, or by fatigue. 4-18...

Owner's Manual
Page 197
... in a turn or curve. Avoid staring directly into the approaching headlamps. that your headlamps light up a film caused by dust. They may require at least twice as much worse by approaching headlamps. Some drivers suffer from headlamps, but they also make a lot of your eyes to readjust...glare (as from a driver who doesn't lower the high beams, or a vehicle with misaimed headlamps), slow down on the glass. You can be examined regularly. Just as your headlamps should be checked regularly for your eyes contract repeatedly. No one can see as well at ...
... in a turn or curve. Avoid staring directly into the approaching headlamps. that your headlamps light up a film caused by dust. They may require at least twice as much worse by approaching headlamps. Some drivers suffer from headlamps, but they also make a lot of your eyes to readjust...glare (as from a driver who doesn't lower the high beams, or a vehicle with misaimed headlamps), slow down on the glass. You can be examined regularly. Just as your headlamps should be checked regularly for your eyes contract repeatedly. No one can see as well at ...
Owner's Manual
Page 209
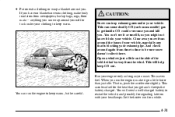
... on extra clothing or wrap a blanket around you must. Open a window just a little on the side of your vehicle, especially any that is in your headlamps. Let the heater run the engine to be careful. 4-31 Clear away snow from time to time to keep CO out. That is, push the...
... on extra clothing or wrap a blanket around you must. Open a window just a little on the side of your vehicle, especially any that is in your headlamps. Let the heater run the engine to be careful. 4-31 Clear away snow from time to time to keep CO out. That is, push the...
Owner's Manual
Page 289
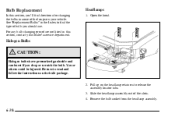
...you'll find the type of bulb you drop or scratch the bulb. Pull up on the headlamp retainers to read and follow the instructions on your dealer's service department. Slide the headlamp assembly out of the lamps on the bulb package. 2. Bulb Replacement In this section, contact... your vehicle. For any bulb changing procedure not listed in some of the slots. 4. Remove the bulb socket from the headlamp assembly. 6-38
...you'll find the type of bulb you drop or scratch the bulb. Pull up on the headlamp retainers to read and follow the instructions on your dealer's service department. Slide the headlamp assembly out of the lamps on the bulb package. 2. Bulb Replacement In this section, contact... your vehicle. For any bulb changing procedure not listed in some of the slots. 4. Remove the bulb socket from the headlamp assembly. 6-38
Owner's Manual
Page 290
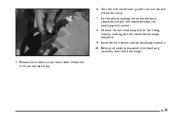
Reverse all steps to the wiring harness, making sure the connector tab snaps into the headlamp assembly. 10. Turn the bulb socket one-quarter turn and remove it from behind the bulb you are replacing). 6-39 Remove the rubber access cover (from the lamp. 7. 6. Connect the new headlamp bulb to reassemble the headlamp assembly, then check the lamps. 5. Insert the bulb socket into place. 9. Lift the plastic locking tab on the electrical connector and pull the connector from the headlamp bulb socket. 8.
Reverse all steps to the wiring harness, making sure the connector tab snaps into the headlamp assembly. 10. Turn the bulb socket one-quarter turn and remove it from behind the bulb you are replacing). 6-39 Remove the rubber access cover (from the lamp. 7. 6. Connect the new headlamp bulb to reassemble the headlamp assembly, then check the lamps. 5. Insert the bulb socket into place. 9. Lift the plastic locking tab on the electrical connector and pull the connector from the headlamp bulb socket. 8.

Owner's Manual
Page 291
... is difficult to re-aim your vehicle is possible for service; NOTICE: To make sure your dealer for you believe your headlamps need no further adjustment. If you to see lane markers (for horizontal aim), or if oncoming drivers flash their scales. D The vehicle must remain...is damaged in the following procedure. vehicle, except it . D The vehicle should have any cargo or loading of fuel and one hour prior to your headlamps are aimed properly, read all four tires on a perfectly D If necessary, pads may be re-aimed, we recommend that you (for one person or...
... is difficult to re-aim your vehicle is possible for service; NOTICE: To make sure your dealer for you believe your headlamps need no further adjustment. If you to see lane markers (for horizontal aim), or if oncoming drivers flash their scales. D The vehicle must remain...is damaged in the following procedure. vehicle, except it . D The vehicle should have any cargo or loading of fuel and one hour prior to your headlamps are aimed properly, read all four tires on a perfectly D If necessary, pads may be re-aimed, we recommend that you (for one person or...

Owner's Manual
Page 292
... and the aiming screw for the horizontal aim indicator is on the outboard side of the headlamp cover (B). Horizontal Block Index Plate C. Driver's Side Headlamp Shown A. Vertical Aim Adjustment Screw B. Passenger's Side Headlamp Shown A. Horizontal Aim Adjustment Screw Open the hood and locate the vertical and horizontal aim indicators. Horizontal Aim Adjustment Screw...
... and the aiming screw for the horizontal aim indicator is on the outboard side of the headlamp cover (B). Horizontal Block Index Plate C. Driver's Side Headlamp Shown A. Vertical Aim Adjustment Screw B. Passenger's Side Headlamp Shown A. Horizontal Aim Adjustment Screw Open the hood and locate the vertical and horizontal aim indicators. Horizontal Aim Adjustment Screw...
Owner's Manual
Page 293
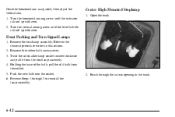
... the level bubble is lined up with zero. Holding the base of the bulb, pull the old bulb from the headlamp assembly. 4. Push the new bulb into the socket. 6. Remove the headlamp assembly. Twist the sidemarker lamp socket counterclockwise and pull it from the socket. 5. Center High-Mounted Stoplamp 1. Remove the rubber...
... the level bubble is lined up with zero. Holding the base of the bulb, pull the old bulb from the headlamp assembly. 4. Push the new bulb into the socket. 6. Remove the headlamp assembly. Twist the sidemarker lamp socket counterclockwise and pull it from the socket. 5. Center High-Mounted Stoplamp 1. Remove the rubber...