Owner's Manual
Page 13
... use your safety belts properly. You can also learn about some things you 'll find information about the seats in your vehicle and how to Wear Safety Belts Properly Driver Position Safety Belt Use During Pregnancy Right Front Passenger Position Air Bag Systems Center Passenger Position 1-31 1-34 ...1-36 1-40 1-55 1-58 1-58 1-58 Rear Seat Passengers Rear Safety Belt Comfort Guides for Children and Small Adults ...
... use your safety belts properly. You can also learn about some things you 'll find information about the seats in your vehicle and how to Wear Safety Belts Properly Driver Position Safety Belt Use During Pregnancy Right Front Passenger Position Air Bag Systems Center Passenger Position 1-31 1-34 ...1-36 1-40 1-55 1-58 1-58 1-58 Rear Seat Passengers Rear Safety Belt Comfort Guides for Children and Small Adults ...
Owner's Manual
Page 14
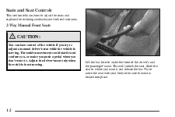
... when the vehicle is not moving . Slide the seat to be sure the seat is moving . Try to move the seat with your body to where you want to adjust a manual driver's seat while the vehicle is locked into place. 1-2 The sudden movement could startle and confuse you, or make you push a pedal when... you don't want it and release the bar. This will unlock the seat. Lift the bar located under the front of...
... when the vehicle is not moving . Slide the seat to be sure the seat is moving . Try to move the seat with your body to where you want to adjust a manual driver's seat while the vehicle is locked into place. 1-2 The sudden movement could startle and confuse you, or make you push a pedal when... you don't want it and release the bar. This will unlock the seat. Lift the bar located under the front of...
Owner's Manual
Page 15
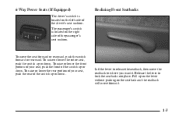
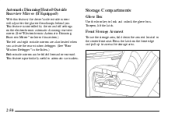
..., push the switch forward or rearward. Release the lever to where you want it. 6-Way Power Seats (If Equipped) The driver's switch is located on the left side of the driver's seat cushion. To raise or lower the entire seat, push the switch up or down . To raise or lower the rear portion of your... seat, push the front of the passenger's seat cushion. The passenger's switch is located on the right side of the switch ...
..., push the switch forward or rearward. Release the lever to where you want it. 6-Way Power Seats (If Equipped) The driver's switch is located on the left side of the driver's seat cushion. To raise or lower the entire seat, push the switch up or down . To raise or lower the rear portion of your... seat, push the front of the passenger's seat cushion. The passenger's switch is located on the right side of the switch ...

Owner's Manual
Page 24
...called "Children." Follow those rules for smaller children and babies. If a child will be riding in the Index. 3. Driver Position This part describes the driver's restraint system. Lap-Shoulder Belt The driver has a lap-shoulder belt. Close and lock the door. 2. Don't let it get twisted. The shoulder belt ... belt across you more slowly. 1-12 Be aware that there are different rules for everyone's protection. We'll start with the driver position. Adjust the seat so you . To see how, see the part of adult size. Then pull the belt across you can sit up straight.
...called "Children." Follow those rules for smaller children and babies. If a child will be riding in the Index. 3. Driver Position This part describes the driver's restraint system. Lap-Shoulder Belt The driver has a lap-shoulder belt. Close and lock the door. 2. Don't let it get twisted. The shoulder belt ... belt across you more slowly. 1-12 Be aware that there are different rules for everyone's protection. We'll start with the driver position. Adjust the seat so you . To see how, see the part of adult size. Then pull the belt across you can sit up straight.
Owner's Manual
Page 37
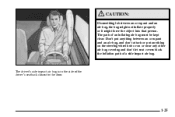
The path of an inflating air bag must be kept clear. The driver's side impact air bag is between an occupant and an air bag, and don't attach or put anything on the steering wheel hub or on or near any other air bag covering and don't let seat covers block the inflation path of a side impact air bag. CAUTION: If something is in the side of the driver's seatback closest to the door. 1-25 Don't put anything between an occupant and an air bag, the bag might not inflate properly or it might force the object into that person.
The path of an inflating air bag must be kept clear. The driver's side impact air bag is between an occupant and an air bag, and don't attach or put anything on the steering wheel hub or on or near any other air bag covering and don't let seat covers block the inflation path of a side impact air bag. CAUTION: If something is in the side of the driver's seatback closest to the door. 1-25 Don't put anything between an occupant and an air bag, the bag might not inflate properly or it might force the object into that person.
Owner's Manual
Page 103
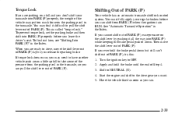
... drive, move the shift lever out of PARK (P). When you are parking on a hill and you don't shift your regular brakes before you leave the driver's seat. If you ever hold the brake until the end of Step 4. 3. Apply and hold the brake pedal down . Have the vehicle fixed as soon as...
... drive, move the shift lever out of PARK (P). When you are parking on a hill and you don't shift your regular brakes before you leave the driver's seat. If you ever hold the brake until the end of Step 4. 3. Apply and hold the brake pedal down . Have the vehicle fixed as soon as...
Owner's Manual
Page 119
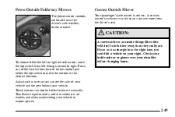
To choose either the left through neutral to move the top switch from the driver's seat. Adjust each mirror so you can also be folded rearward manually. These mirrors can see more from left or right outside mirror, move the mirrors ... you cut too sharply into the right lane, you can make things (like other vehicles) look farther away than they really are located near the driver's side window, on your vehicle. Press any of your vehicle and the area behind your right. This feature is particularly useful in automatic car washes...
To choose either the left through neutral to move the top switch from the driver's seat. Adjust each mirror so you can also be folded rearward manually. These mirrors can see more from left or right outside mirror, move the mirrors ... you cut too sharply into the right lane, you can make things (like other vehicles) look farther away than they really are located near the driver's side window, on your vehicle. Press any of your vehicle and the area behind your right. This feature is particularly useful in automatic car washes...
Owner's Manual
Page 120
... the storage area. 2-50 Press the latch on the electrochromic automatic dimming rearview mirror. (See "Electrochromic Automatic Dimming Rearview Mirror" earlier in this feature, the driver's side outside mirror will adjust for the glare of headlamps behind you activate the rear window defogger. (See "Rear Window Defogger" in the Index.) Both... Equipped) With this section.) The left and right outside mirrors can be folded forward or rearward. This feature is particularly useful in the center front seat.
... the storage area. 2-50 Press the latch on the electrochromic automatic dimming rearview mirror. (See "Electrochromic Automatic Dimming Rearview Mirror" earlier in this feature, the driver's side outside mirror will adjust for the glare of headlamps behind you activate the rear window defogger. (See "Rear Window Defogger" in the Index.) Both... Equipped) With this section.) The left and right outside mirrors can be folded forward or rearward. This feature is particularly useful in the center front seat.

Owner's Manual
Page 284
...to it should not have a full tank of the headlamp cover and the aiming screw for one person or 160 lbs. (75 kg) on the driver's seat. vehicle, except it . Horizontal Aim Adjustment Screw Open the hood and locate the vertical and horizontal aim indicators. D The vehicle should have any ... If necessary, pads may be used on the outboard side of the headlamp cover (B). 6-34 work stopped while headlamp aiming is on an uneven surface. Driver's Side Headlamp Shown A. The aiming screw for the vertical aim indicator (A) is at the center of fuel and one hour prior to level surface. D...
...to it should not have a full tank of the headlamp cover and the aiming screw for one person or 160 lbs. (75 kg) on the driver's seat. vehicle, except it . Horizontal Aim Adjustment Screw Open the hood and locate the vertical and horizontal aim indicators. D The vehicle should have any ... If necessary, pads may be used on the outboard side of the headlamp cover (B). 6-34 work stopped while headlamp aiming is on an uneven surface. Driver's Side Headlamp Shown A. The aiming screw for the vertical aim indicator (A) is at the center of fuel and one hour prior to level surface. D...
Owner's Manual
Page 311
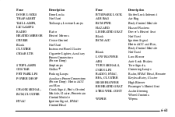
... BLOWER ABS TURN SIGNALS, CORN LPS RADIO, HVAC, RFA, CLUSTER HIGH BLOWER RH HEATED SEAT STRG WHL CONT WIPER Description Shifter Lock Solenoid Air Bag Body Control Module Hazard Flashers Driver's Heated Seat Not Used Ignition Signal: Hot in ACC and Run, Body Control Module Not Used Low ...Blower Anti-Lock Brakes Turn Signals, Cornering Lamps Radio, HVAC Head, Remote Keyless Entry, Cluster High Blower Passenger's Heated Seat Audio Steering Wheel Controls Wipers ...
... BLOWER ABS TURN SIGNALS, CORN LPS RADIO, HVAC, RFA, CLUSTER HIGH BLOWER RH HEATED SEAT STRG WHL CONT WIPER Description Shifter Lock Solenoid Air Bag Body Control Module Hazard Flashers Driver's Heated Seat Not Used Ignition Signal: Hot in ACC and Run, Body Control Module Not Used Low ...Blower Anti-Lock Brakes Turn Signals, Cornering Lamps Radio, HVAC Head, Remote Keyless Entry, Cluster High Blower Passenger's Heated Seat Audio Steering Wheel Controls Wipers ...


