Owner's Manual
Page 14
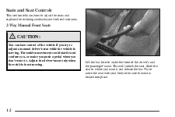
... push a pedal when you want to. Try to move the seat with your body to be sure the seat is not moving . Lift the bar located under the front of the vehicle if you try to adjust a manual driver's seat while the vehicle is moving . Slide the seat to where you...
... push a pedal when you want to. Try to move the seat with your body to be sure the seat is not moving . Lift the bar located under the front of the vehicle if you try to adjust a manual driver's seat while the vehicle is moving . Slide the seat to where you...
Owner's Manual
Page 15
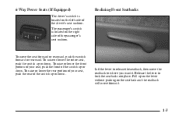
... cushion. Lift the lever to release the seatback, then move the seat forward or rearward, push the switch forward or rearward. The passenger's switch is located on the seatback and the seatback will move forward. 1-3 To raise or lower the rear portion of your seat, push the front of the switch...
... cushion. Lift the lever to release the seatback, then move the seat forward or rearward, push the switch forward or rearward. The passenger's switch is located on the seatback and the seatback will move forward. 1-3 To raise or lower the rear portion of your seat, push the front of the switch...
Owner's Manual
Page 17
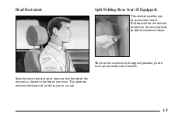
This position reduces the chance of your trunk. Slide the head restraint up and make sure it back up or down . Pull forward on the seat tab, located on the rear seatback, to fold the seatback down so that the top of the restraint is closest to the top of a neck injury in a crash. 1-5 Head Restraints Split Folding Rear Seat (If Equipped) This feature enables you to access your ears. To return the seatback to its original position, push it latches.
This position reduces the chance of your trunk. Slide the head restraint up and make sure it back up or down . Pull forward on the seat tab, located on the rear seatback, to fold the seatback down so that the top of the restraint is closest to the top of a neck injury in a crash. 1-5 Head Restraints Split Folding Rear Seat (If Equipped) This feature enables you to access your ears. To return the seatback to its original position, push it latches.
Owner's Manual
Page 18
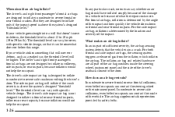
... system. CAUTION: Don't let anyone ride where he or she can be ejected from the tab on the rear of the seatback, located inside seat tab when the release is located on the rear of the manual tells you should not do with safety belts. You can 't wear a safety belt properly. A lockout...
... system. CAUTION: Don't let anyone ride where he or she can be ejected from the tab on the rear of the seatback, located inside seat tab when the release is located on the rear of the manual tells you should not do with safety belts. You can 't wear a safety belt properly. A lockout...
Owner's Manual
Page 38
... the steering wheel, instrument panel and the side of the driver's seatback closest to 29 km/h). For frontal air bags, inflation is determined by the location and severity of gas from the inflator, which inflates the air bag. In an impact of the impact and how quickly the vehicle slows down...
... the steering wheel, instrument panel and the side of the driver's seatback closest to 29 km/h). For frontal air bags, inflation is determined by the location and severity of gas from the inflator, which inflates the air bag. In an impact of the impact and how quickly the vehicle slows down...
Owner's Manual
Page 57
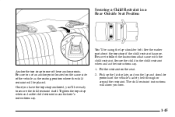
... . 1. Secure the child in a Rear Outside Seat Position You'll be ready to secure the child restraint itself. Be sure to use an anchor point located on the seat. 2. Put the restraint on the same side of the vehicle as the seating position where the child restraint will show you 'll...
... . 1. Secure the child in a Rear Outside Seat Position You'll be ready to secure the child restraint itself. Be sure to use an anchor point located on the seat. 2. Put the restraint on the same side of the vehicle as the seating position where the child restraint will show you 'll...
Owner's Manual
Page 80
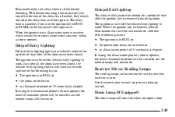
... to use this equipment. Remote Keyless Entry With this feature, you can lock and unlock your doors or unlock your trunk from your D Check the location. Operation is normal for any interference received, including interference that may cause undesired operation. At times you 're still having trouble, see your dealer or...
... to use this equipment. Remote Keyless Entry With this feature, you can lock and unlock your doors or unlock your trunk from your D Check the location. Operation is normal for any interference received, including interference that may cause undesired operation. At times you 're still having trouble, see your dealer or...
Owner's Manual
Page 85
Battery Replacement Under normal use care not to touch any of 40 seconds has elapsed. NOTICE: When replacing the battery, use , the battery in any location. Remember to bring any remaining transmitters with you when you have only four transmitters matched to it 's probably time to change the battery. If a door ...
Battery Replacement Under normal use care not to touch any of 40 seconds has elapsed. NOTICE: When replacing the battery, use , the battery in any location. Remember to bring any remaining transmitters with you when you have only four transmitters matched to it 's probably time to change the battery. If a door ...
Owner's Manual
Page 87
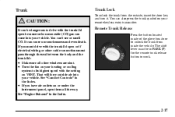
... trunk lid open them all other windows are shut. D If you must drive with the setting on your vehicle. Remote Trunk Release Press the button located inside the vehicle. The shift lever must pass through the seal between the body and the trunk lid: D Make sure all the way. You can...
... trunk lid open them all other windows are shut. D If you must drive with the setting on your vehicle. Remote Trunk Release Press the button located inside the vehicle. The shift lever must pass through the seal between the body and the trunk lid: D Make sure all the way. You can...
Owner's Manual
Page 88
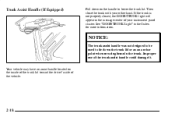
... other hand. NOTICE: The trunk assist handle was not designed to be used to lower the trunk lid. Your vehicle may have an assist handle located on the handle to tie down on the inside of the trunk lid toward the driver's side of the vehicle. 2-18 Trunk Assist Handle (If...
... other hand. NOTICE: The trunk assist handle was not designed to be used to lower the trunk lid. Your vehicle may have an assist handle located on the handle to tie down on the inside of the trunk lid toward the driver's side of the vehicle. 2-18 Trunk Assist Handle (If...
Owner's Manual
Page 89
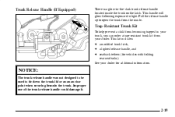
... not designed to be used to tie down the trunk lid or as an anchor point when securing items in -the-dark trunk release handle located inside . Pull the release handle up to light. Improper use of the trunk release handle could damage it. 2-19 Trunk Release Handle (If Equipped) There...
... not designed to be used to tie down the trunk lid or as an anchor point when securing items in -the-dark trunk release handle located inside . Pull the release handle up to light. Improper use of the trunk release handle could damage it. 2-19 Trunk Release Handle (If Equipped) There...
Owner's Manual
Page 95
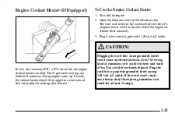
..., the engine coolant heater can help. Open the hood and unwrap the electrical cord. Usually, the coolant heater should be seriously injured. The cord is located above the engine air cleaner filter assembly. 3. Plug the cord into a normal, grounded 110-volt AC outlet. Also, the wrong kind of the vehicle's diagonal...
..., the engine coolant heater can help. Open the hood and unwrap the electrical cord. Usually, the coolant heater should be seriously injured. The cord is located above the engine air cleaner filter assembly. 3. Plug the cord into a normal, grounded 110-volt AC outlet. Also, the wrong kind of the vehicle's diagonal...
Owner's Manual
Page 106
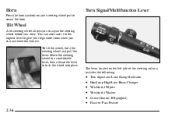
Turn Signal/Multifunction Lever Tilt Wheel A tilt steering wheel allows you to -Pass Feature The lever located on your legs more room when you drive. Move the steering wheel to a comfortable level, then release the lever to give your steering wheel pad ...
Turn Signal/Multifunction Lever Tilt Wheel A tilt steering wheel allows you to -Pass Feature The lever located on your legs more room when you drive. Move the steering wheel to a comfortable level, then release the lever to give your steering wheel pad ...
Owner's Manual
Page 107
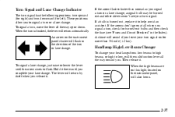
... your turn , move the lever all the way toward you. Headlamp High/Low-Beam Changer To change . When the high beams are on this light, located on the instrument panel, will sound if you leave your lane change . If the arrow flashes faster than 3/4 mile (1.2 km). A chime will also be burned...
... your turn , move the lever all the way toward you. Headlamp High/Low-Beam Changer To change . When the high beams are on this light, located on the instrument panel, will sound if you leave your lane change . If the arrow flashes faster than 3/4 mile (1.2 km). A chime will also be burned...
Owner's Manual
Page 112
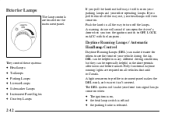
Fully functional daytime running lights are located on the instrument panel. If you pull the knob out halfway, it will then come on when: They control these systems: D D D D D D D Headlamps Taillamps Parking Lamps ...
Fully functional daytime running lights are located on the instrument panel. If you pull the knob out halfway, it will then come on when: They control these systems: D D D D D D D Headlamps Taillamps Parking Lamps ...
Owner's Manual
Page 115
... until one of time after all the doors have been closed . Instead, they go out. The delay time is in RUN, or D the doors are located on . Delayed Exit Lighting This feature illuminates the interior for delayed exit lighting to work . The ignition must be canceled and the interior lamps will...
... until one of time after all the doors have been closed . Instead, they go out. The delay time is in RUN, or D the doors are located on . Delayed Exit Lighting This feature illuminates the interior for delayed exit lighting to work . The ignition must be canceled and the interior lamps will...
Owner's Manual
Page 116
..., push the lever away from day to night position. Inside Day/Night Rearview Mirror with OnStarR and Map Lamps (If Equipped) This mirror has a lever located at the bottom of the mirror toward you (to the night position). This lever is turned to OFF and before any of these lamps on...
..., push the lever away from day to night position. Inside Day/Night Rearview Mirror with OnStarR and Map Lamps (If Equipped) This mirror has a lever located at the bottom of the mirror toward you (to the night position). This lever is turned to OFF and before any of these lamps on...
Owner's Manual
Page 117
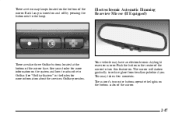
... OnStar provides. See "OnStar System" in the center of the mirror to OnStar. Electrochromic Automatic Dimming Rearview Mirror (If Equipped) There are two map lamps located on and off by pressing the button next to reduce glare from headlamps behind you. Your vehicle may take a few moments. This may have an... on the system and how to subscribe to turn this feature on the bottom sides of the mirror. 2-47 There are also three OnStar buttons located at the bottom of the mirror face. Each lamp is turned on the bottom of the mirror.
... OnStar provides. See "OnStar System" in the center of the mirror to OnStar. Electrochromic Automatic Dimming Rearview Mirror (If Equipped) There are two map lamps located on and off by pressing the button next to reduce glare from headlamps behind you. Your vehicle may take a few moments. This may have an... on the system and how to subscribe to turn this feature on the bottom sides of the mirror. 2-47 There are also three OnStar buttons located at the bottom of the mirror face. Each lamp is turned on the bottom of the mirror.

Owner's Manual
Page 118
... turned on or off by pressing the button next to the lamp. To turn the electrochromic feature off by pressing the far left button, located on the lower part of the mirror face, for more information. Each lamp is becoming dark outside. One photocell on the front of the... of the mirror again. Another photocell, facing rearward, senses headlamps behind you. There are two map lamps located on the bottom of the mirror face. There are also three OnStar buttons located at the bottom of the mirror. See "OnStarR System" in the Index for up to OnStar. Electrochromic ...
... turned on or off by pressing the button next to the lamp. To turn the electrochromic feature off by pressing the far left button, located on the lower part of the mirror face, for more information. Each lamp is becoming dark outside. One photocell on the front of the... of the mirror again. Another photocell, facing rearward, senses headlamps behind you. There are two map lamps located on the bottom of the mirror face. There are also three OnStar buttons located at the bottom of the mirror. See "OnStarR System" in the Index for up to OnStar. Electrochromic ...
Owner's Manual
Page 119
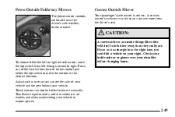
If you cut too sharply into the right lane, you can see the side of the four buttons located on the control pad below the top switch to right. Check your inside mirror or glance over your vehicle in narrow spaces. 2-49 Convex Outside ... neutral to move the top switch from the driver's seat. These mirrors can make things (like other vehicles) look farther away than they really are located near the driver's side window, on your vehicle. To choose either the left or right outside mirror, move the mirrors in automatic car washes and...
If you cut too sharply into the right lane, you can see the side of the four buttons located on the control pad below the top switch to right. Check your inside mirror or glance over your vehicle in narrow spaces. 2-49 Convex Outside ... neutral to move the top switch from the driver's seat. These mirrors can make things (like other vehicles) look farther away than they really are located near the driver's side window, on your vehicle. To choose either the left or right outside mirror, move the mirrors in automatic car washes and...


