
Owner's Manual
Page 19
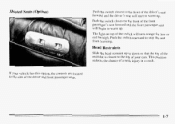
... warm up or down so that the top of the restraint is closest to the top of your vehicle has this option, the controls are located to stop the seat from warming. Heated Seats (Option) Push the switch closest tothe front of the driver and front passenger seats. 1-7 Push the switch...
... warm up or down so that the top of the restraint is closest to the top of your vehicle has this option, the controls are located to stop the seat from warming. Heated Seats (Option) Push the switch closest tothe front of the driver and front passenger seats. 1-7 Push the switch...
Owner's Manual
Page 64
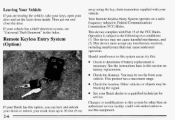
...section on a radio frequency subject to use this option, you can lock and unlock your doors or unlock your vehicle. Check the location. If your door and set the locks from inside. Should interference to determine if battery replacement is subject to the following two ... system by other thanan authorized service facility could void authorization to Federal Communications Commission (FCC) Rules. See your Buick dealer or a qualified technician for service. 0 0 0 If your Buick has this equipment- 2-6 Then get out and close thedoor. This product has a maximum range. away using...
...section on a radio frequency subject to use this option, you can lock and unlock your doors or unlock your vehicle. Check the location. If your door and set the locks from inside. Should interference to determine if battery replacement is subject to the following two ... system by other thanan authorized service facility could void authorization to Federal Communications Commission (FCC) Rules. See your Buick dealer or a qualified technician for service. 0 0 0 If your Buick has this equipment- 2-6 Then get out and close thedoor. This product has a maximum range. away using...

Owner's Manual
Page 67
.... 3. For battery replacement, use , the batteries in as the instructions under the batteries indicate. 2-9 Automatic Pull-Down Feature (Option) If you to get in any location. If you do, you have this feature, it 's probably time to change the batteries. Remove the screw from the back cover. 2. Replace the front cover...
.... 3. For battery replacement, use , the batteries in as the instructions under the batteries indicate. 2-9 Automatic Pull-Down Feature (Option) If you to get in any location. If you do, you have this feature, it 's probably time to change the batteries. Remove the screw from the back cover. 2. Replace the front cover...

Owner's Manual
Page 105
Repeatedly press the CAL switch until the number for your particular location: 2-47 If this happens, follow these instructions to cause falsecompass readings. Note your location on the display. Variance is the difference between the two can be greatenough to set the variance for the new zone entry is displayed, stop ...
Repeatedly press the CAL switch until the number for your particular location: 2-47 If this happens, follow these instructions to cause falsecompass readings. Note your location on the display. Variance is the difference between the two can be greatenough to set the variance for the new zone entry is displayed, stop ...
Owner's Manual
Page 106
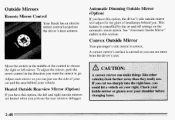
... the driver's seat. Convex Outside Mirror Your passenger's side mirror is curved so you have this section. Outside Mirrors Remote Mirror Control Your Buick has an electric mirror control located on the automatic insidemirror. See "Automatic Inside Mirror" earlier in the directionyou want the mirror to choose the right or leftmirror. A convex...
... the driver's seat. Convex Outside Mirror Your passenger's side mirror is curved so you have this section. Outside Mirrors Remote Mirror Control Your Buick has an electric mirror control located on the automatic insidemirror. See "Automatic Inside Mirror" earlier in the directionyou want the mirror to choose the right or leftmirror. A convex...

Owner's Manual
Page 109
... Moore-O-Matic DT DT2 Ladybug (MIN) Sears 652030 53706/53707 53708/53718 53738 Stanley 1047 1050 1052 1075 1077 1079 Tru-Guard 50TV 54TV B C -X X X X Hole - Location 1 4 X X X X X X X X X X X X To use your garage dooropener is not listed on the chart you have found a pin and hole combination, follow these instructions: X X X X X X X X X X X X X X X X X X X X X X X X 2-51...
... Moore-O-Matic DT DT2 Ladybug (MIN) Sears 652030 53706/53707 53708/53718 53738 Stanley 1047 1050 1052 1075 1077 1079 Tru-Guard 50TV 54TV B C -X X X X Hole - Location 1 4 X X X X X X X X X X X X To use your garage dooropener is not listed on the chart you have found a pin and hole combination, follow these instructions: X X X X X X X X X X X X X X X X X X X X X X X X 2-51...

Owner's Manual
Page 110
While holding the panel and lever, place the panel over your garage door opener in the slot located above the word GARAGE and pry down on the lever as shown. Insert a screwdriver in the storage area, carefully open the cover with a screwdriver, as indicated from the chart. Now install the selected pin into the specified hole on the cover. 3. To place your garage door opener so that the button is over the pin. 2-52 I I 2. Next, carefully pry the panel out of the slots in the cover to disassemble the panel and lever. 4. ' 1.
While holding the panel and lever, place the panel over your garage door opener in the slot located above the word GARAGE and pry down on the lever as shown. Insert a screwdriver in the storage area, carefully open the cover with a screwdriver, as indicated from the chart. Now install the selected pin into the specified hole on the cover. 3. To place your garage door opener so that the button is over the pin. 2-52 I I 2. Next, carefully pry the panel out of the slots in the cover to disassemble the panel and lever. 4. ' 1.
Owner's Manual
Page 116
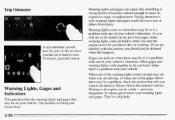
... set it , push the button. When one of the warning lights comes on and stays on briefly when you start the engine justto let you locate them. 2-58 Please followthis manual's advice. They're a big help you know your vehicle's functions. Warning Lights, Gages and Indicators This part describes the warning...
... set it , push the button. When one of the warning lights comes on and stays on briefly when you start the engine justto let you locate them. 2-58 Please followthis manual's advice. They're a big help you know your vehicle's functions. Warning Lights, Gages and Indicators This part describes the warning...

Owner's Manual
Page 121
... go off. (See "Traction Control System" in the Index for an extended period of time when the system is affected by pressing the TRACTION CONTROLbutton located on the instrument panel to the left the steeringwheel the of warning light will come on and stay on , press the button again.
... go off. (See "Traction Control System" in the Index for an extended period of time when the system is affected by pressing the TRACTION CONTROLbutton located on the instrument panel to the left the steeringwheel the of warning light will come on and stay on , press the button again.

Owner's Manual
Page 191
... leave your warranty. 4. The repairs wouldn't be covered your radio on, could be aren't touching ground each other vehicle. Open the hoods and locate the batteries. Turn off the ignitionon both vehicles. NOTICE: If'the other system isn't 12-volt system with a negativeground system. 3. It must... If they are, it by damaged. Turn off the radios and all lamps that aren't needed. To Jump Start Your Buick 1. Check the other . the if Set parking brake firmly on each vehicle.Put an automatic transaxle inPARK (P) or a manual transaxle in NEUTRAL (N). Find the positive(+) and...
... leave your warranty. 4. The repairs wouldn't be covered your radio on, could be aren't touching ground each other vehicle. Open the hoods and locate the batteries. Turn off the ignitionon both vehicles. NOTICE: If'the other system isn't 12-volt system with a negativeground system. 3. It must... If they are, it by damaged. Turn off the radios and all lamps that aren't needed. To Jump Start Your Buick 1. Check the other . the if Set parking brake firmly on each vehicle.Put an automatic transaxle inPARK (P) or a manual transaxle in NEUTRAL (N). Find the positive(+) and...

Owner's Manual
Page 212
There is a notch in the frame. 5-24 The jack handle markings at 8 inches (20 cm) for the has rear and 10 inches (25 cm) for the front, which will help you to locate the jacking notches in the frame near each of the wheels. Next, attach the wheel wrench to the right). . .. , . Don't remove them yet. Fit the top of the jack.Raise the jack alittle bv rotating the wheel wrench clockwise (to the bolt on the end of the jack into the notch nearest the wheel with the flat tire. Position the jack under the vehicle. Using the wheel wrench, loosen all the wheel nuts.
There is a notch in the frame. 5-24 The jack handle markings at 8 inches (20 cm) for the has rear and 10 inches (25 cm) for the front, which will help you to locate the jacking notches in the frame near each of the wheels. Next, attach the wheel wrench to the right). . .. , . Don't remove them yet. Fit the top of the jack.Raise the jack alittle bv rotating the wheel wrench clockwise (to the bolt on the end of the jack into the notch nearest the wheel with the flat tire. Position the jack under the vehicle. Using the wheel wrench, loosen all the wheel nuts.

Owner's Manual
Page 213
Raise the vehicle far enough off the flat tire. 5-25 Be sure to fall the jack. Remove all the wheel nuts and take off the ground so there is enough room for the spare tireto fit. Raise the vehicle by rotating the wheel wrench clockwise. NOTICE: Raising your vehicle with the jack improperly positioned will damage the vehicleor may allow the vehicle to fit the off jack lift head into the proper location before raising your vehicle.
Raise the vehicle far enough off the flat tire. 5-25 Be sure to fall the jack. Remove all the wheel nuts and take off the ground so there is enough room for the spare tireto fit. Raise the vehicle by rotating the wheel wrench clockwise. NOTICE: Raising your vehicle with the jack improperly positioned will damage the vehicleor may allow the vehicle to fit the off jack lift head into the proper location before raising your vehicle.

Owner's Manual
Page 227
There is located in the top of the trunk compartment, on the driver's side of the steering column. While refueling, hang the cap inside the fuel door. 6-7 The release button for the fuel door is to release the fuel door. Pull the white tab to the left of the vehicle. This mechanism is also a manual fuel door release.
There is located in the top of the trunk compartment, on the driver's side of the steering column. While refueling, hang the cap inside the fuel door. 6-7 The release button for the fuel door is to release the fuel door. Pull the white tab to the left of the vehicle. This mechanism is also a manual fuel door release.

Owner's Manual
Page 229
Checking Things Under the Hood Hood Release To open the hood, pull the handle inside thevehicle. It is under the front edge of the grille. 6-9 Then go to the front of the instrument panel. It is located on the lower left side of the vehicle and locate the secondary hood release.
Checking Things Under the Hood Hood Release To open the hood, pull the handle inside thevehicle. It is under the front edge of the grille. 6-9 Then go to the front of the instrument panel. It is located on the lower left side of the vehicle and locate the secondary hood release.

Owner's Manual
Page 244
The repair cost wouldn't be covered your engine could overheat and be badly damaged. When your engine is warm, the level should be up toFULL HOT or a little higher. 6-24 To Check Coolant When your engine is cold, the coolant level should be at the left of the engine compartment. Too much water in the mix can freeze and crack the engine, radiator, heater core and other parts. Adding Coolant NOTICE: If you use an improper coolant mix, your by warranty. The coolant recovery tank is located at FULL COLD or alittle higher.
The repair cost wouldn't be covered your engine could overheat and be badly damaged. When your engine is warm, the level should be up toFULL HOT or a little higher. 6-24 To Check Coolant When your engine is cold, the coolant level should be at the left of the engine compartment. Too much water in the mix can freeze and crack the engine, radiator, heater core and other parts. Adding Coolant NOTICE: If you use an improper coolant mix, your by warranty. The coolant recovery tank is located at FULL COLD or alittle higher.
Owner's Manual
Page 246
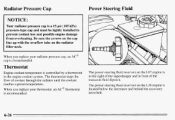
... the cap line up with the overflow tube on the L67 engine is recommended. When you replace your radiator pressure cap, an AC@ cap is located below the alternator and behind the accessory drive belt. 6-26
... the cap line up with the overflow tube on the L67 engine is recommended. When you replace your radiator pressure cap, an AC@ cap is located below the alternator and behind the accessory drive belt. 6-26

Owner's Manual
Page 256
... don't have valve caps, be sure to Check Check your vehicle has been sitting for damaged tires or wheels. It's not. If unusual wear is located on . Also check for at least three hours ordriven no more than a mile. See "When it's Time for New Tires" and "Wheel Replacement'' later in...
... don't have valve caps, be sure to Check Check your vehicle has been sitting for damaged tires or wheels. It's not. If unusual wear is located on . Also check for at least three hours ordriven no more than a mile. See "When it's Time for New Tires" and "Wheel Replacement'' later in...
Owner's Manual
Page 273
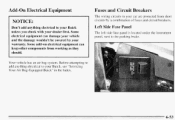
Before attempting t o add anything electrical your Buick to unless you check with your Buick, see "Servicing Your Air Bag-Equipped Buick" in your by a combination of fuses and circuit breakers. Add-on electrical equipment can damage your vehicle and the damage wouldn't be covered... Index. Some electrical equipment can keep other components from short circuits by warranty. Left Side Fuse Panel The left side fuse panel is located under the instrument panel, next to the parking brake. Someadd-on Electrical Equipment NOTICE: Don't add anything electrical to your dealer first.
Before attempting t o add anything electrical your Buick to unless you check with your Buick, see "Servicing Your Air Bag-Equipped Buick" in your by a combination of fuses and circuit breakers. Add-on electrical equipment can damage your vehicle and the damage wouldn't be covered... Index. Some electrical equipment can keep other components from short circuits by warranty. Left Side Fuse Panel The left side fuse panel is located under the instrument panel, next to the parking brake. Someadd-on Electrical Equipment NOTICE: Don't add anything electrical to your dealer first.
Owner's Manual
Page 276
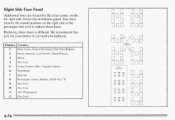
... insulator on the far right side, below the instrument panel. Trunk Pull-Down. Replacing these fuses. Lock Switch. Right Side Fuse Panel Additional fuses are located in the relay center, on the right side of the passenger foot well to replace these fuses is dil'ficult. Trunk Release HQ~IIS Not...
... insulator on the far right side, below the instrument panel. Trunk Pull-Down. Replacing these fuses. Lock Switch. Right Side Fuse Panel Additional fuses are located in the relay center, on the right side of the passenger foot well to replace these fuses is dil'ficult. Trunk Release HQ~IIS Not...
Owner's Manual
Page 277
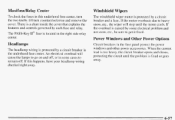
The PASS-Key II@ fuseis located in the fuse panel protect the power windows and other power accessories. Windshield Wipers The windshield wiper motor is too heavy, the circuit breaker opens ...
The PASS-Key II@ fuseis located in the fuse panel protect the power windows and other power accessories. Windshield Wipers The windshield wiper motor is too heavy, the circuit breaker opens ...


