
Owner's Manual
Page 10
... this manual, you'll find a circle with gray background and the word CAUTION to tell you about thingsthat could hurt you if you were to end when they first receivetheir new vehicle. Index A good place to explainthings quickly. It's an alphabetical list of the manual. Then we tell you what you...
... this manual, you'll find a circle with gray background and the word CAUTION to tell you about thingsthat could hurt you if you were to end when they first receivetheir new vehicle. Index A good place to explainthings quickly. It's an alphabetical list of the manual. Then we tell you what you...

Owner's Manual
Page 38
..., someone can sit in a station wagon third seat, you have a lap safety belt, which has no retractor. To make the belt shorter, pull its free end as the lap part of this section. Make sure the release button on the buckle is snug. If the belt isn't longenough, see "Safety Belt... Extender" at the end of a lap-shoulder belt. When you ever had to unbuckle the safety belt quickly if you sit in a center seating position or in the center...
..., someone can sit in a station wagon third seat, you have a lap safety belt, which has no retractor. To make the belt shorter, pull its free end as the lap part of this section. Make sure the release button on the buckle is snug. If the belt isn't longenough, see "Safety Belt... Extender" at the end of a lap-shoulder belt. When you ever had to unbuckle the safety belt quickly if you sit in a center seating position or in the center...

Owner's Manual
Page 40
To make sure itis secure. 3. Make sure the release button on the shoulder part. Pull up on the buckle is not long enough, see "Safety Belt Extender" at the end of the belt as you pull up on the latch plate to . 1-28 If the belt is positioned so you would be able tounbuckle the safety belt quickly if you can buckle it reaches the buckle, tilt the latch plate and keep pulling until you ever had to make the lap part tight, pull down on the buckle end of this section. If the beltstops before it .
To make sure itis secure. 3. Make sure the release button on the shoulder part. Pull up on the buckle is not long enough, see "Safety Belt Extender" at the end of the belt as you pull up on the latch plate to . 1-28 If the belt is positioned so you would be able tounbuckle the safety belt quickly if you can buckle it reaches the buckle, tilt the latch plate and keep pulling until you ever had to make the lap part tight, pull down on the buckle end of this section. If the beltstops before it .

Owner's Manual
Page 54
Follow the instructions for end. 1-42 To make it end for the child restraint. 6. If the belt won't stay tight, switch it tight, pull the belt while you push down on the seat. Secure the child in the child restraint as the instructions say. 9. Put the restraint on the child restraint. 5.
Follow the instructions for end. 1-42 To make it end for the child restraint. 6. If the belt won't stay tight, switch it tight, pull the belt while you push down on the seat. Secure the child in the child restraint as the instructions say. 9. Put the restraint on the child restraint. 5.
Owner's Manual
Page 81
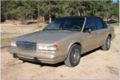
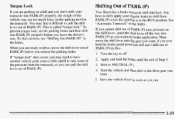
... another vehiclepush yours a little uphill to take some of PARK (P) try this: 11' you 1. If you ever you hold the brake until the end of PARK (P) Your Buick has a brake transaxleshift interlock. Start the vehicle and then shift to the drive gear you want . Torque Lock If you are ready to drive...
... another vehiclepush yours a little uphill to take some of PARK (P) try this: 11' you 1. If you ever you hold the brake until the end of PARK (P) Your Buick has a brake transaxleshift interlock. Start the vehicle and then shift to the drive gear you want . Torque Lock If you are ready to drive...
Owner's Manual
Page 92
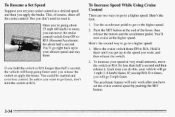
You'll now cruise at the end of course, shutsoff the cruise control.But you don't need to the speed you want to WA. To increase your chosen speed and stay there. ...
You'll now cruise at the end of course, shutsoff the cruise control.But you don't need to the speed you want to WA. To increase your chosen speed and stay there. ...
Owner's Manual
Page 93
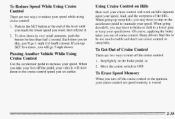
... pedal, your vehicle will go 1 mph (1.6 km/h) slower. Step lightly on the accelerator pedal to keep your speed. Push in the SET button at the end of the hills. To slow down to OFF.
... pedal, your vehicle will go 1 mph (1.6 km/h) slower. Step lightly on the accelerator pedal to keep your speed. Push in the SET button at the end of the hills. To slow down to OFF.

Owner's Manual
Page 101
... let it back onto the roller. To Remove the Cover: You can remove the cover and roller assembly for extra cargo room. Slide back the end sleeve and lift the assembly out of the slots. When the cover isn't in the trim panel near the liftgate. Hold the handleand lift the.... To Use the Cover:Grasp the handleand pull the cover the over the rear storage area. To replace the assembly, reverse the procedure. 2-43 Insert ends of the support rod into the slots in use, roll it roll back automatically. Don't release the handleuntil the cover has rolled back completely.
... let it back onto the roller. To Remove the Cover: You can remove the cover and roller assembly for extra cargo room. Slide back the end sleeve and lift the assembly out of the slots. When the cover isn't in the trim panel near the liftgate. Hold the handleand lift the.... To Use the Cover:Grasp the handleand pull the cover the over the rear storage area. To replace the assembly, reverse the procedure. 2-43 Insert ends of the support rod into the slots in use, roll it roll back automatically. Don't release the handleuntil the cover has rolled back completely.
Owner's Manual
Page 123
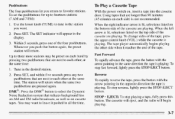
... when the same two pushbuttons arepressed again. When the right indicator arrow is playing. The tape player automatically begins playing the other sidewhen it reachesthe end of 3. The SET indicatorwdl appear in the desired station. Fast Forward To rapidly advance the tape, press the button with the arrow pointing in all...
... when the same two pushbuttons arepressed again. When the right indicator arrow is playing. The tape player automatically begins playing the other sidewhen it reachesthe end of 3. The SET indicatorwdl appear in the desired station. Fast Forward To rapidly advance the tape, press the button with the arrow pointing in all...

Owner's Manual
Page 133
... weather conditions. We've also included many other drivers are about the most preventable of accidents. Please start with a very important safety device in your Buick: Buckle up. (See "Safety Belts" in the Index.) Defensive driving really means "be ready for their mistakes. You never know when the vehicle in front... the Road Defensive Driving The best advice anyone can give about driving is going to brake or turn suddenly. Here you is : Drive defensively. Rear-end collisions are going to be careless and make mistakes.
... weather conditions. We've also included many other drivers are about the most preventable of accidents. Please start with a very important safety device in your Buick: Buckle up. (See "Safety Belts" in the Index.) Defensive driving really means "be ready for their mistakes. You never know when the vehicle in front... the Road Defensive Driving The best advice anyone can give about driving is going to brake or turn suddenly. Here you is : Drive defensively. Rear-end collisions are going to be careless and make mistakes.

Owner's Manual
Page 134
... have been associated with the use of all motor vehicle-related deaths involvealcohol. For persons under 21, it's against the law in an hour will end up with a BAC of victims every year. state to drink alcohol and then drive. The obvious way to solve this highway safety problem is consumed...
... have been associated with the use of all motor vehicle-related deaths involvealcohol. For persons under 21, it's against the law in an hour will end up with a BAC of victims every year. state to drink alcohol and then drive. The obvious way to solve this highway safety problem is consumed...

Owner's Manual
Page 171
... but not near engine parts that move. Now connect the black negative (-) cable to thebattery is much less. -6. Don't let the other end touch metal. The other of the vehicle with the dead battery. 9. Connect the red positive (+) cable to the positive(+) terminal of the ...negative cabledoesn't go end to the dead battery. battery's negative (-) terminal. Connect it to a heavy unpainted metal parton the engine of the good battery. 8. It goes...
... but not near engine parts that move. Now connect the black negative (-) cable to thebattery is much less. -6. Don't let the other end touch metal. The other of the vehicle with the dead battery. 9. Connect the red positive (+) cable to the positive(+) terminal of the ...negative cabledoesn't go end to the dead battery. battery's negative (-) terminal. Connect it to a heavy unpainted metal parton the engine of the good battery. 8. It goes...
Owner's Manual
Page 177
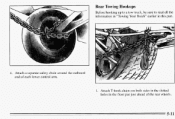
Rear Towing Hookups Before hooking up to a tow truck, be sure to read all the information in "Towing Your Buick" earlier in the tloor pan just ahead of each lower control arm. I 1. Attach T-hook chains on both sides in the slotted holes in this part. 1 4. Attach a separate safety chain around the outboard end of the rear wheels. - 5-11
Rear Towing Hookups Before hooking up to a tow truck, be sure to read all the information in "Towing Your Buick" earlier in the tloor pan just ahead of each lower control arm. I 1. Attach T-hook chains on both sides in the slotted holes in this part. 1 4. Attach a separate safety chain around the outboard end of the rear wheels. - 5-11

Owner's Manual
Page 194
Put the flat end into the notch and carefully pry the small center cover off . Removing the wire wheel cover requires this wire wheel key wrench. Pry along the edge of the wheel wrench to remove the wheel cover. A. Standard Wheel Cover Wire Wheel Cover You will be using the flat end of the wheel cover until it comes off . 5-28
Put the flat end into the notch and carefully pry the small center cover off . Removing the wire wheel cover requires this wire wheel key wrench. Pry along the edge of the wheel wrench to remove the wheel cover. A. Standard Wheel Cover Wire Wheel Cover You will be using the flat end of the wheel cover until it comes off . 5-28

Owner's Manual
Page 195
... wire wheel wrench over the nut and turning it is jacked is supported mly by a jack. 5-29 Raise the jack a little by placing the key end of the jack. Remove the theft deterrent wheel nut by rotating the wheel wrench clockwise (to be changed. If the vehicle slips the jack, you...
... wire wheel wrench over the nut and turning it is jacked is supported mly by a jack. 5-29 Raise the jack a little by placing the key end of the jack. Remove the theft deterrent wheel nut by rotating the wheel wrench clockwise (to be changed. If the vehicle slips the jack, you...

Owner's Manual
Page 197
Remove any rust or dirt from the wheel bolts, mounting surfaces and spare wheel. Replace the wheel nuts with the rounded end of the nuts toward the wheel. 9. Place the spare on mounting surface. 5-31 Tighten each nut by hand until the wheel is held against thehub. Place the spare the wheel on the wheel mounting surface. 10.
Remove any rust or dirt from the wheel bolts, mounting surfaces and spare wheel. Replace the wheel nuts with the rounded end of the nuts toward the wheel. 9. Place the spare on mounting surface. 5-31 Tighten each nut by hand until the wheel is held against thehub. Place the spare the wheel on the wheel mounting surface. 10.

Owner's Manual
Page 242
... Class "S' type chains that are the proper for your tires. Drive slowly and follow the chain manufacturer's instructions. Driving too fast spinning thewheels with the ends securely fastened. NOTICE: The wrongwheel can hear the chains contacting yourvehicle, stop and retighten slow down until it them tightly as possible with chains onwill...
... Class "S' type chains that are the proper for your tires. Drive slowly and follow the chain manufacturer's instructions. Driving too fast spinning thewheels with the ends securely fastened. NOTICE: The wrongwheel can hear the chains contacting yourvehicle, stop and retighten slow down until it them tightly as possible with chains onwill...