

Quick Start Guide
Page 3
The browser will be used to access the Internet and/or access the P-660HNU-F1's Web Configurator. 3 Requirements ENGLISH Make sure you have the following things before you start. • INTERNET ACCESS: You need an Internet account with an ISP (Internet Service Provider) and information such as user name, password, and so on. • WEB BROWSER: Internet Explorer 6.0 and later versions, with JavaScript enabled, or Mozilla Firefox 3 and later versions or Safari 2.0 and later versions.
The browser will be used to access the Internet and/or access the P-660HNU-F1's Web Configurator. 3 Requirements ENGLISH Make sure you have the following things before you start. • INTERNET ACCESS: You need an Internet account with an ISP (Internet Service Provider) and information such as user name, password, and so on. • WEB BROWSER: Internet Explorer 6.0 and later versions, with JavaScript enabled, or Mozilla Firefox 3 and later versions or Safari 2.0 and later versions.

Quick Start Guide
Page 4
Hardware Connections Remove the P-660HNU-F1's plastic wrapping before using it. 1. ANTENNAS: Attach the antennas. 4
Hardware Connections Remove the P-660HNU-F1's plastic wrapping before using it. 1. ANTENNAS: Attach the antennas. 4

Quick Start Guide
Page 5
...USB printer to the DSL/MODEM jack on when the wireless LAN is not activated. 5 DSL: Use a telephone wire to connect this port to the P-660HNU-F1. 5. If you are using a splitter, use an Ethernet cable to connect a computer to the on position and look at the LEDs (lights) on... the top panel of these ports for initial configuration and/or Internet access. 4. POWER: Use the power adaptor provided with your P-660HNU-F1 to connect this socket to the telephone wall jack. 3. The light will not turn on if the corresponding ETHERNET port is properly connected. Use another...
...USB printer to the DSL/MODEM jack on when the wireless LAN is not activated. 5 DSL: Use a telephone wire to connect this port to the P-660HNU-F1. 5. If you are using a splitter, use an Ethernet cable to connect a computer to the on position and look at the LEDs (lights) on... the top panel of these ports for initial configuration and/or Internet access. 4. POWER: Use the power adaptor provided with your P-660HNU-F1 to connect this socket to the telephone wall jack. 3. The light will not turn on if the corresponding ETHERNET port is properly connected. Use another...

Quick Start Guide
Page 6
...) logo - If one of the following methods: 1. If the DSL light is not, you need to www.zyxel.com. If the POWER light does not turn on during start up a wireless connection using the P-660HNU-F1, use one or both of these lights are on if you want to contact your Internet access... If you have the WPS logo - see page 10. see page 7. 2. Internet Access Setup The DSL and INTERNET lights are not on, try turning the P-660HNU-F1 off , check the connections, wait a few seconds and then turn it back on but the INTERNET light is on . Use the wireless SSID (network name...
...) logo - If one of the following methods: 1. If the DSL light is not, you need to www.zyxel.com. If the POWER light does not turn on during start up a wireless connection using the P-660HNU-F1, use one or both of these lights are on if you want to contact your Internet access... If you have the WPS logo - see page 10. see page 7. 2. Internet Access Setup The DSL and INTERNET lights are not on, try turning the P-660HNU-F1 off , check the connections, wait a few seconds and then turn it back on but the INTERNET light is on . Use the wireless SSID (network name...

Quick Start Guide
Page 7
Right-click the wireless adapter icon which appears in the rear panel of your P-660HNU-F1 is enabled by default. Press the WLAN/WPS button on the P-660HNU-F1's top panel for 1 second to the network, use the settings found in the bottom right of the P-660HNU-F1, such as the following: SSID: Zy_private_R9XP9P WPA2-PSK: 7WC3R7TVKWK3R 1. To add a wireless client to turn this function on your computer monitor. Click View Available Wireless Networks. 7 ENGLISH Setting Up a Wireless Connection using the Information on the Label The wireless function on or off.
Right-click the wireless adapter icon which appears in the rear panel of your P-660HNU-F1 is enabled by default. Press the WLAN/WPS button on the P-660HNU-F1's top panel for 1 second to the network, use the settings found in the bottom right of the P-660HNU-F1, such as the following: SSID: Zy_private_R9XP9P WPA2-PSK: 7WC3R7TVKWK3R 1. To add a wireless client to turn this function on your computer monitor. Click View Available Wireless Networks. 7 ENGLISH Setting Up a Wireless Connection using the Information on the Label The wireless function on or off.

Quick Start Guide
Page 8
The SSID "SecureWirelessNetwork" is given here as an example. 2. A 3. You should now be securely connected wirelessly to the wireless network. 5. You may have to wait several minutes while your computer connects to the P-660HNUF1. 8 Enter the WPA-PSK encryption key found in the rear panel of the P-660HNU-F1 and click Connect. 4. You are prompted to enter a password. Select the P-660HNU-F1's SSID name and click Connect (A).
The SSID "SecureWirelessNetwork" is given here as an example. 2. A 3. You should now be securely connected wirelessly to the wireless network. 5. You may have to wait several minutes while your computer connects to the P-660HNUF1. 8 Enter the WPA-PSK encryption key found in the rear panel of the P-660HNU-F1 and click Connect. 4. You are prompted to enter a password. Select the P-660HNU-F1's SSID name and click Connect (A).

Quick Start Guide
Page 9
... to connect near one device at a time with the P-660HNU-F1. 9 The WLAN/WPS light on the P-660HNU-F1. The WLAN/WPS light blinks. 3 Press the WPS button on a compatible device within 2 minutes of the P-660HNU-F1 for more than 5 seconds to the P-660HNU-F1, check that the WLAN/WPS LED on the front panel... is turned on or off. You must use WPS one another. 2 Press the WLAN/WPS button on top of pressing the button on the P660HNU-F1 shines steadily when connected...
... to connect near one device at a time with the P-660HNU-F1. 9 The WLAN/WPS light on the P-660HNU-F1. The WLAN/WPS light blinks. 3 Press the WPS button on a compatible device within 2 minutes of the P-660HNU-F1 for more than 5 seconds to the P-660HNU-F1, check that the WLAN/WPS LED on the front panel... is turned on or off. You must use WPS one another. 2 Press the WLAN/WPS button on top of pressing the button on the P660HNU-F1 shines steadily when connected...

Quick Start Guide
Page 10
... login, enter username admin and password 1234 (default). Click Login. If the login screen does not open, make sure you to configure the P-660HNU-F1. If the INTERNET light is a web browser tool that allows you allow web browser pop-up windows, JavaScript and Java permissions. Click Network Setting, then... Configurator is off, manually configure the Internet connection. For user login, enter user as the username and 1234 as the address. 2. The computer and the P-660HNU-F1 need to be set to use this tool. 1. Open your User's Guide for more information. 3.
... login, enter username admin and password 1234 (default). Click Login. If the login screen does not open, make sure you to configure the P-660HNU-F1. If the INTERNET light is a web browser tool that allows you allow web browser pop-up windows, JavaScript and Java permissions. Click Network Setting, then... Configurator is off, manually configure the Internet connection. For user login, enter user as the username and 1234 as the address. 2. The computer and the P-660HNU-F1 need to be set to use this tool. 1. Open your User's Guide for more information. 3.
Quick Start Guide
Page 12
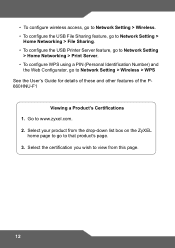
Select the certification you wish to view from the drop-down list box on the ZyXEL home page to go to www.zyxel.com. 2. • To configure wireless access, go to Network Setting > Wireless. • To configure the USB File Sharing feature, go to Network Setting > Home Networking > ..., go to that product's page. 3. Go to Network Setting > Wireless > WPS See the User's Guide for details of these and other features of the P660HNU-F1 Viewing a Product's Certifications 1. Select your product from this page. 12
Select the certification you wish to view from the drop-down list box on the ZyXEL home page to go to www.zyxel.com. 2. • To configure wireless access, go to Network Setting > Wireless. • To configure the USB File Sharing feature, go to Network Setting > Home Networking > ..., go to that product's page. 3. Go to Network Setting > Wireless > WPS See the User's Guide for details of these and other features of the P660HNU-F1 Viewing a Product's Certifications 1. Select your product from this page. 12
User Guide
Page 21
...ADSL Series User's Guide 21 Computers can function as a print server with rich features and performance that use firmware for example P-661HNU-F1, denote a device that works over the analog telephone system, POTS (Plain Old Telephone Service). There is also a complete security ...wireless signal. CHAPTER 1 Introduction 1.1 Overview The ADSL Router Series includes the P-660HNU-Fx, P-660HN-Fx, P-661HNU-Fx (x stands for which the ZyXEL Device is well suited. 1.2.1 Internet Access Your ZyXEL Device provides shared Internet access by connecting the DSL port to the following description...
...ADSL Series User's Guide 21 Computers can function as a print server with rich features and performance that use firmware for example P-661HNU-F1, denote a device that works over the analog telephone system, POTS (Plain Old Telephone Service). There is also a complete security ...wireless signal. CHAPTER 1 Introduction 1.1 Overview The ADSL Router Series includes the P-660HNU-Fx, P-660HN-Fx, P-661HNU-Fx (x stands for which the ZyXEL Device is well suited. 1.2.1 Internet Access Your ZyXEL Device provides shared Internet access by connecting the DSL port to the following description...


