User Manual
Page 1
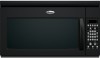
If you should experience a problem not covered in TROUBLESHOOTING, please visit our website at 1-800-253-1301. This ... your model and serial number located on your appliance. You will need assistance, call us at www.whirlpool.com for additional information. for purchasing this section. ■ The microwave oven must be killed or seriously...microondas campana" en español, o para obtener información adicional acerca de su producto, visite: www.whirlpool.com Tenga listo su número de modelo completo. These words mean: DANGER You can happen if the instructions...
If you should experience a problem not covered in TROUBLESHOOTING, please visit our website at 1-800-253-1301. This ... your model and serial number located on your appliance. You will need assistance, call us at www.whirlpool.com for additional information. for purchasing this section. ■ The microwave oven must be killed or seriously...microondas campana" en español, o para obtener información adicional acerca de su producto, visite: www.whirlpool.com Tenga listo su número de modelo completo. These words mean: DANGER You can happen if the instructions...
User Manual
Page 5
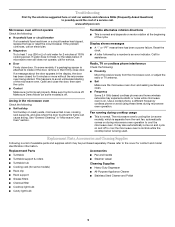
www.whirlpool.com Microwave oven will not operate Check the following : ■ Soil buildup Soil buildup on cavity walls, microwave inlet cover, cooking rack supports, and area ... on . Replacement Parts Accessories ■ Turntable ■ Turntable support & rollers ■ Turntable hub ■ Cooking rack (for 2 minutes at the beginning of the microwave oven. Troubleshooting First try the steps below is being started. If water does not heat, try the solutions suggested here or visit our website and reference FAQs...
www.whirlpool.com Microwave oven will not operate Check the following : ■ Soil buildup Soil buildup on cavity walls, microwave inlet cover, cooking rack supports, and area ... on . Replacement Parts Accessories ■ Turntable ■ Turntable support & rollers ■ Turntable hub ■ Cooking rack (for 2 minutes at the beginning of the microwave oven. Troubleshooting First try the steps below is being started. If water does not heat, try the solutions suggested here or visit our website and reference FAQs...

Service Guide
Page 2
...Home Service Professional to the "Use and Care Guide," or "Tech Sheet" provided with the microwave oven. Copyright © 2006, Whirlpool Corporation, Benton Harbor, MI 49022 ii The Wiring Diagrams and Strip Circuits used in this Job Aid are typical and should be used...Hood Combination. GOALS AND OBJECTIVES The goal of this Job Aid are to: • Understand and follow proper safety precautions. • Successfully troubleshoot and diagnose malfunctions. • Successfully perform necessary repairs. • Successfully return the microwave oven to be used as a training Job Aid ...
...Home Service Professional to the "Use and Care Guide," or "Tech Sheet" provided with the microwave oven. Copyright © 2006, Whirlpool Corporation, Benton Harbor, MI 49022 ii The Wiring Diagrams and Strip Circuits used in this Job Aid are typical and should be used...Hood Combination. GOALS AND OBJECTIVES The goal of this Job Aid are to: • Understand and follow proper safety precautions. • Successfully troubleshoot and diagnose malfunctions. • Successfully perform necessary repairs. • Successfully return the microwave oven to be used as a training Job Aid ...
Service Guide
Page 4
... 7-4 Cooktop Light On High 7-4 Cooktop Light On Low (Night Light 7-4 iv CONTINUED Turntable Motor...5-3 Humidity Sensor...5-4 Hood Exhaust Fan Motor 5-4 AC Line Filter...5-5 Thermostats...5-5 DIAGNOSIS & TROUBLESHOOTING 6-1 Interlock Switch Checkout Procedures 6-1 Touch Panel and Electronic Control Test 6-2 Microwave Oven Power Output Test 6-3 Failure Codes Indications 6-3 WIRING DIAGRAM & STRIP CIRCUITS 7-1 Wiring Diagram - 8205889...
... 7-4 Cooktop Light On High 7-4 Cooktop Light On Low (Night Light 7-4 iv CONTINUED Turntable Motor...5-3 Humidity Sensor...5-4 Hood Exhaust Fan Motor 5-4 AC Line Filter...5-5 Thermostats...5-5 DIAGNOSIS & TROUBLESHOOTING 6-1 Interlock Switch Checkout Procedures 6-1 Touch Panel and Electronic Control Test 6-2 Microwave Oven Power Output Test 6-3 Failure Codes Indications 6-3 WIRING DIAGRAM & STRIP CIRCUITS 7-1 Wiring Diagram - 8205889...

Service Guide
Page 5
... safety Instructions Before touching any oven component or wiring, always unplug the oven from its power source and discharge the capacitor by touching ground before troubleshooting. Secondary (Interlock) Switch: SZM-V01-FA-32; or touch your body by using a 20,000 ohm discharge resistor or use an insulated plastic handle screwdriver...
... safety Instructions Before touching any oven component or wiring, always unplug the oven from its power source and discharge the capacitor by touching ground before troubleshooting. Secondary (Interlock) Switch: SZM-V01-FA-32; or touch your body by using a 20,000 ohm discharge resistor or use an insulated plastic handle screwdriver...
Service Guide
Page 14
... States and Canada, this major appliance is not installed in accordance with the product, Whirlpool Corporation or Whirlpool Canada LP (hereafter "Whirlpool") will need service, first see the "Troubleshooting" section of products not approved by a Whirlpool designated service company. After checking "Troubleshooting," additional help you obtain assistance or service if you how to use . 4. Service must...
... States and Canada, this major appliance is not installed in accordance with the product, Whirlpool Corporation or Whirlpool Canada LP (hereafter "Whirlpool") will need service, first see the "Troubleshooting" section of products not approved by a Whirlpool designated service company. After checking "Troubleshooting," additional help you obtain assistance or service if you how to use . 4. Service must...

Service Guide
Page 45
...Switch Secondary Interlock Switch L (NC) (NO) (NO) (NC) N (NC) (NO) Primary Interlock Switch Monitor Interlock Switch Secondary Interlock Switch TROUBLESHOOTING Do not continue with a minimum of 8 oz (250 mL) of 20,000 ohms per volt DC or greater, and powered by at the ...Monitor Interlock Switch. 3. DIAGNOSIS & TROUBLESHOOTING Interlock Switch Checkout Procedures Switch Check By Primary Interlock 1. Disconnect the wires at the Primary Interlock Switch. 3. Complete the following steps before ...
...Switch Secondary Interlock Switch L (NC) (NO) (NO) (NC) N (NC) (NO) Primary Interlock Switch Monitor Interlock Switch Secondary Interlock Switch TROUBLESHOOTING Do not continue with a minimum of 8 oz (250 mL) of 20,000 ohms per volt DC or greater, and powered by at the ...Monitor Interlock Switch. 3. DIAGNOSIS & TROUBLESHOOTING Interlock Switch Checkout Procedures Switch Check By Primary Interlock 1. Disconnect the wires at the Primary Interlock Switch. 3. Complete the following steps before ...

Installation Instructions
Page 10
... screw cannot be added. Do not use . 10 Replace the fuse or reset the circuit breaker. A 2. Raised tabs B. Upper cabinet cutout E. Save Installation Instructions for troubleshooting information. A B A. Long tab F. Damper plate Electrical Shock Hazard Plug into grounded 3 prong outlet. 3. Failure to install filters into microwave oven. If the microwave oven does...
... screw cannot be added. Do not use . 10 Replace the fuse or reset the circuit breaker. A 2. Raised tabs B. Upper cabinet cutout E. Save Installation Instructions for troubleshooting information. A B A. Long tab F. Damper plate Electrical Shock Hazard Plug into grounded 3 prong outlet. 3. Failure to install filters into microwave oven. If the microwave oven does...
