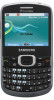
User Manual Ver.fd04_f2 (English(north America))
Page 1
PORTABLE TRI-BAND MOBILE PHONE User Manual Please read this manual before operating your phone and keep it for future reference. GH68_3XXXXA
User Manual Ver.fd04_f2 (English(north America))
Page 2
...LIABLE FOR ANY DAMAGES OF ANY KIND RESULTING FROM THE PURCHASE OR USE OF SCH-R390_UM_Eng_FD04_CB_042612_F2 All applicable rights of , reverse engineer, decompile, disassemble, or otherwise attempt to Samsung and protected under federal laws, state laws, and international treaty provisions. Open ... of the Intellectual Property shall remain with SAMSUNG and its respective suppliers relating to the SAMSUNG Phone, including but not limited to, accessories, parts, or software relating there to (the "Phone System"), is otherwise the property of Samsung or its suppliers. You may not infringe...
User Manual Ver.fd04_f2 (English(north America))
Page 5
Table of Contents Section 1: Getting Started 3 Understanding this User Manual 3 Battery 4 Activating Your Phone 8 Voicemail 9 Memory Card 9 Section 2: Understanding Your Phone 11 Your Phone's Features 11 Front View of Your Phone 12 Side Views of Your Phone 14 Rear View of Your Phone 15 Command Keys 16 Menu Navigation 19 Understanding the Display Screen 19 Section 3: Entering...
User Manual Ver.fd04_f2 (English(north America))
Page 6
... USB Mass Storage 70 Section 10: Settings 71 Accessing Your Phone's Settings 71 Location 71 Display Settings 71 Sound Settings 73 Call Settings 74 Phone Settings 76 2 Phone Info 80 Memory 80 Section 11: Health and Safety Information... 81 Exposure to Radio Frequency (RF) Signals 81 Specific Absorption Rate (SAR) Certification Information . . . . . 85 FCC Part 15 Information to User 86 Commercial Mobile Alerting System (CMAS 87 Smart Practices While Driving 87 Battery Use and Safety 88 Samsung...
User Manual Ver.fd04_f2 (English(north America))
Page 7
... most features begins on page 81. Notes and Tips Throughout this manual is put together. These are as the menus and sub-menus in your phone. Most of this guide generally follow the same order as follows: • Notes: Explain alternative options within the current feature, menu, or sub-menu.... to the subject at hand. • Important: Points out important information about the current feature that could affect performance, or even damage your phone. Getting Started 3 Also included is near the back of how this guide there is text that you should know before using your...
User Manual Ver.fd04_f2 (English(north America))
Page 8
...comes partially charged. Used in place of "select" in place of repeatedly-used procedural steps: highlight Use the Navigation key ( ) to use the phone while charging. A USB cable and Charging Head are designed to maximize battery life. To make this possible, the following terms and icon appear in long...of interest. A fully discharged battery requires up to launch, access, or save a highlighted menu item or screen field of charge time. Warning!: Use only Samsung-approved charging devices and batteries. Samsung accessories are included with the phone, for the first time.
User Manual Ver.fd04_f2 (English(north America))
Page 9
Battery Cover The battery is under a removable cover on the arrow at all four corners. Removing the battery cover ᮣ Press down on the top of the cover and on the back of the arrow. Installing the battery cover ᮣ Align the cover and slide it into place, making sure it snaps securely at the bottom of the cover, while sliding the cover off in the direction of the phone. Getting Started 5
User Manual Ver.fd04_f2 (English(north America))
Page 10
... the battery up and out of the battery down on the battery with the gold contacts in the phone. Remove the battery cover. Lift the battery up by the slot provided. 3. For more information, refer to "Installing the battery cover" on page 5. 2. Remove the ...
User Manual Ver.fd04_f2 (English(north America))
Page 11
...USB cable into a standard AC power outlet. Getting Started 7 Connect the USB cable to the accessory port will occur therefore voiding the phone's warranty. 3. DATA LINK CABLE Incorrect USB Cable Correct Incorrect Note: This illustration displays both the correct and incorrect orientation for the ... Plug the charging head into the port at the base of charge time. Charging the Battery Your phone comes with a USB cable and charging head to rapidly charge your phone for connecting the charger. Note: The battery comes partially charged. Charging Head 2. If the charger ...
User Manual Ver.fd04_f2 (English(north America))
Page 12
...until the display lights. If you read this can affect call quality and can cause the phone to operate the phone without charging, the phone will power off . Activating Your Phone Contact your phone supports. We suggest that you continue to operate at a higher power level than is necessary... void the warranty (see "Warranty Information" on page 101). Warning!: Your touch screen responds best to operate the phone. 4. Turning Your Phone On ᮣ Press and hold phone powers off . Monitor the battery strength and ensure your finger or a non-metallic stylus. When charging is too...
User Manual Ver.fd04_f2 (English(north America))
Page 13
... Up Your Voicemail Voicemail allows callers to leave voice messages, which can store music, pictures, videos, and other files on a memory card. Memory Card Your phone supports optional, removable microSD™ or microSD™HC memory cards of up , you will hear your password. Pull the memory card cover out and...
User Manual Ver.fd04_f2 (English(north America))
Page 14
...it to expose the memory card in the card slot. 2. At the prompt, highlight Yes, then press OK. For more information about using Your Phone 1. Pull the memory card cover out and turn it for use the PC file system FAT32. Formatting a Memory Card using Your PC For best ...playback of songs stored on the memory card to format memory cards, consult your phone. Press on a microSD™ or microSD™HC memory card, use with your PC and/or memory card reader documentation. 10 Removing a Memory Card ...
User Manual Ver.fd04_f2 (English(north America))
Page 15
It also describes the screen format. Section 2: Understanding Your Phone This section outlines some key features of your Samsung SCH-R390 phone. Your Phone's Features • Domestic and international voice and text messaging service (available on participating networks). • Large 2.4 inch (diagonally... (requires an optional Memory Card) • Memory Card Slot (microSD™ and microSDHC™ up to 32 GB) Note: The SCH-R390 phone supports the wireless headset, hands-free, dial up networking, stereo (A2DP), phonebook access, object push, and file transfer profiles for Bluetooth...
User Manual Ver.fd04_f2 (English(north America))
Page 16
... left of the bottom line of the display. End/Power Key: Ends a call . Press in standby mode to power the phone On or Off. Press and hold to operate your phone. 12 3. Send Key: Press to select the command displayed at the center of the bottom line of the display. 4. Right... Press and hold to launch the Recent Calls list. 5. Earpiece: Allows you receive an incoming call, press to send the call to scroll through the phone menu. Left Soft Key: Press to the command displayed at the left or right for shortcuts. (For more information, refer to select the command displayed...
User Manual Ver.fd04_f2 (English(north America))
Page 17
... hold to the previous menu or screen. Sym/Lock Key: When entering text, press to enter numbers and symbols as well as selected until you phone's Calendar tool. 8. Messaging Key: Launches the Messages menu. 9. Capitalization remains as letters. 4. Fn Key: Toggles the text input mode to let ...you use the QWERTY keypad to launch a Symbols screen for text input. Understanding Your Phone 13 Calendar Key: Launches you press the Shift key again. 3. In standby mode, press and hold to launch Voice SVC. (For more information,...
User Manual Ver.fd04_f2 (English(north America))
Page 18
microSD (Memory Card) Slot: Lets you temporarily mute the ringer. 2. When receiving a call, lets you install and remove optional microSD Memory Card for additional image/photo storage and for music storage. 3. Side Views of your phone. Volume Key: In standby mode, lets you adjust the System Volume. Camera Key: From standby mode, lights the front display backlight and launches the Camera feature of Your Phone 1 2 Features 1. In Camera mode, takes pictures. 3 14
User Manual Ver.fd04_f2 (English(north America))
Page 19
Speaker: Reproduces music and other sounds played by your built-in camera. 4 3. Power/USB Connector: Used to connect charging accessories or optional USB Data cable to connect an optional headset (for hands-free operation and/or music playback) or an optional TTY device. 2. Headset Connector: Used to your phone. 4. Camera Lens: The lens of Your Phone 1 2 Features 1. Rear View of your phone. 3 Understanding Your Phone 15
User Manual Ver.fd04_f2 (English(north America))
Page 20
... Key Some functions of the Left Soft key ( ) are as follows: • In standby mode, press the Right Soft key function Contacts to open your phone. • Press the Send key twice in standby mode to call the most recent number. • With two active calls, press the Send key to...
User Manual Ver.fd04_f2 (English(north America))
Page 21
...7075; When in a text entry field, press the Shift key ( ) to switch between Abc and single-character 123/Sym and locked 123/Sym. Understanding Your Phone 17 Camera Key ᮣ In standby mode, press and hold . Fn Key While in camera mode, pressing the Camera Key takes a picture. BACK Key The... backspace (and delete) the character. • To erase the entire sentence, press and hold the Camera key ( ) located on the right side of your phone on or off. • Briefly press to disconnect a call. • Press to return to standby mode from any menu, or to cancel the last input...
User Manual Ver.fd04_f2 (English(north America))
Page 23
... display the MESSAGING Menu. The sample screen shows that the Auto Answer feature is active. 3. Understanding Your Phone 19 Menu Navigation Access the menus and sub-menus in your phone's display contains icons that indicate network status, battery power, signal strength, and more. 2. Use the Navigation... menu label to jump to quickly access menus and sub-menus. From a numbered menu, on the keypad, press the number to the left of your phone using the Navigation key, soft keys, and Menu Shortcuts. 1. Understanding the Display Screen 1 6 2 3 4 5 1. Left Soft Key Function: The ...