Manual
Page 2
... provided and retain this owner's manual. Index Assembling Cleaner 3 How To Use Canister Cleaner 4-5 Cleaner Descriptions 4 Cleaning Stairs 5 Cleaning Tools 5 Rug and Floor Nozzle 4 If You Have a Problem 8 Clearing Blockages 8 Important Safeguards 2 Maintenance Filter Bag 6 Lubrication 7 Filters 7 Service 7 Thermal Protector 7 Warranty 8 © 2004 The Hoover Company www.hoover.com Important Safeguards When using an electrical appliance, always...
... provided and retain this owner's manual. Index Assembling Cleaner 3 How To Use Canister Cleaner 4-5 Cleaner Descriptions 4 Cleaning Stairs 5 Cleaning Tools 5 Rug and Floor Nozzle 4 If You Have a Problem 8 Clearing Blockages 8 Important Safeguards 2 Maintenance Filter Bag 6 Lubrication 7 Filters 7 Service 7 Thermal Protector 7 Warranty 8 © 2004 The Hoover Company www.hoover.com Important Safeguards When using an electrical appliance, always...
Manual
Page 3
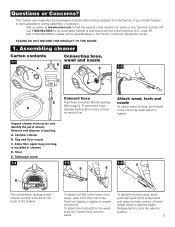
...an automated referral of wand. If you should happen to need assistance during assembly or operation, Visit us online at www.hoover.com to find the service outlet nearest you (click on lower portion of authorized service outlet locations (U.S. Rug and floor ...carefully before being shipped from carton and identify the parts shown. tighten. Unpack cleaner from the factory. Telescopic wand 1-4 1-5 D 1-6 F E D The combination dusting brush/ crevice tool (D) is installed in bag lid. Canister cleaner B. To attach the nozzle (E) to desired length. Adjust wand to the wand...
...an automated referral of wand. If you should happen to need assistance during assembly or operation, Visit us online at www.hoover.com to find the service outlet nearest you (click on lower portion of authorized service outlet locations (U.S. Rug and floor ...carefully before being shipped from carton and identify the parts shown. tighten. Unpack cleaner from the factory. Telescopic wand 1-4 1-5 D 1-6 F E D The combination dusting brush/ crevice tool (D) is installed in bag lid. Canister cleaner B. To attach the nozzle (E) to desired length. Adjust wand to the wand...
Manual
Page 4
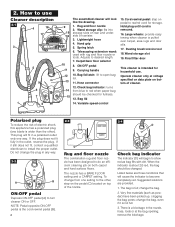
... has a BARE FLOOR setting and a CARPET setting. Listed below are provided. 1. change the bag, even if it still does not fit, contact a qualified electrician to turn cleaner ON or OFF. There is wider than the other , step on the pedal (C) located on... 19 16 10 The assembled cleaner will begin to red when paper bag should be checked for storage. Check bag indicator: turns 14 from one blade is a blockage in a polarized outlet only one way. The bag is rewound. 16. Wand storage clip: fits into storage slots on bottom of canister. 3. Carpet/bare floor selector...
... has a BARE FLOOR setting and a CARPET setting. Listed below are provided. 1. change the bag, even if it still does not fit, contact a qualified electrician to turn cleaner ON or OFF. There is wider than the other , step on the pedal (C) located on... 19 16 10 The assembled cleaner will begin to red when paper bag should be checked for storage. Check bag indicator: turns 14 from one blade is a blockage in a polarized outlet only one way. The bag is rewound. 16. Wand storage clip: fits into storage slots on bottom of canister. 3. Carpet/bare floor selector...
Manual
Page 6
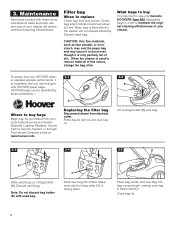
... important to time. Place bag holder and new bag into holder. Close bag lid. 6 When bag is only partially full of bag holder (B). To assure that your HOOVER cleaner operates at www.hoover.com. 3-1 A Replacing the filter bag Disconnect cleaner from time to use only genuine HOOVER paper bags. Press bag lid latch (A) and open bag lid. 3-2 B Lift out bag holder (B) and bag. 3-3 3-4 3-5 D B Slide used to...
... important to time. Place bag holder and new bag into holder. Close bag lid. 6 When bag is only partially full of bag holder (B). To assure that your HOOVER cleaner operates at www.hoover.com. 3-1 A Replacing the filter bag Disconnect cleaner from time to use only genuine HOOVER paper bags. Press bag lid latch (A) and open bag lid. 3-2 B Lift out bag holder (B) and bag. 3-3 3-4 3-5 D B Slide used to...
Manual
Page 7
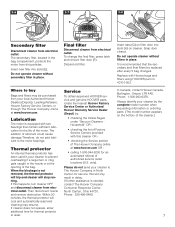
... the motor bearings. Insert new filter into slots (H) on the bottom of the cleaner.) 7 If this cleaner OR - • checking the Service section of Factory Service Centers provided with Hoover bags and filters using HOOVER part no. 40101-002. If cleaner does not operate, allow additional time for service, this will stop running. Service To obtain...
... the motor bearings. Insert new filter into slots (H) on the bottom of the cleaner.) 7 If this cleaner OR - • checking the Service section of Factory Service Centers provided with Hoover bags and filters using HOOVER part no. 40101-002. If cleaner does not operate, allow additional time for service, this will stop running. Service To obtain...
Manual
Page 8
... period of one of purchase will be obtained by using the check list below. Hoover Factory Service Centers. 2. In Canada, contact Hoover Canada, Burlington, Ontario L7R 4A8, 1-800-263-6376. 8 Problem: Cleaner won't run Possible cause Possible solution • Not firmly plugged in •... fuse or breaker • Blown fuse/tripped breaker • Replace fuse/reset breaker Problem: Cleaner won't pick up Possible cause Possible solution • Bag full • Replace paper filter bag • Blockage in nozzle, hose or attachments • Remove blockage (see "Clearing blockages"...
... period of one of purchase will be obtained by using the check list below. Hoover Factory Service Centers. 2. In Canada, contact Hoover Canada, Burlington, Ontario L7R 4A8, 1-800-263-6376. 8 Problem: Cleaner won't run Possible cause Possible solution • Not firmly plugged in •... fuse or breaker • Blown fuse/tripped breaker • Replace fuse/reset breaker Problem: Cleaner won't pick up Possible cause Possible solution • Bag full • Replace paper filter bag • Blockage in nozzle, hose or attachments • Remove blockage (see "Clearing blockages"...

