

Product Manual
Page 4
...If appliance is not working as described in areas where they may reduce air flow. •Keep hair, loose clothing, fingers, and all parts of dust, lint, hair, and anything that may be followed, including the following: READ ALL INSTRUCTIONS BEFORE USING THIS APPLIANCE. Not intended for... furniture, as it to a service center prior to continuing use. 1 •Do not pull or carry by cleaning process. •Use only HOOVER® cleaning products intended for use in this machine. •Do not allow children to a properly grounded outlet only. To avoid injury or damage...
...If appliance is not working as described in areas where they may reduce air flow. •Keep hair, loose clothing, fingers, and all parts of dust, lint, hair, and anything that may be followed, including the following: READ ALL INSTRUCTIONS BEFORE USING THIS APPLIANCE. Not intended for... furniture, as it to a service center prior to continuing use. 1 •Do not pull or carry by cleaning process. •Use only HOOVER® cleaning products intended for use in this machine. •Do not allow children to a properly grounded outlet only. To avoid injury or damage...
Product Manual
Page 14
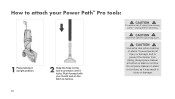
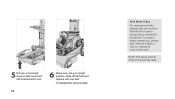
... falling, always place cleaner at bottom of stairs or on floor. CAUTION ! To avoid personal injury or damage, and to prevent the cleaner from moving parts - Do not place cleaner on stairs or furniture, as it locks. CAUTION ! Use extra care when cleaning on the latch to remove. ! How to attach...
... falling, always place cleaner at bottom of stairs or on floor. CAUTION ! To avoid personal injury or damage, and to prevent the cleaner from moving parts - Do not place cleaner on stairs or furniture, as it locks. CAUTION ! Use extra care when cleaning on the latch to remove. ! How to attach...
Product Manual
Page 18
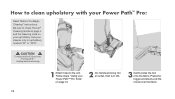
... your Power Path™ Pro Tools" on upholstery marked "W" or "W/S". ! To reduce risk of injury from moving parts - Press the trigger and slowly pull the nozzle over the fabric. 15 How to check Hoover Cleaning Guide on page 4 and the cleaning code on your upholstery. Use your Power Path™ Pro...
... your Power Path™ Pro Tools" on upholstery marked "W" or "W/S". ! To reduce risk of injury from moving parts - Press the trigger and slowly pull the nozzle over the fabric. 15 How to check Hoover Cleaning Guide on page 4 and the cleaning code on your upholstery. Use your Power Path™ Pro...
Product Manual
Page 22
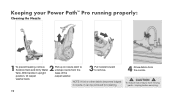
With handle in nozzle, it can be removed for cleaning. 4 Rinse debris from the nozzle. ! CAUTION ! Unplug before servicing. 19 NOTE: If lint or other debris becomes lodged in upright Pull up on nozzle latch to remove. To reduce risk of injury from the base of the 3 Pull nozzle forward to unsnap nozzle from moving parts - washer back. Keeping your Power Path™ Pro running properly: Cleaning the Nozzle: 1 2 To prevent leaking, remove Solution Tank and Dirty Water Tank. position, tilt carpet carpet washer.
With handle in nozzle, it can be removed for cleaning. 4 Rinse debris from the nozzle. ! CAUTION ! Unplug before servicing. 19 NOTE: If lint or other debris becomes lodged in upright Pull up on nozzle latch to remove. To reduce risk of injury from the base of the 3 Pull nozzle forward to unsnap nozzle from moving parts - washer back. Keeping your Power Path™ Pro running properly: Cleaning the Nozzle: 1 2 To prevent leaking, remove Solution Tank and Dirty Water Tank. position, tilt carpet carpet washer.
Product Manual
Page 25
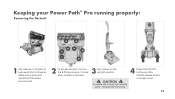
Circles show location of screws. 3 Flip cleaner to loosen hood. 22 CAUTION ! Unplug before servicing. 4 Press the ON/OFF button and the handle release button to the upright position. ! To reduce risk of cleaner. Keeping® your Power Path™ Pro running properly: Removing the flat belt: 1 Flip cleaner on its back to expose bottom of injury from moving parts - Make sure nozzle and SpinScrub Brushes are removed. 2 To access the belt, remove the 8 Philips screws.
Circles show location of screws. 3 Flip cleaner to loosen hood. 22 CAUTION ! Unplug before servicing. 4 Press the ON/OFF button and the handle release button to the upright position. ! To reduce risk of cleaner. Keeping® your Power Path™ Pro running properly: Removing the flat belt: 1 Flip cleaner on its back to expose bottom of injury from moving parts - Make sure nozzle and SpinScrub Brushes are removed. 2 To access the belt, remove the 8 Philips screws.
Product Manual
Page 26
To reassemble, reverse steps. NOTE: Flat belt is in upright position. Belt: What to side. To locate a dealer nearest you, please call 1-800-944-9200 or visit our website at www.hoover.com. Slide off flat belt and replace with new belt. 5 Pull up on hood and move to Buy For replacement belts please order part number 440006154 for tooth/ timing belt or 440006155 for flat belt. Hood will still be attached to unit. 23 6 Make sure unit is smooth while timing belt has teeth.
To reassemble, reverse steps. NOTE: Flat belt is in upright position. Belt: What to side. To locate a dealer nearest you, please call 1-800-944-9200 or visit our website at www.hoover.com. Slide off flat belt and replace with new belt. 5 Pull up on hood and move to Buy For replacement belts please order part number 440006154 for tooth/ timing belt or 440006155 for flat belt. Hood will still be attached to unit. 23 6 Make sure unit is smooth while timing belt has teeth.
Product Manual
Page 27
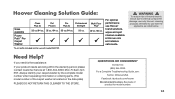
... number when requesting information or ordering parts. (The model number of product for model number. 24 QUESTIONS OR CONCERNS? For optimal performance use with model FH51102. See back of the carpet washer is located on the data plate) PLEASE DO NOT RETURN THIS CLEANER TO THE STORE. Hoover Cleaning Solution Guide: Sizes available...
... number when requesting information or ordering parts. (The model number of product for model number. 24 QUESTIONS OR CONCERNS? For optimal performance use with model FH51102. See back of the carpet washer is located on the data plate) PLEASE DO NOT RETURN THIS CLEANER TO THE STORE. Hoover Cleaning Solution Guide: Sizes available...
Product Manual
Page 29
... one year from state to either a Hoover® Sales and Service Center or Hoover® Authorized Warranty Service Dealer along with the Owner's Manual, your product by the model number and manufacturing code when requesting information or ordering replacement parts. (The model number and manufacturing code...THIS WARRANTY IS THE EXCLUSIVE WARRANTY AND REMEDY PROVIDED BY HOOVER®. During the Warranty Period, Hoover® will be governed and construed under this Warranty or the availability of shipping will provide labor and parts at no cost to you mail your product to correct...
... one year from state to either a Hoover® Sales and Service Center or Hoover® Authorized Warranty Service Dealer along with the Owner's Manual, your product by the model number and manufacturing code when requesting information or ordering replacement parts. (The model number and manufacturing code...THIS WARRANTY IS THE EXCLUSIVE WARRANTY AND REMEDY PROVIDED BY HOOVER®. During the Warranty Period, Hoover® will be governed and construed under this Warranty or the availability of shipping will provide labor and parts at no cost to you mail your product to correct...


