Manual
Page 8
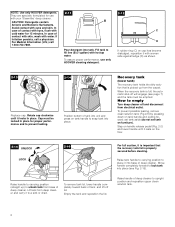
... of deep cleaner. Empty the tank and reposition the lid. They are specially formulated for use only HOOVER cleaning detergent. 2-12 C D If rubber ring (C) on tank handle to prevent leaking. 2-14 Position bottom of deep cleaner. When the recovery tank is properly secured before cleaning. Raise ... Surfactants. Move handle completely forward to place it with your 'SteamVac' deep cleaner. Raise handle of contact with eyes, flush with water. In case of deep cleaner to unlock tank from deep cleaner and carry it locks In place. Rotate cap clockwise until it is...
... of deep cleaner. Empty the tank and reposition the lid. They are specially formulated for use only HOOVER cleaning detergent. 2-12 C D If rubber ring (C) on tank handle to prevent leaking. 2-14 Position bottom of deep cleaner. When the recovery tank is properly secured before cleaning. Raise ... Surfactants. Move handle completely forward to place it with your 'SteamVac' deep cleaner. Raise handle of contact with eyes, flush with water. In case of deep cleaner to unlock tank from deep cleaner and carry it locks In place. Rotate cap clockwise until it is...
Manual
Page 11
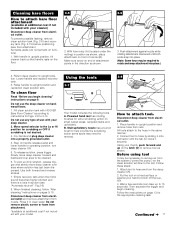
... replace recovery tank. 5. Raise handle to the Lo or Hl position for scrubbing or OFF if scrubbing is a loss in clear water. Do not use any type of wax with your deep cleaner. 2. Move speed selector to upright position and reposition clean solution tank...Place handle in the same manner: 2. Follow these steps: 1. To prevent possible leaking, remove clean solution tank (Fig. 2-8) and recovery tank (Fig. 2-15) before positioning bare floor attachment. Fill clean solution tank with HOOVER Bare Floor Cleaner* according to instructions for extra scrubbing action on hardwood floors. ...
... replace recovery tank. 5. Raise handle to the Lo or Hl position for scrubbing or OFF if scrubbing is a loss in clear water. Do not use any type of wax with your deep cleaner. 2. Move speed selector to upright position and reposition clean solution tank...Place handle in the same manner: 2. Follow these steps: 1. To prevent possible leaking, remove clean solution tank (Fig. 2-8) and recovery tank (Fig. 2-15) before positioning bare floor attachment. Fill clean solution tank with HOOVER Bare Floor Cleaner* according to instructions for extra scrubbing action on hardwood floors. ...

Manual
Page 13
...included in upright position. 2. Make sure that the square post (E) also aligns with HOOVER Carpet/Upholstery Detergent according to instructions for Figs. 2a-8 to snap into a properly ...Overlap strokes by 1/2 inch to lower handle. For heavily soiled areas, it may be cleaned under running water. 4-4 CD F E D C To replace brushes Align posts (C) on upholstery marked "W" or "W/S". ...in upright position. To remove brushes Disconnect cleaner from the system. To prevent possible leaking, remove clean solution tank and recovery tank. Place handle in corners or creases,...
...included in upright position. 2. Make sure that the square post (E) also aligns with HOOVER Carpet/Upholstery Detergent according to instructions for Figs. 2a-8 to snap into a properly ...Overlap strokes by 1/2 inch to lower handle. For heavily soiled areas, it may be cleaned under running water. 4-4 CD F E D C To replace brushes Align posts (C) on upholstery marked "W" or "W/S". ...in upright position. To remove brushes Disconnect cleaner from the system. To prevent possible leaking, remove clean solution tank and recovery tank. Place handle in corners or creases,...


