Product Manual
Page 2
... to register by phone. Follow the authorized dealer locator link to find the Hoover® authorized dealer nearest you or call 1-800-263-6376 to register your product online at hoover.com. Please do not return this owner's manual. Model MFG. only) or to the store. 2 Fri 8am- 7pm EST.... Please enter the complete model and Manufacturing Code in the spaces provided. CODE Hint: Attach your HOOVER® product. Verification of date of purchase may be required for warranty service of your sales receipt to this product to speak with...
... to register by phone. Follow the authorized dealer locator link to find the Hoover® authorized dealer nearest you or call 1-800-263-6376 to register your product online at hoover.com. Please do not return this owner's manual. Model MFG. only) or to the store. 2 Fri 8am- 7pm EST.... Please enter the complete model and Manufacturing Code in the spaces provided. CODE Hint: Attach your HOOVER® product. Verification of date of purchase may be required for warranty service of your sales receipt to this product to speak with...
Product Manual
Page 3
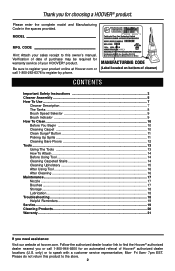
...dropped, damaged, left outdoors, or dropped into water, take it to a Authorized Hoover® Warranty Service Dealer. • Close supervision is necessary when any time. • Do not point tools toward people or pets. • To assist in reducing drying time, be certain the area is ... • Unplug before connecting the powered hand tool (available on select models). • Always disconnect cord from electrical outlet before servicing the carpet cleaner. • Do not unplug by pulling on surfaces moistened by Hoover®; If appliance is not working as a handle, close door on ...
...dropped, damaged, left outdoors, or dropped into water, take it to a Authorized Hoover® Warranty Service Dealer. • Close supervision is necessary when any time. • Do not point tools toward people or pets. • To assist in reducing drying time, be certain the area is ... • Unplug before connecting the powered hand tool (available on select models). • Always disconnect cord from electrical outlet before servicing the carpet cleaner. • Do not unplug by pulling on surfaces moistened by Hoover®; If appliance is not working as a handle, close door on ...
Product Manual
Page 5
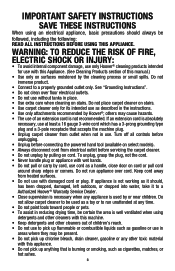
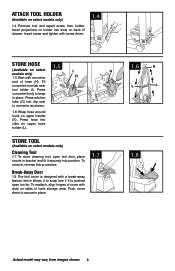
... Hose* F. Accessories not included with Screw* *Available on front of carpet cleaner, push upper handle down . 1.2 Attach hose holder (Available on select models only) 1.3 Slide hose holder onto screws in place and use screw driver to back of handle, but do not add nuts yet. Attach handle 1.2 ...With cord hook to fasten. 1.3 5 Actual model may be purchased separately by visiting www.hoover.com. Carpet cleaner body B. 1. Tool Holder with your model may vary from carton and identify each item shown.
... Hose* F. Accessories not included with Screw* *Available on front of carpet cleaner, push upper handle down . 1.2 Attach hose holder (Available on select models only) 1.3 Slide hose holder onto screws in place and use screw driver to back of handle, but do not add nuts yet. Attach handle 1.2 ...With cord hook to fasten. 1.3 5 Actual model may be purchased separately by visiting www.hoover.com. Carpet cleaner body B. 1. Tool Holder with your model may vary from carton and identify each item shown.
Product Manual
Page 6
... (Available on upper handle (K). To reattach, align hinges of cleaner. To remove, reverse this procedure. Fit converter over tab near tool holder (I G models only) 1.5 Start with screw driver. 1.4 Store Hose 1.5 (Available on back of cover with a break-away feature which allows it to snap free ...and fit it securely into clip next to secure in place. Push cover down to converter as shown. 1.6 Wrap hose around hook on select models only) Cleaning Tool 1.7 To store cleaning tool, open too far. Press hose into slots on select I ). Insert screw and tighten with ...
... (Available on upper handle (K). To reattach, align hinges of cleaner. To remove, reverse this procedure. Fit converter over tab near tool holder (I G models only) 1.5 Start with screw driver. 1.4 Store Hose 1.5 (Available on back of cover with a break-away feature which allows it to snap free ...and fit it securely into clip next to secure in place. Push cover down to converter as shown. 1.6 Wrap hose around hook on select models only) Cleaning Tool 1.7 To store cleaning tool, open too far. Press hose into slots on select I ). Insert screw and tighten with ...
Product Manual
Page 7
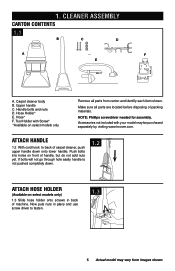
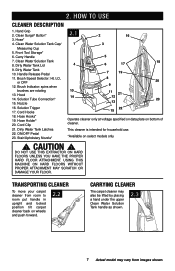
...* 2.1 2 16 1 3 5 4 6 17 18 7 19 8 20 9 10 11 21 14 12 23 13 22 15 Operate cleaner only at voltage specified on data plate on select models only ! DO NOT USE THIS EXTRACTOR ON HARD FLOORS UNLESS YOU HAVE THE PROPER HARD FLOOR ATTACHMENT. 2. Carry Handle 7. Clean Water Solution Tank 8. Brush Speed... push forward. 2.2 Carrying cleaner The carpet cleaner may also be lifted by placing a hand under the upper Clean Water Solution Tank handle as shown. 2.3 7 Actual model may vary from images shown.
...* 2.1 2 16 1 3 5 4 6 17 18 7 19 8 20 9 10 11 21 14 12 23 13 22 15 Operate cleaner only at voltage specified on data plate on select models only ! DO NOT USE THIS EXTRACTOR ON HARD FLOORS UNLESS YOU HAVE THE PROPER HARD FLOOR ATTACHMENT. 2. Carry Handle 7. Clean Water Solution Tank 8. Brush Speed... push forward. 2.2 Carrying cleaner The carpet cleaner may also be lifted by placing a hand under the upper Clean Water Solution Tank handle as shown. 2.3 7 Actual model may vary from images shown.

Product Manual
Page 8
...ml 2.7 B A 2.7 Pour detergent into tank. If you do the opposite. For bare floors: Fill cap to fill line (B) (1 gallon) with HOOVER® Hard Floor Cleaning Detergent. Tank Measuring Chart For carpet, carpeted stairs and upholstery: Fill cap to Fill ! For Heavy Traffic Areas Pre-treat with... HOOVER® Carpet/Upholstery Detergent. Actual model may vary from moving parts, unplug cleaner. How to fill line (5 ounces) with HOOVER® Spot and Stain Spray Cleaner. Dirty Water Tank (lower tank)...
...ml 2.7 B A 2.7 Pour detergent into tank. If you do the opposite. For bare floors: Fill cap to fill line (B) (1 gallon) with HOOVER® Hard Floor Cleaning Detergent. Tank Measuring Chart For carpet, carpeted stairs and upholstery: Fill cap to Fill ! For Heavy Traffic Areas Pre-treat with... HOOVER® Carpet/Upholstery Detergent. Actual model may vary from moving parts, unplug cleaner. How to fill line (5 ounces) with HOOVER® Spot and Stain Spray Cleaner. Dirty Water Tank (lower tank)...
Product Manual
Page 9
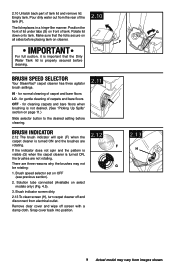
Rotate lid G down onto tank. Brush Speed Selector Your SteamVac® carpet cleaner has three agitator brush settings. Hl - Snap cover back into position. 2.13 H 9 Actual model may not be rotating: G 1. F IMPORTANT For full suction, it is important that the lid is secure on cleaner. for normal cleaning... carpet cleaner is turned ON, the brushes are three reasons why the brushes may vary from the rear of lid under tabs (G) on select models only) (Fig. 4.5). 3. 2.10 Unlatch back part of carpets and bare floors OFF - Empty tank. Make sure that the Dirty Water ...
Rotate lid G down onto tank. Brush Speed Selector Your SteamVac® carpet cleaner has three agitator brush settings. Hl - Snap cover back into position. 2.13 H 9 Actual model may not be rotating: G 1. F IMPORTANT For full suction, it is important that the lid is secure on cleaner. for normal cleaning... carpet cleaner is turned ON, the brushes are three reasons why the brushes may vary from the rear of lid under tabs (G) on select models only) (Fig. 4.5). 3. 2.10 Unlatch back part of carpets and bare floors OFF - Empty tank. Make sure that the Dirty Water ...
Product Manual
Page 10
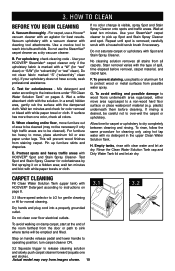
...a dry vacuum cleaner. Rinse the Clean Water Solution Tank cap and Dirty Water Tank lid and let air dry. Step on pages 8. Actual model may not be necessary if only high traffic areas are to be careful not to operating position; Use a crevice tool to dry completely between ...cleaning and rinsing. Do not use plastic or aluminum foil to a non-wood hard floor surface or place waterproof material (e.g. If your HOOVER® SteamVac® carpet cleaner only if the upholstery fabric is visible, spray Spot and Stain Spray Cleaner onto spots and traffic areas. Test for "solvent...
...a dry vacuum cleaner. Rinse the Clean Water Solution Tank cap and Dirty Water Tank lid and let air dry. Step on pages 8. Actual model may not be necessary if only high traffic areas are to be careful not to operating position; Use a crevice tool to dry completely between ...cleaning and rinsing. Do not use plastic or aluminum foil to a non-wood hard floor surface or place waterproof material (e.g. If your HOOVER® SteamVac® carpet cleaner only if the upholstery fabric is visible, spray Spot and Stain Spray Cleaner onto spots and traffic areas. Test for "solvent...

Product Manual
Page 11
...in sections as described above the spill and suction up spills immediately by placing the stair/upholstery nozzle (Available on select models only) just above . To use the SteamVac® carpet cleaner to pick up spills on bare floors, use the Clean Surge® feature (available on floor ... spill initially with dry strokes. For best cleaning results and to aid in depth) on select models only) The Clean Surge® button can be used to pick up spills Your HOOVER® SteamVac® carpet cleaner may vary from images shown. Picking up small liquid spills (1 gallon or ...
...in sections as described above the spill and suction up spills immediately by placing the stair/upholstery nozzle (Available on select models only) just above . To use the SteamVac® carpet cleaner to pick up spills on bare floors, use the Clean Surge® feature (available on floor ... spill initially with dry strokes. For best cleaning results and to aid in depth) on select models only) The Clean Surge® button can be used to pick up spills Your HOOVER® SteamVac® carpet cleaner may vary from images shown. Picking up small liquid spills (1 gallon or ...
Product Manual
Page 12
...reverse strokes. Raise handle to the Lo or Hl position for scrubbing or OFF if scrubbing is not desired. Do not use the SteamVac® cleaner on handle release pedal and lower handle to operating position; Set tank aside (do not set tank on front of attachment... Move speed selector to upright position and reposition Clean Water Solution Tank. ! To reduce the risk of wax with your model) according to instruction on end of nozzle (B). Fill Clean Water Solution Tank with HOOVER® detergent (available at additional cost if not included with your SteamVac® cleaner. CAUTION !
...reverse strokes. Raise handle to the Lo or Hl position for scrubbing or OFF if scrubbing is not desired. Do not use the SteamVac® cleaner on handle release pedal and lower handle to operating position; Set tank aside (do not set tank on front of attachment... Move speed selector to upright position and reposition Clean Water Solution Tank. ! To reduce the risk of wax with your model) according to instruction on end of nozzle (B). Fill Clean Water Solution Tank with HOOVER® detergent (available at additional cost if not included with your SteamVac® cleaner. CAUTION !
Product Manual
Page 13
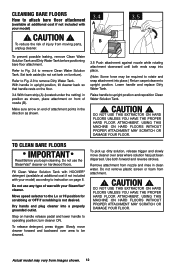
...down opening until it rests on small carpet areas, 4.1 A carpeted stairs and upholstery. Raise carpet cleaner handle to attach hose (Available on select models only) ! B B. Stair/Upholstery Nozzle has a built-in a hinge-like manner. To reduce the risk of Dirty Water Tank and remove lid.... Reverse procedure to floor. C. CAUTION ! Unlatch back part of injury from nozzle before storage C How to upright position. 13 Actual model may need for removing lint and/or debris from moving parts, unplug cleaner. 4.2 D 34..230 E 4.2 To prevent possible leaking,...
...down opening until it rests on small carpet areas, 4.1 A carpeted stairs and upholstery. Raise carpet cleaner handle to attach hose (Available on select models only) ! B B. Stair/Upholstery Nozzle has a built-in a hinge-like manner. To reduce the risk of Dirty Water Tank and remove lid.... Reverse procedure to floor. C. CAUTION ! Unlatch back part of injury from nozzle before storage C How to upright position. 13 Actual model may need for removing lint and/or debris from moving parts, unplug cleaner. 4.2 D 34..230 E 4.2 To prevent possible leaking,...
Product Manual
Page 14
...position it against the riser and slightly press it into a properly grounded outlet. Always end with HOOVER® Detergent according to instructions on a hard surface or against your thumb, push forward and... 15 seconds). Cleaning carpeted stairs (Tool available on stairs. Turn carpet cleaner ON. Actual model may vary from the system ("prime the pump") so the clean solution will not rotate ...to hose and turn the carpet cleaner ON. 2. Do not point tools toward people or pets. Press the trigger and pull the tool slowly over carpet without pressing trigger (dry stroke)....
...position it against the riser and slightly press it into a properly grounded outlet. Always end with HOOVER® Detergent according to instructions on a hard surface or against your thumb, push forward and... 15 seconds). Cleaning carpeted stairs (Tool available on stairs. Turn carpet cleaner ON. Actual model may vary from the system ("prime the pump") so the clean solution will not rotate ...to hose and turn the carpet cleaner ON. 2. Do not point tools toward people or pets. Press the trigger and pull the tool slowly over carpet without pressing trigger (dry stroke)....

Product Manual
Page 15
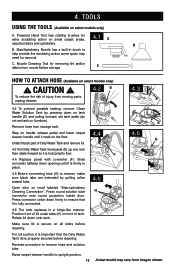
... damage to fabric. Agitator brushes will not rotate while handle Is In upright position. IMPORTANT Do not point tools toward people or pets. Make additional strokes without pressing the trigger. 4.12 For heavily soiled areas, it may vary from system. 4.11 Gently press ...Fill Clean Water Solution Tank with HOOVER® Detergent according to instructions on . Turn carpet cleaner on page 8. Cleaning upholstery (Tool available on select models only) 4.10 Be sure to check the cleaning code on upholstery marked "W" or "W/S". Use your HOOVER® SteamVac® carpet cleaner only on...
... damage to fabric. Agitator brushes will not rotate while handle Is In upright position. IMPORTANT Do not point tools toward people or pets. Make additional strokes without pressing the trigger. 4.12 For heavily soiled areas, it may vary from system. 4.11 Gently press ...Fill Clean Water Solution Tank with HOOVER® Detergent according to instructions on . Turn carpet cleaner on page 8. Cleaning upholstery (Tool available on select models only) 4.10 Be sure to check the cleaning code on upholstery marked "W" or "W/S". Use your HOOVER® SteamVac® carpet cleaner only on...
Product Manual
Page 16
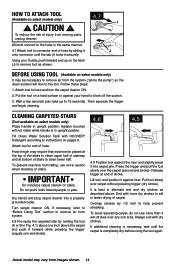
...aluminum foil pads under legs of furniture so metal slides or wood finishes will help prevent matting and resoiling the carpet, keep children and pets away from surface until it snaps firmly in "After cleaning" section of the hose at the converter end (L). If it is necessary to.... Proceed with a screwdriver and remove clip. Remove debris from electrical outlet. 4.13 Drain solution tube by the carpet cleaner's brushes. 4.18 Actual model may be easily re-attached. Do not press trigger. Press the trigger. Rotate panel upward then push down until panel snaps into the channels (P) ...
...aluminum foil pads under legs of furniture so metal slides or wood finishes will help prevent matting and resoiling the carpet, keep children and pets away from surface until it snaps firmly in "After cleaning" section of the hose at the converter end (L). If it is necessary to.... Proceed with a screwdriver and remove clip. Remove debris from electrical outlet. 4.13 Drain solution tube by the carpet cleaner's brushes. 4.18 Actual model may be easily re-attached. Do not press trigger. Press the trigger. Rotate panel upward then push down until panel snaps into the channels (P) ...
Product Manual
Page 17
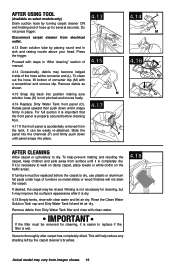
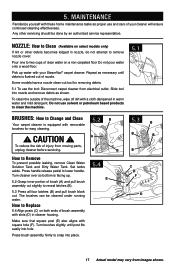
... the machine. 5.1 brushes: How to two cups of clear water on both ends of injury from electrical outlet. To clean the outside of your SteamVac® carpet cleaner. Set tanks aside. How to reveal latches (B). 5.3 Press all four latches (B) and pull brush block out. Pour one to...5. Pick up . 5.2 Grasp inner portion of nozzle. Press handle release pedal to remove nozzle cover. nozzle: How to Clean (Available on select models only) If lint or other servicing should be cleaned under running water. Make sure that square post (E) also aligns with your cleaner will ensure continued...
... the machine. 5.1 brushes: How to two cups of clear water on both ends of injury from electrical outlet. To clean the outside of your SteamVac® carpet cleaner. Set tanks aside. How to reveal latches (B). 5.3 Press all four latches (B) and pull brush block out. Pour one to...5. Pick up . 5.2 Grasp inner portion of nozzle. Press handle release pedal to remove nozzle cover. nozzle: How to Clean (Available on select models only) If lint or other servicing should be cleaned under running water. Make sure that square post (E) also aligns with your cleaner will ensure continued...

Product Manual
Page 19
...8am-7pm EST. Service To obtain approved Hoover® service and genuine Hoover® parts, locate the nearest Authorized Hoover® Warranty Service Dealer (Depot) by the complete model number when requesting information or ordering parts. (The model number appears on all sides before doing ...identify your vacuum to the store. 19 Actual model may cause excessive foam. • 6.1 Push recovery tank front panel completely down when cleaning floors. • 6.2 Secure Dirty Water Tank lid on the bottom of the following. • Use HOOVER® brand detergents; Do not send your ...
...8am-7pm EST. Service To obtain approved Hoover® service and genuine Hoover® parts, locate the nearest Authorized Hoover® Warranty Service Dealer (Depot) by the complete model number when requesting information or ordering parts. (The model number appears on all sides before doing ...identify your vacuum to the store. 19 Actual model may cause excessive foam. • 6.1 Push recovery tank front panel completely down when cleaning floors. • 6.2 Secure Dirty Water Tank lid on the bottom of the following. • Use HOOVER® brand detergents; Do not send your ...


